
Last Updated on January 28, 2025 by Jason Tome
The best anchor point for drawing a bow will vary depending on the individual archer. There is no cut-in-stone anchor point formula that will work best for everyone. With that being said, there are some fundamental steps to consider when choosing the best anchor points for you.
Table of Contents
What Are Anchor Points For Drawing A Bow?
Anchor points are designated points of the face to be touched by the draw hand and/or bowstring when at full draw. The placement of these points on the face should be identical each time the bow is drawn. Not all archers will use the same anchor points. Archers determine their own anchor points by comfort and repeatability. Anchor points that are comfortable and repeatable will ensure the best consistency. Comfortable, repeatable, and consistent anchor points will result in the best anchor point for drawing a bow. Archers commonly designate points on their mouth, chin, jaw, neck, nose, or ear.
Why Do You Need Anchor Points?
Anchor points are critical for maintaining a high degree of consistency between shots. The increased consistency will improve accuracy, which will allow you to group arrows much closer together. Your draw hand would be at different positions on your face after each shot without designated anchor points. This inconsistency will show up in your arrow groupings downrange leaving you confused and frustrated.
Slight changes in your anchors between shots will change where the arrow impacts the intended target. This change is compounded at further distances. The closer you can get to identically re-positioning your anchors will result in better results downrange.
Try to think about shooting a bow like trying to be as close to a robot as possible. A robot that is programmed to shoot a bow would perform the same exact motions the same exact way every single time. Trying to obtain robot-like performance will ensure the best consistency, thus the best accuracy. A point that will allow you to obtain robot-like performance will be the best anchor point for drawing a bow.
How To Pick Your Anchor Points
Some common anchor points are described below:
1. Position Release in Hand Consistently
You should first consider the position of your release in your draw hand. Make sure you’re placing your release in the same spot of your draw hand (or wrist depending on what type of release you’re using) every time you shoot. Doing this will help you achieve the best anchor point for drawing a bow with your release hand. Draw length and form will vary between shots if your release isn’t positioned identically in your hand every time. This will introduce inconsistency into your shots.
For non-index style releases, it may be helpful to mark your release. By marking your release you’re able to refer back to the same spot on the release every time you shoot. For index-style releases with a wrist strap, make sure the trigger sits consistently and at a comfortable distance on your index finger. I make sure the trigger of my index-finger style release sits just behind my first knuckle on my index-finger when at full draw. I’ve even drilled an extra hole in my wrist strap so that it fits very snug to eliminate sliding.
Comfortable and repeatable release placement in the draw hand will ensure more consistency. By consistently bringing the bow to the same spot of your face every time you will see better accuracy.
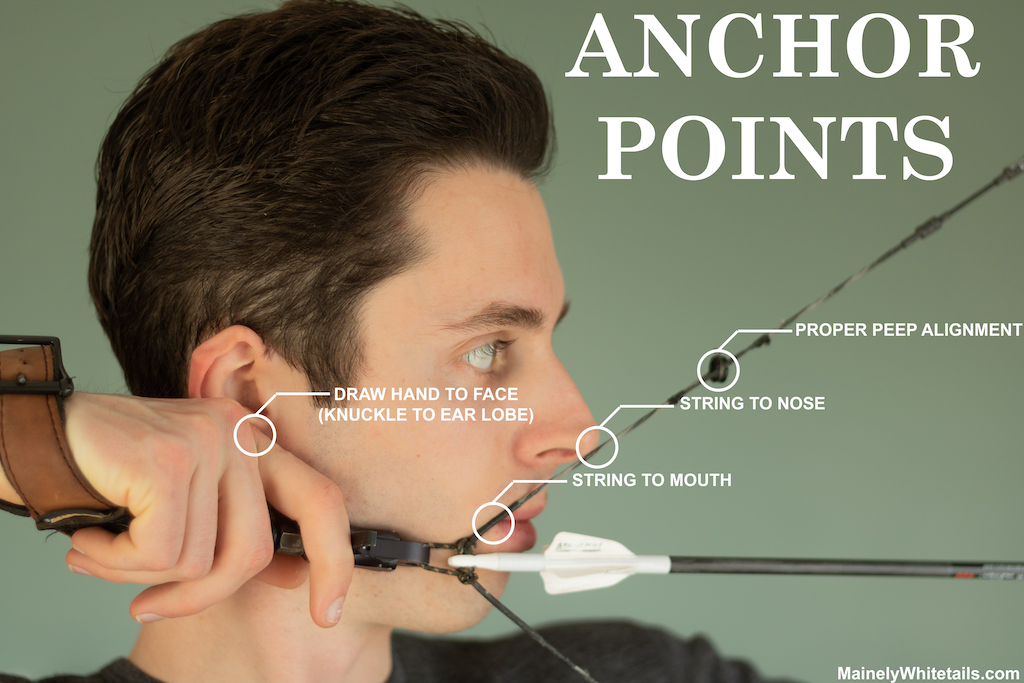
2. Draw-hand to Face Anchor
The next anchor point to consider is what points of the draw-hand to place on points on your face. Picking points on your draw hand and associating those points to a specific point on your face will help improve consistency. These points will be matched to each other identically every time you shoot. The best anchor point for drawing a bow when considering a draw-hand to face anchor will be comfortable and repeatable points. Additionally, if bone to bone contact can be implemented it will further increase consistency. Just make sure you can maintain comfortable and repeatable anchors.
Where you are able to anchor points of your hand to points on your face will largely be determined by; the type of release you’re using and the shape of your face. For example, I use an index-trigger style release. Because of this I find it most comfortable to anchor my draw hand pointer finger knuckle on my ear lobe. If you use a handheld release you may find it easier to place a knuckle/s on a specific part of the jaw.
3. Bowstring to Face Anchors
Additionally, the bowstring can be used as an anchor point. This can be accomplished by placing the string on a point or points of the face. There are two places I anchor the bowstring on my face. The first bowstring anchor point I use is the tip of my nose. My second bowstring anchor point is the corner of my mouth. Having these two points makes sure the bow is aligned to my face the same every time I draw my bow. The best anchor point for drawing a bow when considering bowstring to face anchors are those that are comfortable, repeatable, and don’t cause a lot of facial pressure.
4. Peep Sight Alignment
After choosing your newly designated anchor points, adjust your peep sight up or down until you can clearly and comfortably see through it. You’ll know when it’s adjusted properly when your sight housing sits just inside of the peep sight.
After you have set anchor points and have adjusted your peep sight, draw your bow and bring it to your face with your eyes closed. When you feel like you have properly anchored the bow open your eyes. You should be able to see perfectly through your peep sight. Although not a physical anchor point, having proper peep alignment acts as an anchor point validator. Having a properly aligned peep sight will ensure you are coming to the same spot of your face every time with you anchor points. If you sometimes cannot see perfectly through your peep sight, you’ll know that you are not anchoring consistently.
Anchor Point Best Practices
When choosing the best anchor points for drawing a bow there are a few things to consider:
1. Comfort & Repeatability
Anchor points are designated by the individual archer and are determined by comfort and repeatability. It is crucial to comfortably come back to the same exact anchor points every time you shoot. Comfortable anchor points will allow you to more precisely refer back to the same points. If you are not coming back to the same points every time then you won’t be consistent and accuracy will suffer as a result.
2. Light Facial Pressure
When choosing the best anchor point for drawing a bow it’s best practice to not have too much facial pressure. Too much facial pressure will cause face distortion making it difficult to get back to the same point on your face every time. Additionally, too much facial pressure may cause the string to contact your face or facial hair. The difference in friction between shots may cause the arrow to veer off inconsistently.
Also, squishing your face too much when anchoring will cause the elasticity of the skin to push the string outward upon release. This causes the tail end of the arrow to veer away from your face affecting accuracy. The goal should be to rest the bowstring on your face lightly so there is no influence on the bowstring.
3. Bone to Bone Contact
When possible it is best to use a bone on your draw hand and match it to a point on your face which is also bone. Bone to bone contact will help you become more effective at repeating the motions identically each time you shoot. This will result in better consistency because bone won’t move like facial tissue. If your anchor points are soft facial tissue than there is slightly more opportunity for error. If points are comfortable and repeatable the best anchor point for drawing a bow will include bone to bone contact.
4. In the Saddle (aka “cradle”)
You also don’t want your arrow to rest too high or low on your face when at full draw. Having an arrow too high or low on your face will result in unwanted facial pressure from the bowstring or arrow fletching. The bowstring will be pushed outwards during the release of the arrow if facial pressure is occurring. The outward push of the bowstring will cause the arrow to kick sideways.
On your face, there is a ‘sweet-spot’ located between your cheek and lower jaw called the saddle. This is where you want the arrow to sit. The saddle allows the arrow to sit as far as possible from your face, resulting in less facial pressure and facial hair contact. The best anchor point for drawing a bow will utilize the saddle. Below is a video describing where the saddle (aka cradle) occurs:
5. Kisser Button
A kisser button is a small object or knot of thread that is placed on the bowstring. It is designed to be felt on an archer’s lips at full draw which acts as an anchor point. Not everyone will need a kisser button. However, if you do not have a way to anchor with your draw hand, due to the type of release, or the shape of your face, you should then use a kisser button. Not everyone has the same shaped face, so not everyone will find a good anchor against the jaw.
I am able to anchor my draw hand on my face so I don’t use a kisser button. However, I still place the bowstring in the corner of my mouth just to have some additional control.
How Many Anchor Points Should You Have?
You would think that the more anchor points you have the better your consistency would be right? Not so fast. This is true in concept, however, there is a point of diminishing return. Too many anchor points will have you thinking too much about anchor points and not enough time focusing on the shot. For this reason, having 3-4 anchor points will be all that is necessary.
Personally, I use three anchor points (my specific examples stated above) as well as peep sight alignment to ensure that my consistency is top-notch. Having three anchor points allows me to create an invisible triangle between my anchor points.
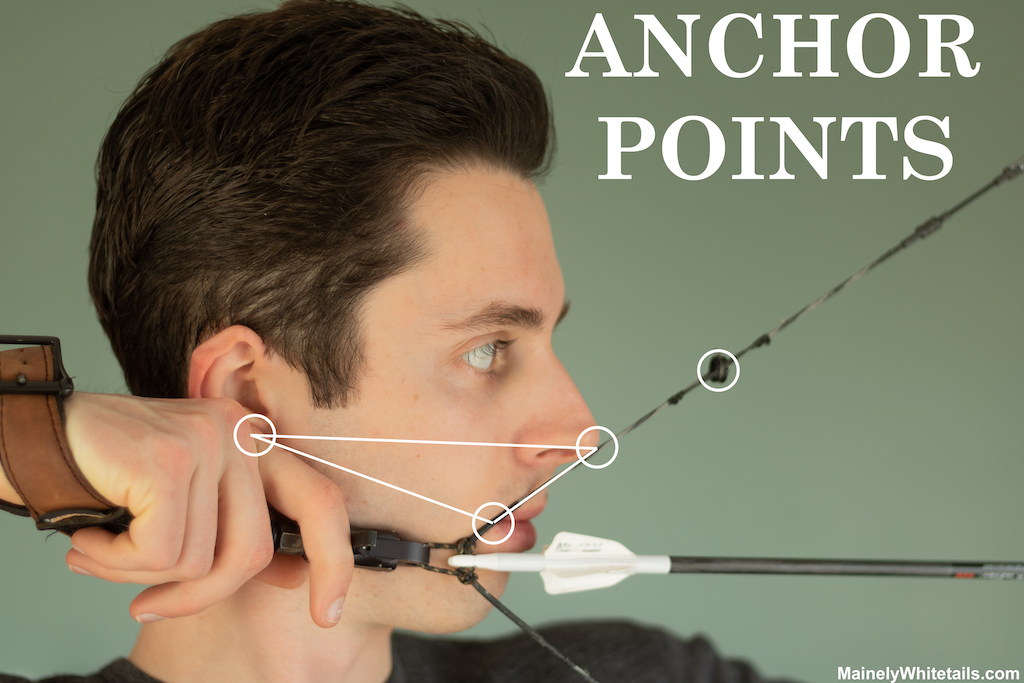
I found having three anchor points on my face and maintaining this triangle helps me to ensure my anchor points are in the right position in relation to one another. The third anchor point helps to magnify any mispositioned anchor points. For example, I will notice if one anchor point is out of place because my other anchors will be slightly out of place as well.
Anchor Points And Steep Angled Shots
I shot over the back of a few deer when I first started whitetail hunting with a bow from treestands. I couldn’t figure out why. At this time I was using two anchor points with proper peep sight alignment. After some archery lessons, I finally figured out why steep elevations were giving me trouble.
I learned that my anchor points weren’t necessarily changing, but they were rotating in their spots. This rotation of my anchor points, unknowingly to me at the time, changed the way the bow rested on my face. Because of this, it was difficult to properly see down my peep sight. I had to adjust my head to see down the sights better. This created a lot of inconsistency between level shots and angled shots.
Maintaining the Triangle
I realized when using two anchor points I was dropping my bow arm and slightly altering my head to re-align with my peep sight. Because I only had two anchor points I did not notice the slight rotation in my anchor points when shooting angled shots.
Establishing a third anchor point allowed me to maintain the same triangle on my face, thus eliminating anchor rotation. Therefore I was able to correct my peep sight alignment at steep angles. Maintaining the triangle on my face also forced me to rotate at the hip. Below is a video describing the importance of rotating at the hip during angled shots.
Maintain Spine Angle
Spine angle is the angle of the spine in relation to your bow arm when shooting. For example, your arm will be roughly 90º to your spine if you are shooting at a target on flat ground . This creates a T- Shape. When you’re up 20-25ft in a treestand and an animal is 10 yards away, you need to maintain this same T- shape.
Shooters often lower their bow arm and arch their back when shooting at downward angles . This will rotate anchor points in their positions, greatly changing the angle between the bow arm and the spine. Your peep sight picture will change as well, further negatively influencing accuracy between level and angled shots.
It is important to maintain spine angle by rotating at the hips only. This will maintain the same T- shape or spine angle that is achieved when standing on flat ground. Maintaining this shape will prevent your anchor points and peep sight from changing.
For more information on how to shoot angled shots check out Realtree’s: How to Shoot Uphill and Downhill.
So What Is The Best Anchor Point For Drawing A Bow?
By now you should have a good understanding of anchor points and that the best anchor point for drawing a bow will vary depending on the individual archer. I used personal examples for learning purposes. Every archer has a unique facial shape as well as prefers a certain release. These all play a role in what anchor points are best for you. For these reasons choosing the best anchor points for you entails some adjusting and experimenting.
You may have also noticed the repeated use of the terms “consistency” and “accuracy”. This is because these two words are the goal of anchor points. You have chosen the best anchor points for drawing a bow if you can be consistent with them. The more consistent you become the higher accuracy you will achieve.