In this post, I share the best exercises for tracking bucks on snow. It is helpful to get in shape to maximize each day. The best muscles that to train to get the most out of your workout are your trapezius, biceps, and hamstring muscles. In this post, I describe three easy workouts you can do to train each of these muscles.
These are easy workouts that don’t require a lot of time and don’t have a learning curve, but help immensely to prevent lameness, muscle cramps, and to hit the woods harder, faster, and stronger.
I’m no fitness expert, but these have helped me a lot and I know they will help you too.
Trapezius (Traps) Exercises
The trapezius or traps muscles are located on your upper back and shoulders.
If you don’t work out your traps before the season they will become incredibly sore. These muscles hold the weight of your gun. Carrying a 7-8 lbs gun around all day will give your traps a good workout, especially if you rarely use these muscles.
Training your traps before the season will keep them from getting sore which will keep your mind sharp and focused on looking for bucks.
Trap Exercise For Tracking Big Woods Bucks On Snow
Because I like to train as similar to the real hunting scenarios as possible, I like barbell shrugs for getting your traps in shape for tracking deer on snow. Holding a barbell is very comparable to holding a rifle in form. For this reason, I like doing shrugs with barbells.
How To Workout Your Traps
I like to do 3 sets of 10-15 reps. This will cause your traps to get really sore in the next day or two. I want these muscles to get very sore and let them heal. Once healed they won’t be as sore the next time they are worked out. It really doesn’t take more than a few workout sessions for these muscles to stop getting sore.
How Often To Workout Your Traps
After waiting for 3-4 days I will work out my traps again and repeat this process until they pretty much stop getting sore altogether. At this point, you’re ready for hunting season. Once you start tracking, you will barely notice your traps. This makes a big difference in your ability to focus on the hunt.
Bicep Exercises For Tracking Bucks On Snow
Your biceps are another muscle that is used when your gun is in your hands. Your arms can get pretty tired and sore from your gun over the course of a long day if they are not worked out before the season.
Best Biceps Exercises For Tracking Bucks On Snow
Hammer curls are my favorite bicep exercise when preparing for tracking bucks on snow. Hammer curls also work your forearms in addition to your biceps. This is important because when you hold your rifle, your forearm muscle will naturally be used near the elbow joint and will get tired if you don’t train it.
Fortunately, the hammer curl is the perfect exercise to prevent both bicep and forearm fatigue when tracking.
How To Workout Your Biceps
Again, I like to do 3 sets of 10-15 reps. This will cause your biceps to get sore in the next day or two. Once healed they won’t be as sore the next time they are worked out. Similar to your traps, it does not take more than a few workout sessions for these muscles to reduce soreness after workouts.
How Often To Workout Your Biceps
After waiting for 3-4 days I will work out my biceps again and repeat this process until they pretty much stop getting sore altogether. At this point, you’re ready for hunting season. Once you start tracking, you will barely notice your biceps, allowing you to focus on the hunt.
Hamstring Exercises For Tacking Bucks On Snow
Your hamstrings are a very important muscle to work out before the season. It does not matter how in shape you think your legs are, your hamstrings take a beating when tracking in snow. The high-steps that are needed when walking quietly in snow will make you use your hamstrings a lot more than any other common activity.
I often walk 5-7 miles per day for work, but I found out the hard way that it doesn’t matter. I still got leg cramps until I started working out my hamstrings before the season.
Best Hamstring Workout For Tracking Bucks On Snow
I like the seated or lying-down leg curl machine. It’s very controlled and allows you to focus on working out the hamstrings.
How To Workout Your Hamstrings
Like I’ve mentioned with the other workouts, I like to do high reps and low weight I will do 3 sets of 10-15 reps. This will cause your hamstrings to get sore in the next day or two. Once healed they won’t be as sore the next time they are worked out. It does not take more than a few workout sessions for these muscles to stop getting as sore.
How Often To Workout Your Hamstrings
After waiting for 3-4 days I will work out my hamstrings again and repeat this process until they pretty much stop getting sore. Trust me, you’ll be thankful you worked out these muscles once you’re lifting your legs up over 6-8 inches of snow for 6-10 miles multiple days in a row.
Conclusion
Hopefully, these exercises for tracking bucks on snow have helped you prepare for the upcoming tracking season. Can you track deer on snow without working out and getting in shape? Absolutely, but working out allows you to hit the ground running. If you don’t work out you’ll likely be needing recovery days or pushing your body harder than it’s ready to go out of the gate.
This is just a very simple workout regime that will help you in tracking scenarios. You can add additional exercises to these muscle groups to further your progress.
It is important to also be in shape cardiovascularly. Additionally, drinking water while tracking and stretching before after tracking will go a long way to prevent muscle rigidity, lameness, cramping, and improve muscle longevity.
Looking For More Articles About Tracking Bucks On Snow? You Can Find More Here
The best all around hunting rifle caliber will allow you to get the most out of your hunting rifle because you’ll be able to use it for the widest range of hunting possibilities.
Hunting rifles are expensive. In order to get the most for your money, it is important to buy a rifle caliber that you can use for the widest range of species for hunting.
In this post, you’ll learn what the most versatile hunting rifle caliber is, and why, let’s get started…
Table of Contents
Best All-Around Hunting Rifle Caliber Criteria
To be considered the best all around hunting rifle caliber there are some criteria that must be met:
Ammo Availability
Diverse Bullet Selection
Power or Foot Pounds of Energy (FPE)
The Best All Around Hunting Rifle Caliber
30-06 Springfield
The 30-06 Springfield is the best all around hunting rifle caliber. It’s been around since 1906, hence the “06” in 30-06, and is still one of the most popular calibers for hunting on the market today because of its versatility and time-tested performance.
The 30-06 Springfield is a .30 caliber rifle, hence the “30” in 30-06. There are a lot of 30 caliber rifles on the market but there is a lot of variation in ballistics between .30 caliber rifles.
This caliber has great ammo availability, diverse bullet selection, and a range of power.
30-06 Springfield Hunting Rifles Top to Bottom: Remington 7600 Carbine, Remington 700, Marlin XL7
30-06 Springfield Ammo Availability
Ammo availability is really good with the 30-06 Springfield. Since the 30-06 is a commonly used caliber, stores will likely have plenty in stock at all times so you don’t have to worry about finding ammunition. This is great when you’re traveling to hunt because there will almost always be a store that will carry 30-06 ammunition.
With some other calibers, you might have to order online or jump from store to store to find the right ammo.
30-06 Springfield Diverse Bullet Selection
Certain calibers are more versatile than others because they offer a more diverse bullet selection. A vast bullet selection will allow you to tailor your caliber to specific types of hunting.
For example, with the 30-06 Springfield, you can buy ammo in many different grains. This means you can hunt many different animals of many different sizes just by adjusting the grain of the bullet.
With the 30-06 Springfield you can shoot anything from small 100-grain bullets all the way up to 220-grain bullets. This allows you to use the 30-06 Springfield for anything from varmints to large and dangerous game. This is one of the biggest reasons the 30-06 Springfield is the best all around hunting rifle caliber and one of the most versatile hunting calibers.
30-06 Springfield Ballistics
One of the greatest features of the 30-06 is the varying amounts of energy it can produce depending on bullet selection. Energy is measured in foot-pounds or the energy required to move one pound for one foot.
Small Grain Bullets
A 100-grain bullet is pretty small so there is less overall FPE, but there is still a lot of powder in the cartridge which makes these small bullets shoot fast and flat. For this reason, the 30-06 Springfield is great for long-range varmint shooting.
If you’re looking to preserve pelts you will probably want jacketed bullets so that the bullets don’t expand. If you use bullets that expand the 100-grain bullets will do a lot of damage because too much energy will be directly dealt to those smaller animals even with the 100-grain bullets. However, if preservation is not the goal, a small 30-06 bullet will work great.
The 30-06 Springfield is generally overkill for smaller species. However, if you’re looking for one gun that can do it all you can make the 30-06 Springfield work with the right bullet weight and type.
Large Grain Bullets
A 220-grain bullet is the largest bullet you can get for the 30-06 Springfield. These heavier bullets are going to have a lot more drop than the light 100-grain bullets but they have more energy.
The high ft-lbs energy of these bullets can deal 3000+ ft-lbs of energy. This is enough energy to take down any North American animal. It is also powerful enough to take down many dangerous game species with proper shot placement.
The 30-06 Springfield is generally underpowered for large game species like brown bears, elk, and moose at longer ranges. That said, it is still a great choice for those short to medium ranges with heavy bullets.
History of the 30-06 Springfield
Best All-Around Hunting Rifle Caliber Considerations
Although this is the best all-around rifle caliber, don’t forget that you will have to sight in your gun each time you change the ammo.
Even though the 30-06 Springfield is an extremely versatile caliber, you might not want to use it for all types of hunting. For example, it might make more sense to own multiple guns at different calibers. This will further maximize versatility and simplicity.
Hunting Rifle Caliber Spectrum
For example, depending on what you hunt you might want a 300 win mag for large animals and a .243 for smaller animals. With these two rifles, you are able to hunt a very broad spectrum of animals with more appropriate bullet energy for animals at each end of the size spectrum.
.243 Caliber
For example, the .243 works great for small (fox) to medium-sized animals (deer). The smaller diameter of the bullets and slower speeds, when compared to the 30-06, is better suited for smaller animals. You can also get much lighter bullets, like 55 grain, which is just about half of the smallest bullet you can get with the 30-06 Springfield.
300 Win Mag Caliber
The 300 Win Mag works great for medium (deer) to large and dangerous game (elk, bear, and moose…etc). The 300 Win Mag is still a .30 caliber rifle just like the 30-06. However, a 300 Win Mag is a bigger cartridge with more powder which allows it to shoot the .30 caliber bullets faster and flatter. This makes it better for big game at long ranges when compared to the 30-06 Springfield.
This way you can hunt different-sized game without resighting in your guns each time because you’ll have a gun dedicated to both sides of the size spectrum when it comes to hunting.
Conclusion
Is The 30-06 Springfield Right For You?
The 30-06 Springfield is perfect for a hunter that is looking for the best all around hunting rifle caliber. This caliber will work for anything from small to dangerous game. That said, if you’re hunting really small or very large game you might want to consider getting a more appropriate caliber for those ends of the spectrum.
Overall, the 30-06 Springfield is the most versatile hunting rifle caliber on the market. Because of the vast bullet selection, it is highly customizable to different species.
Of course, this is a highly debated topic and comes down to personal preference. But you can’t go wrong with a 30-06 Springfield because of its ammo availability, diverse bullet selection, and ballistics.
With so many air rifles on the market today, choosing the right one can be overwhelming. Whether you’re a beginner looking for your first air rifle, an experienced shooter upgrading your gear, or a hunter in need of precision and power, this guide has you covered.
Each air rifle comes with trade-offs in power, accuracy, and features, but I’ve made the selection process easy. Below, you’ll find a sortable comparison spreadsheet to help you quickly filter air rifles by specs like FPS, caliber, weight, and price—allowing you to choose the best option for your budget and intended use.
Beyond just specs, I’ll break down key factors to consider—such as rifled barrels, FPE (foot-pounds of energy), noise levels, and cocking effort—so you can make an informed decision.
This post contains Amazon and other affiliate links, which means I’ll receive a commission if you purchase through my link, at no extra cost to you. Of course, you are not obligated to use my links, but it does help fund these posts in hopes of bringing more value to you!
Table of Contents
Why Trust My Recommendations?
With over two decades of hunting experience, I know firsthand what makes a high-quality air rifle. As a registered hunting guide and professional ecologist, I take pride in testing gear and providing practical, field-tested advice. I’ve also spent over a decade using air rifles for small-game hunting and pest control, so I understand what works—and what doesn’t.
For easy comparison, I’ve compiled a sortable Google Sheets spreadsheet of the 15 air rifles covered in this article. The spreadsheet contains all of the important specs of these air rifles (price, weight, FPS…etc). Not only does this make comparing easier but you can also copy/paste from the spreadsheet while doing your own research. You can get access to this spreadsheet for free by entering your email.
Google Sheets Air Rifle Spreadsheet Outline
Best Air Rifles For Beginners Under 100$
Crosman M4-177
The Crosman M4-177 is a .177 pellet gun that can also shoot bbs. This gun shoots about 650 FPS, which is fairly slow compared to the other beginner air rifles on this list. However, at close range (10-20 yards) this gun will have no problem shooting squirrel-sized game. It’s also a great platform for target practicing.
Although it does not shoot as fast as some of the other rifles it does have its perks. For example, it has a reservoir that can hold up to 350 bbs so you never need to worry about running out of ammo. It also has a 5 shot pellet clip, so you don’t need to load a pellet every time.
If you’re looking for the best beginner air rifle, the Powerline 880 is a great option. You pump this gun with the forearm handle, the more times you pump it, the faster it will shoot. This air rifle will shoot .177 pellets at 800 FPS. Because it shoots a max of 800 FPS it is subsonic, so it is a quiet air rifle.
The other big benefit of this air rifle is that it will also shoot bb’s and it can hold up to 50 bbs in the magazine for easy reloading. This air rifle is powerful enough to kill small game or pests at close ranges (within 25-30 yards) with a full pump.
The Daisy Powerline 901 is another one of the best air rifles for beginners. It’s very similar to the 880 Powerline because most of the components are the same. The biggest difference is how the gun is pumped. For example, the 880 Powerline is pumped with a larger forearm lever, whereas the 901 is pumped with a smaller forearm grip.
It also shoots at the same max speed of 800 FPS, meaning its subsonic, thus quiet. This air rifle is powerful enough to kill small game or pests at close ranges (within 25-30 yards) with a full pump.
The Winchester Model 1977XS is another great air rifle for beginners. It’s very similar to the Powerline 880 and Powerline 901 but it shoots 1000 FPS, which is 200 FPS faster than the other models mentioned. It is still subsonic, making it a quiet air rifle compared to supersonic air rifles.
With a max speed of 1000 FPS, this air rifle is powerful enough to kill small game or pests at close ranges (within 30-35 yards) with a full pump. This air rifle also takes both pellets and bbs and has a rifled barrel which puts spin on the pellets which increases accuracy.
The thumbhole stock is a great addition for added comfort.
This is the least expensive Gamo air rifle you can buy making it a good option for beginners because of what you get for the price. You can only get this air rifle in .177 caliber which this air rifle can shoot at 1250 FPS via a spring-piston.
This is fast enough to take down small game and varmints. If you’re trying to get a decent air rifle for as little money as possible, the Gamo Varmit air rifle is a great option.
Because this gun uses a spring it can be quite noisy. Additionally, it shoots supersonic so it will be louder than the subsonic air rifles. Also, the spring creates a vibration that can lead to parts eventually moving (like the scope).
Gamo also has a 5-Year warranty, which is great because you can have peace of mind if the air rifle does not operate properly.
The Gamo Raptor Whisper air rifle offers more advanced features than the Varmit air rifle above. For example, the ‘Whisper’ technology, which reduces noise and vibration when shooting.
The spring piston has also been replaced with a gas piston for better speed, less vibration, improved accuracy, and smooth cocking. You can also get a .22 caliber model of this air rifle. The .22 cal shoots 975 FPS or you can get the .177 cal which shoots 1300 FPS.
For only a small amount of money more than the Gamo Varmit Model, you get a lot of added features. Gamo also has a 5-Year warranty, which is great because you can have peace of mind if the air rifle does not operate properly.
The Gamo Swarm Whisper 10X air rifle offers more key features than the Raptor (above). For example, the Swarm offers a 10-round clip (hence the 10X in the name). This is a big deal because normally when you shoot an air rifle you need to load a pellet into the gun by hand every time.
With the 10-round clip, you don’t need to worry about reloading and fumbling around with pellets and can focus on shooting. You will still need to cock the gun every time, but when you do, a new pellet will be automatically loaded.
To get these features you don’t have to spend a lot of money. This Swarm Whisper air rifle is only slightly more expensive than the Raptor Whisper model.
The spring piston has also been replaced with a gas piston for better speed, less vibration, improved accuracy, and smooth cocking. You can also get a .22 caliber model of this air rifle. The .22 cal shoots 975 FPS or you can get the .177 cal which shoots 1300 FPS. It also includes the ‘Whisper’ technology, which reduces noise and vibration when shooting.
Gamo also has a 5-Year warranty, which is great because you can have peace of mind if the air rifle does not operate properly.
This air rifle costs a bit more than the previously mentioned rifles. The reason it costs more is for the increased speed with this gun due to the larger cylinder which allows this gun to shoot faster.
The spring piston has also been replaced with a gas piston for better speed, less vibration, improved accuracy, longevity, and smooth cocking. You can also get a .22 caliber model of this air rifle. The .22 cal shoots 1020 FPS or you can get the .177 cal which shoots 1420 FPS.
Again, Gamo also has a 5-Year warranty, which is great because you can have peace of mind if the air rifle does not operate properly.
The Gamo Swarm Magnum 10X Gen2 air rifle is the best air rifle that Gamo makes as far as specs are concerned. This gun has everything you need for serious air rifle fun.
This is the most powerful air rifle that Gamo makes. The .22 cal shoots a blazing speed of 1300 FPS or you can get the .177 cal which shoots an even faster speed of 1650 FPS. Although not in the name, this air rifle includes the ‘Whisper’ technology, which reduces noise and vibration when shooting. This air rifle has enough stopping power for some long-distance small game hunting.
Just be ready for that heavy 41 lbs cocking weight of the gun that enables it to reach those higher velocities.
The Swarm Magnum offers an updated 10-round clip (hence the 10X Gen2 in the name). This is a big deal because when you shoot most regular air rifles you need to load a pellet into the gun by hand every time.
With the 10-round clip, you don’t need to worry about reloading and fumbling around with pellets and can focus on shooting. You will still need to cock the gun every time, but when you do, a new pellet will be automatically loaded.
Like most of the Gamo air rifles, the spring piston has been replaced with a gas piston for better speed, less vibration, improved accuracy, and smooth cocking.
The Gamo Swarm Magnum 10X Gen2 Air Rifle shoots .22 caliber pellets up to 1300 FPS making it one of the fastest and most deadly air rifles for small game and pests.
The Benjamin Marauder is a great value air rifle for those looking to get into PCP air rifles. This is a bolt-action Marauder that comes with a 10-round magazine. Once you fill the air rifle with the air you will get about 30 shots before you need to refill your gun.
The Marauder get up to 1000 FPS with .22 cal pellets. You also have the option to buy a .177 cal and .25 cal with the Marauder platform. The .25 cal will be slower (900 FPS) and won’t shoot as flat but will have a lot of take-down power and is subsonic for quieter shooting. The .25 cal can deliver 50 FPE, making it very deadly.
The wooden versions are a bit heavy so I would opt for the synthetic version.
The Benjamin Marauder semi-auto is another great option for those looking to get into the PCP world of air rifles. There aren’t many great auto-loading air rifles on the market which makes the Marauder one of the best air rifles when quick follow-up shots are needed.
Like the bolt-action above, this Marauder comes with the same 10-round magazine. It also shoots .22-caliber pellets up to 950 fps and you get about 30 usable shots per fill at 3000 PSI.
The wooden versions are a bit heavy so I would opt for the synthetic version.
Each magazine holds 10-rounds and the Marauder’s can shoot between about 30-60 shots before they need to be re-pressurized. For this reason, it can be helpful to have between 3-6 extra mags so you don’t need to worry about reloading these mags until you need to repressurize the air rifle.
The AirForce Condor SS is one of the best PCP air rifles on the market. This air rifle has a built-in baffle system to make shots ridiculouslyquiet. This makes it perfect for pest control in populated areas where you don’t want to disturb neighbors.
Additionally, you can raise or lower the FPS so that you can keep the air rifle subsonic for even quieter shooting. When you’re looking to shoot longer distances, you can crank it up.
This is also one of the most powerful PCP air rifles. The .22 cal shoots 1100 FPS or you can get the .177 cal which shoots an even faster speed of 1300 FPS. You also have the option to buy a .25 cal model. The .25 cal will be a little slower (950 FPS) and won’t shoot as flat but will have a lot of take-down power for bigger species of small game and will be even quieter since it is subsonic.
The max fill for the AirForce Condor SS tank is 3000 psi. You can expect 20-40 usable shots per tank out of the AirForce Condor SS depending on caliber and pellet weight.
Keep in mind that this air rifle is a single shot and that it is not cheap. But you get what you pay for. If anything does go wrong there is also a lifetime limited warranty.
Best Big Bore Air Rifles For Big Game (Coyotes, Deer, Hogs)
Benjamin Bulldog PCP
You can get the Benjamin Bulldog in two calibers, .357 or .457. The .357 can send bullets up to 910 FPS which delivers a lot of energy downrange. This is a very powerful air rifle for taking larger animals like coyotes, hogs, and small deer at close ranges.
One of the best features of this gun is its 5-round magazine for fast and easy follow-up shots. This is something that many other large bore air rifles lack. Depending on the caliber and weight of the bullets you can expect around 10 usable shots per 3000 PSI refillable tank.
Because of the bullpup design, this air rifle is much more compact and has a longer barrel than more conventional air rifles on the market.
You can get the AirForce Texan SS in many calibers, the biggest bores being .457 or .50 caliber, and can send pellets up to 1100 FPS which deliver over 650 ft-lbs of energy (FPE) giving it second place for the most powerful air rifle on the market.
Although 650 FPE is only about 1/4 of the FPE of a shotgun slug, it’s impressive for an air rifle. This air rifle has no issues taking down big game like hogs and deer around that 40-yard range and even further for smaller animals like coyotes with good shot placement.
Depending on the caliber and weight of the bullets you can expect to get between 3-5 usable shots per 3000 PSI refillable tank.
You can get the HatsanUSA PileDriver in .457 or .510 caliber and can send bullets up to 850 FPS which deliver around 800 ft-lbs of energy (FPE) giving it the title of most powerful air rifle on the market.
Although 800 FPE is only about 1/3 of the FPE of a shotgun slug, it’s very impressive for an air rifle. This air rifle has no issues taking down big game like hogs and deer around that 50-yard range and even further for smaller animals like coyotes with good shot placement.
Depending on the caliber and weight of the bullets you can expect to get between 3-6 shots per 4350 PSI refillable tank.
You can bring your air rifle to a paintball or scuba shop to get tanks refilled, but if you’re going to be using PCP air rifles with any regularity you’re going to want to purchase your own portable way to fill up your PCP air rifle. There are a couple of options below:
Portable High-Pressure Hand Pump For PCP Air Rifles
The first option to refill your PCP air rifle is by hand. There are high-pressure hand pumps that can fill up your air rifle but to be honest it can take between 20-30 minutes and a lot of work to do so. This is probably best as a backup option.
Because hand pumps require a lot of work to fill your air rifle I would suggest getting a portable compressor. Surprisingly, they’re only slightly more expensive than hand pumps, making them worth every penny for simplicity and convenience.
Best Air Rifle For Small Game, Varmints, and Pests
Some air rifles are better than others when it comes to hunting small game. Most air rifles are sufficient to ethically take small game, but it does depend on the size of the small game and how far away you are from your target you will be.
Small game animals are also usually quick and can get away fast, for this reason, when choosing your rifle it would be beneficial to get a fast reloading air rifle. This will greatly improve your chances when hunting small game.
Best Air Rifle For Squirrels
Squirrels are on the smaller side of small game and any gun on this list will be able to take down squirrels. The air rifles in the 600-700 FPS range with .177 caliber pellets are best within that 20-yard range. This is because they don’t have the speed for a flat shot. Additionally, a lot of energy is lost out at the longer ranges with slower air rifles.
If you want to shoot squirrels at longer ranges then I would suggest an air rifle that shoots 1000+ FPS with .177 caliber pellets. These have plenty of power to kill a squirrel out to 40-yards.
.22 caliber pellets are even better options for hunting even though they are slower FPS because they have more knockdown power. An air rifle that shoots .22 caliber pellets at around 1000 FPS will be able to kill a squirrel out to 50-60 yards easily.
Best Air Rifle For Rabbits
Rabbits are pretty similar to squirrels in terms of hardiness. You can kill a rabbit out to 20 yards with an air rifle in the 600-700 FPS range, but I would hesitate to shoot much further at a rabbit at that power. Again, an air rifle that can shoot .177 cal 1000+ FPS will be the more ethical choice and can kill rabbits out to about 40-yards no problem.
.22 caliber pellets are even better options for hunting rabbits even though they reduce FPS because they have more overall energy and knockdown power. An air rifle that shoots .22 caliber pellets at around 1000 FPS will be able to kill a rabbit out to 50-60 yards without a problem.
Best Air Rifles For Varmints and Pests
The best air rifle for varmints and pests becomes a little more tricky because these animals are of all different sizes. If you’re trying to kill bigger pests like woodchucks, raccoons, skunks, or porcupines you’re going to need a more powerful air rifle than you would if you trying to shoot pesky squirrels in the bird feeder.
That said, there’s nothing wrong with getting an overpowered air rifle for small varmints and then having the option of using it for the larger varmints. If anything, it just makes dispatching those smaller pests quicker and more ethical.
An air rifle that shoots .22 caliber pellets at around 1000 FPS will be a good rule of thumb for dispatching woodchuck-sized pests out to 25-35 yards with good shot placement.
What Is the Best Air Rifle Caliber?
The best air rifle caliber depends on what you’re using it for. For example:
Feet per Second (FPS) vs Foot Pounds of Energy (FPE)
You will want an appropriate balance of feet per second (FPS) and pellet weight for your specific application.
A lighter pellet will travel faster and shoot flatter, but will not have a lot of energy once it hits the target, especially at longer ranges. This makes lighter pellets better for target practice because it does not matter how much energy is behind the pellet if you’re shooting targets.
With the same amount of air pressure, heavier pellets won’t travel as fast (FPS) but have some weight or energy (FPE) behind them which transfers into knockdown power. So, you can get away with slower speeds with heavier pellets to an extent.
To calculate Foot-Pounds of Energy (FPE), you need to know the mass of the pellet (grains) and the velocity (FPS). The FPE is calculated by using this formula:
E= mv2 ÷ K or…
Energy = (mass)*(velocity)2 ÷ 450,240 or…
FPE =(pellet grains)*(FPS)2 ÷ 450,240
.177 Caliber Air Rifle Pellets
For target practicing/plinking the .177 caliber pellets are best because it’s the fastest and flattest shooting ammo. If you want to hunt with this caliber just buy heavier pellets and it will work just fine to those short and medium ranges for any small game animal. A heavier pellet will give the air rifle more FPE resulting in more knockdown power.
.22 Caliber Air Rifle Pellets
The .22 caliber pellets are a better choice if you’re looking to hunt with the air rifle. You can buy heavier grain pellets than .177 that will dish out more knock-down power upon impact and retain energy at longer ranges. That said, they’re still light enough so that they shoot pretty flat.
.22 caliber pellets can shoot woodchuck-sized game at medium ranges and smaller game out further than the .177 caliber pellets. These pellets are a great in-between pellet size.
.25 Caliber Air Rifle Pellets
When you start getting into higher-end air rifles that have a lot of speed they will offer a .25 caliber pellets option. These are a great option for air rifle hunters because if you have a decent FPS, these .25 caliber pellets can have a lot of energy behind them. .25 caliber ammo in combination with decent FPS allows air rifle hunters to target bigger animals like coyotes at close ranges and increases the lethal range at medium-sized small game animals like woodchucks.
Final Thoughts
Hopefully, this post has helped you determine the best air rifles for your budget, skill level, and use. Each air rifle has its trade-offs. It is up to you to decide what is important for the application you are using it for.
Luckily, you can easily filter what is important to you by using the comparison spreadsheet above to find the best air rifles for you.
In this post, you’ll learn how to ice fish step by step for beginners. This post will also cover ice fishing gear and ice fishing tips & tricks.
Ice fishing may seem complicated at first, however, with the right advice you can start having success right away. I give you all the information you need to have success from the start.
Let’s get started…
This post contains Amazon and other affiliate links, which means I’ll receive a commission if you purchase through my link, at no extra cost to you. Of course, you are not obligated to use my links, but it does help fund these posts in hopes of bringing more value to you!
Ice Fishing Gear For Beginners
You don’t need to spend a lot of money to have the best equipment when you’re first getting started ice fishing. That said, you will want to buy the essentials for safety and to have the most enjoyable time out on the ice.
Recommended Ice Fishing Gear
Fishing License
Proper Clothing
Ice Auger
Jigs For Ice Fishing
Ice Fishing Traps (Tip-Ups)
Protective Cases For Ice Fishing Traps
Pack Basket For Traps
Bait
Bait Bucket and Net
Ice Chisel
Ice Scoop or Skimmer
Depth Sounders
Pliers
Ice Safety Picks
Shovel
Jet Sled
Creepers or Ice Cleats For Boots
Chairs
Split Shot Line Weights
Optional But Useful Ice Fishing Gear
Thermos
Wood Saw
Stuff To Build A Fire
Hand and Foot Warmers
Listen to Music
Propane
Portable Grill
Snowmobile
Anything For Cooking and Eating
What Ponds and Lakes To Ice Fish On
To determine where would be a good spot to ice fish, I would suggest calling local fishing guides because they guide fishermen for a living and can point you to some great spots on nearby lakes and ponds.
Another excellent option is to call your state wildlife department. A regional fish biologist will be able to point you in the right direction. Make sure you tell the biologist what your goals are so they can fine-tune their recommendations to the experience you are looking to have.
For example, if you’re looking to catch a lot of fish you might want to fish warmwater species such as bass and perch because they often provide the fastest action. For beginners, this is usually the best choice.
Check The Ice Thickness
Make sure you check to see if the ice is safe before spending a lot of time on it. Because the ice can vary from spot to spot it is a good idea to chisel a few holes next to shore and keep doing so until you reach the spot you are going to fish at. You can learn everything you need to know about ice safety by visiting Maine’s IFW Ice Safety Tips.
There are two methods of catching fish when ice fishing. They are; ice fishing traps (AKA tip-ups) and/or by jigging.
Ice Fishing Traps (Also Known As Tip-Ups)
The best way to have success when ice fishing is to use Ice fishing traps. These traps have a spring-loaded flag that when a fish bites the flag springs into the air so you know there’s a fish on.
The benefit of ice fishing tip-up traps is that you bait them with live bait, which does all the work for you. You just have to wait for a flag to pop up into the air. For this reason, you are able to use many ice fishing traps at one time to maximize your chances of catching fish.
Ice Fishing Jigs
Ice fishing jigs can also be a successful way to catch fish but you can only operate one at a time. This is because it requires you to bob (jig) the pole up and down.
Jigging can be fun to do while you are waiting for your ice fishing traps to catch a fish. Also, you will increase your chances of catching a fish by having another pole in the water.
Where To Place Ice Fishing Traps
A great place to put traps is fairly close to shore, fish like the structure of the bottom so you likely don’t want to fish in very deep water, especially for warmwater fish.
You can also use structures that create funnels or pinch points, like points of land to place your traps. This will give your bait a high probability of being seen, and thus potentially get more bites.
Use An Ice Auger To Make Ice Fishing Holes
After you’ve chosen a spot you like it’s time to start augering holes for your ice fishing traps and jigs. You can do this by hand or with a powered auger. I recommend a power auger because it makes the process so much easier and takes much less time.
Ice Auger For Ice Fishing
After you’ve augured your holes make sure to scoop out the fragments of ice that the auger created with an ice scoop or skimmer. This will make it easier to bait hooks, catch fish, and keep the holes from freezing back in as fast when it’s cold.
Check The Water Depth Using A Depth Sounder
After you’ve cleaned up the hole with the ice skimmer, you’re ready to check the water depth. You can use a depth sounder to check the depth.
Basically, all you do is put a weight on the end of your fishing like and lower it into the water until you feel slack. Once you feel slack, you’re on the bottom. Lift the sounder out of the water and look to see how much fishing line you used to hit bottom.
Checking the water depth is important because you’ll want to put some traps out just above the bottom because fish will often be found within the structure of the bottom. So, this is a good place to put your bait.
What Bait To Use Ice Fishing
Use Live Bait With Ice Fishing Traps
Live bait usually works best because it is the most realistic.
Common live bait includes:
Smelts
Chubs
Shiners
Earthworms
Nightcrawlers
You’ll need to find a local bait shop and see what they have in stock.
You’ll want to buy plenty of bait for how long you’ll be fishing. You should also plan to have some extra bait for freshening old bait and for when you catch a fish that will usually kill your live bait.
How To Bait Ice Fishing Tip-Up Traps
To bait ice fishing traps with minnows, simply put the hook through their back, just under the spine. The minnows will be able to last like this for a long time.
Make sure to check your bait every hour to make sure they’re still lively. If the minnows aren’t looking lively, it is time to put a new minnow on to freshen things up.
Baiting Ice Fishing Traps
Best Ice Fishing Tip-Up Traps
If you’re planning to do a lot of ice fishing the more expensive ones are worth it because they don’t have as many hiccups. For example, cheaper traps tend to wear out faster, the trippers don’t stay in place as well, the trippers can also freeze up, and the reels might bend or fall off with use. The more expensive tip-ups tend to withstand more seasons offering a better value in the long run.
How Deep To Set Ice Fishing Traps
It’s a good idea to place traps in various depths to identify what depths are catching the most fish. Between 15-35 ft are good depths to start with. Then either place the bait just under the ice (a few feet down) or put bait just off the bottom for best results. Then you can readjust your traps throughout the day to mimic the traps that are getting the most bites.
How To Set Ice Fishing Traps
Once you bait your ice fishing traps and put the bait down to your desired depth, the next step is to set the trap. Setting an ice fishing trap is much easier than it might first appear. That said, there are different types of tip-up traps so I can’t tell you exactly how to set your model, but I can tell you the basics.
Basically, you need to bend the flexible flag down and lock it into place. There will be a trigger mechanism on the reel so that when a fish bites and starts taking out the line, the trigger mechanism will set off the flag.
What To Do While You Wait For Fish To Bite
If fish aren’t biting often, ice fishing can get boring, especially for beginners. Luckily, there are many things you can do while you wait. For example, you could get a fire started and cook food, play football, ice skate, frisbee…etc.
What To Do When A Trap Flag Is Sprung
Run! When a fish bites and the flag is set off you want to get to the trap as soon as possible so you can set the hook. The sooner you can do this the better because it gives the fish less chance to get away.
Running To An Ice Fishing Tip-Up Trap With Sprung Flag
How To Set The Hook When Ice Fishing
When a fish bites live bait, they are often don’t realize it has a hook. For this reason, they’re often not stripping the line out. In this case, you need to take in the slack until you feel tension on the line. Once you feel tension, you give the line a quick pull to set the hook.
If the line is being stripped out then you can just start pulling the line or give it a light tug because the hook will set itself due to the force generated from the motion of the fish.
How To Set The Hook With Ice Fishing Tip-Up Trap
How To Land A Fish When Ice Fishing
Once you have the fish hooked, you use your hands to take up the line. So, you’re battling the fish with your hands. If the fish wants to run with the line let it take some line. Otherwise, it might break the line. That said, keep a little tension on the line with your fingers to make it harder for the fish to strip line, this will tire the fish out faster.
Once the fish is not stripping the line out as aggressively you can start winding in the line again by hand. Keep repeating this process until you get the fish to the hole.
Once the fish is at the hole don’t be afraid to use your hand to aid in pulling the fish up and out of the hole. It’s a good idea to use your hand because if you don’t have a good hook set this is when the hook might get pulled out of the mouth of the fish due to all of the fish’s weight will be out of the water. Thus, this can be a time when you can lose the fish.
Catching Fish With A Ice Fishing Tip-Up Trap
Ice Fishing Jigs
Jigging for fish is another method that can be used to catch fish when ice fishing. With a jig, you use an artificial lure and bob it up and down. A jig called the Swedish Pimple is a favorite among ice fishermen. You can even add pieces of meat to the hook of the jig to further entice fish to bite.
The mechanics of jigging involve keeping the lure close to the bottom and lightly bouncing the rod tip up and down in fairly slow even intervals.
Hopefully, this post helped speed up your learning curve on how to ice fish. If you have any further questions on how to ice fish you can message me on social media or leave a comment below.
You don’t need every piece of duck hunting gear to start duck hunting, you just need the essentials. Also, there are different ways to hunt ducks. The duck hunting gear you will need will vary depending on the type of duck hunting you’re doing.
For this reason, this article not only covers the must-have duck hunting gear to get started. It also covers optional duck hunting gear that isn’t necessarily essential, but that is often worth having.
Essential Duck Hunting Gear
Hunting License & Waterfowl Stamp
Can’t duck hunt without these!!
Duck Hunting Shotgun
The quintessential tool for ducks hunters is a shotgun. There are some specs that you should be aware of when buying a duck hunting shotgun. These specs are:
Barrel Length
For duck hunting having a longer barrel is nice because it helps you swing through the shot instead of just pointing and aiming. A 28-inch barrel length is a good option for duck hunters.
Choke Tubes
Choke tubes are screwed into shotgun barrels in order to increase or decrease shot-pattern density. They’re helpful because you can adjust your shot pattern depending on the distance you expect to be shooting.
They’re also helpful for duck hunting because are hardier than upland birds, especially when they get their full plumage. A modified choke tube is a good option for duck hunting because it’s effective from roughly 20-40 yards. You can change choke tubes to change your effective range.
Carlson choke tubes are well-known for waterfowlers. They use triple-shot technology (TST) in which makes the shotgun pellet spread-rate release more gradually than other choke tubes on the market for longer range shooting.
The chamber of your shotgun is also important. For example, if you have a 12 ga shotgun but it can only shoot 2 3/4-inch shotgun shells, that is going to greatly limit your shot opportunities. Instead, I would get a shotgun that can handle up to 3.5-inch shells. This was you can use any 12 ga shotgun shell from 2 3/4-inches up to 3.5-inches giving you the maximum flexibility out of your shotgun.
Non-Toxic Shotgun Shells
For duck hunting, you can’t use lead shot because it pollutes the environment. There are many steel and metal blends of shot you can buy.
Best Shotgun Shell Size For Duck Hunting
The best shotgun shell size will depend on your specific hunting scenario. That said, a 3.5-inch #2 is a good all-around shotgun shell for duck hunting from 20-40 yards with steel shot.
If you use heavier ammo like Hevi-Shot which is heavier than lead and is made of tungsten, nickel, iron, and other alloys, you don’t need such a big bullet and could get away with 3-inch #4 or #6. The reason for this is a heavier bullet will have better penetration and knock-down power.
Water Resistant Ammo Box
An ammo box provides storage and protection for duck hunting ammunition. The hard plastic is durable and the box makes a good seat if needed. The box is water waterproof, it can handle any weather event. It just can’t be submerged underwater. You can use it as a seat when duck hunting and throw a cushion on top for additional comfort.
An ammo box provides storage and protection for duck hunting ammunition
Decoys are almost always a necessary tool for duck hunters unless you’re jump-shooting because they attract ducks into shooting range. You don’t need a lot of decoys to start off but a dozen is a good place to start.
Duck calls are an essential piece of duck hunting gear because sound adds realism to your decoy setup which helps get more ducks to believe in your decoy spread and come in for a closer look. Haydel’s Deceiver call is an excellent call for both beginners and experienced hunters. The best part is they’re so confident you’ll like it they offer a 100% satisfaction guarantee.
Duck calls are an essential piece of duck hunting gear because sound adds realism to your decoy setup which helps get more ducks to believe in your decoy spread
Waders are great for marshes and swamps that are too deep for knee-highs or hip boots. They come in handy for duck retrieval, placing decoy spreads, and other duck hunting applications where the water is shallow enough to wade in.
This jacket is made specifically for duck hunters. It is a waterproof and GoreTex breathable jacket that is uninsulated so that hunters can keep layering clothes under this jacket as the hunting season progresses and gets colder. It is designed to keep waterfowl hunters dry throughout the entire hunting season. SITKA Gear makes high-quality and well-thought-out clothing specifically for hunters. This jacket even has a built-in duck call lanyard.
A headlamp is an essential piece of duck hunting gear because lights are a must in the dark mornings and evenings. A headlamp keeps both hands free so you can carry other equipment and focus on the task at hand. Just don’t skimp on a good headlamp because cheap ones will break or stop working.
A headlamp keeps both hands free so you can carry other equipment
One of the most important pieces of duck hunting gear is hearing protection. Keeping the ears protected during repeated shooting is essential for hearing longevity. If you know someone who needs a good pair of hearing protection they’ll appreciate it, and even more so in the long term.
The Howard Leight earmuffs are great because they an adjustable amplification knob so you can still have conversations. However, as soon as the noise is too loud, the headphones will block it.
Hearing protection is one of the most important pieces of duck hunting gear
If the water is too deep to wade through with chest waders then you’re going to need a boat or canoe to set decoys and retrieve ducks. These Old Town Discovery 119 canoes are great single-person canoes because they are small and light making them easily transportable for one person.
Camo Life Jacket
If you’re going to be hunting by boat a life jacket is an essential piece of duck hunting gear for safety.
These Lacrosse boots are insulated to keep feet warm, have a nice tight ankle fit for great mobility, and don’t roll your ankle. Also, these boots have button-style traction which works better in the muck and mud.
These boots have button-style traction which works great in the mud.
Sunglasses are a staple for duck hunters. Waterfowl tends to be flying in the sky, and the sky is usually bright, even on cloudy days. In addition, the sun and sky reflecting off the water are also bright. Having quality sunglasses will keep you from getting headaches after staring into the sky all day.
Having quality sunglasses will keep duck hunters from getting headaches after staring into the sky all-day
The ability to carry a dozen decoys at once is a blessing when traveling back and forth from hunting spots. There’s nothing more frustrating than having your hands or shoulders maxed out with decoys and not able to carry anything else. A single large bag allows duck hunters to free their hands up for more equipment.
These bags are also great because they separate decoys into individual slots so that they don’t get scratched up during transport. This keeps decoys in good condition for much longer than the decoys bags where you just stuff all decoys together.
Decoy bags are useful gear for duck hunters because it makes carrying decoys easy
It’s nice to have a gun case that will float if you drop your gun into the water. But another great benefit of having a gun case is the shoulder strap. A shoulder strap allows you to free your hands up when carrying equipment so you can carry more gear at one time.
Neoprene waterproof gloves keep hands dry when handling decoys. This can be critical when temperatures are cold, otherwise, the remainder of the hunt may be very uncomfortable with freezing hands.
These waterproof gloves keep hands dry when handling decoys
A duck call lanyard is worn around the neck for easy accessibility to different calls. Different species of waterfowl make different noises and having quick access to the right call at the right time is key.
A Mojo duck decoy is a helpful piece of duck hunting gear because the spinning wings from this motorized decoy can be seen and attract ducks from farther distances than regular decoys. The Mojo gives ducks confidence in a decoy spread, making them commit harder offering more opportunities and better shots.
Waterfowl hunting and training with a duck dog is usually wet, muddy, brushy, stinky, and messy. Seat covers keep the pup safe and keep the vehicle clean, especially after duck hunting trips.
Seat covers keep the pup safe and keep the vehicle clean, especially after duck hunting trips.
This definitely one of the top pieces of duck hunting gear because every duck hunter needs and wants dry boots. There is nothing more uncomfortable than damp or wet boots the next day. Damp or wet boots will also speed up getting frozen toes.
Instead, just place boots on this dryer after a day of hunting and they’ll be toasty and dry for the next day. Boot dryers also kill odors and bacteria for even more scent control. This Peet boot dryer can dry every type of boot, even chest waders when folded down.
Place boots on this dryer after a day of use and they’ll be toasty and dry for the next day. Boot dryers also kill odors and bacteria for even more scent control.
This 14 in 1 tool is not only convenient but it manages to reduce a lot of frustration when things go awry or fall apart. There will be times when the leatherman will save the day when doing repairs while out duck hunting. Their helpfulness in unideal situations makes them one of the best duck hunting gear items.
A Leatherman’s helpfulness in unideal situations makes them one of the pieces of gear for duck hunters
Seat cushions are helpful for duck hunters to be comfortable for sitting most of the day. This cushion isn’t your average hunting cushion. It uses layers of memory foam in order to create a very comfortable seat. It has quiet fabric and a buckle so it can be easily carried when in transport.
An actual seat is much more comfortable and will be easier on a hunter’s back than being hunched over. Additionally, you’ll be able to see over the tall marsh grass without being fully exposed to waterfowl.
Waterproof duffle bags are very handy pieces of duck hunting gear to have in wetland duck habitats. They can be used on long hunting trips, or to keep gear dry in the duck boat, as well as an infinite amount of other scenarios where water is a factor. With a waterproof bag, there is no need to worry about the elements.
Waterproof duffle bags are very handy to have in wetland duck habitats
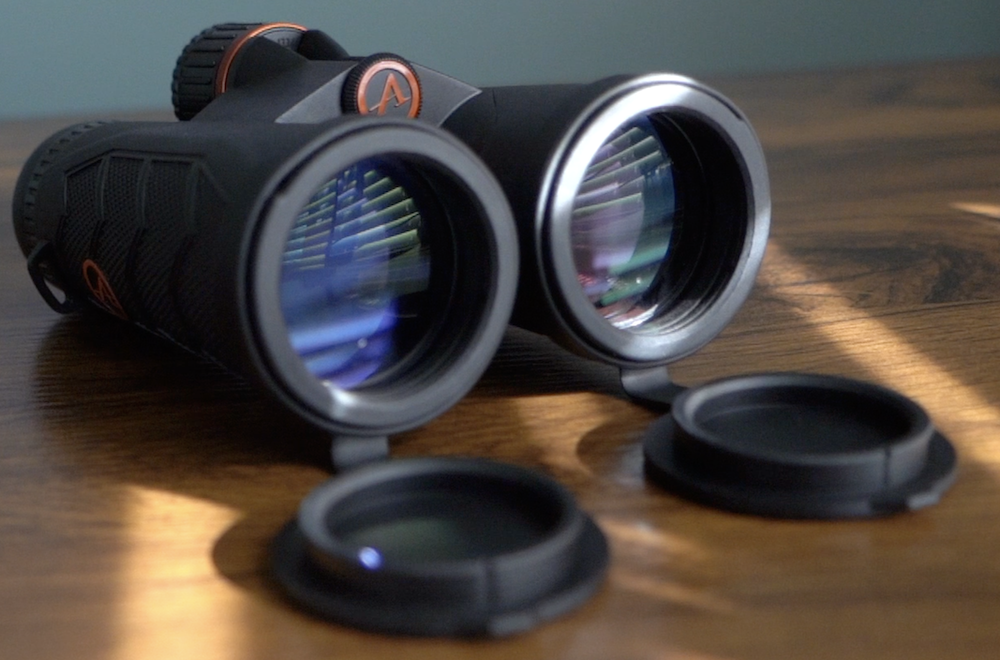
Binoculars can be helpful for scouting for ducks and for duck identification at longer distances. I tested 14 different binoculars from all price ranges to see which hunting binoculars were the best value for the money. In my opinion, the Athlon Midas binoculars were by far the best value. You can check out my video review below:
You can stay hidden in plain sight by laying down in a field inside one of these. The ALPS OutdoorZ Legend Layout Blind is comfortable, waterproof, and easily transportable. What separates the ALPS from other layout blinds is that is has a specially designed chair “zero gravity” that makes laying on the ground very comfortable.
Hopefully, this duck hunting gear list has helped you identify the essentials you’ll need for duck hunting as well as some non-essential gear that will make your life easier when duck hunting. What duck hunting gear do you think should be added? If you have any suggestions let me know in the comments below.
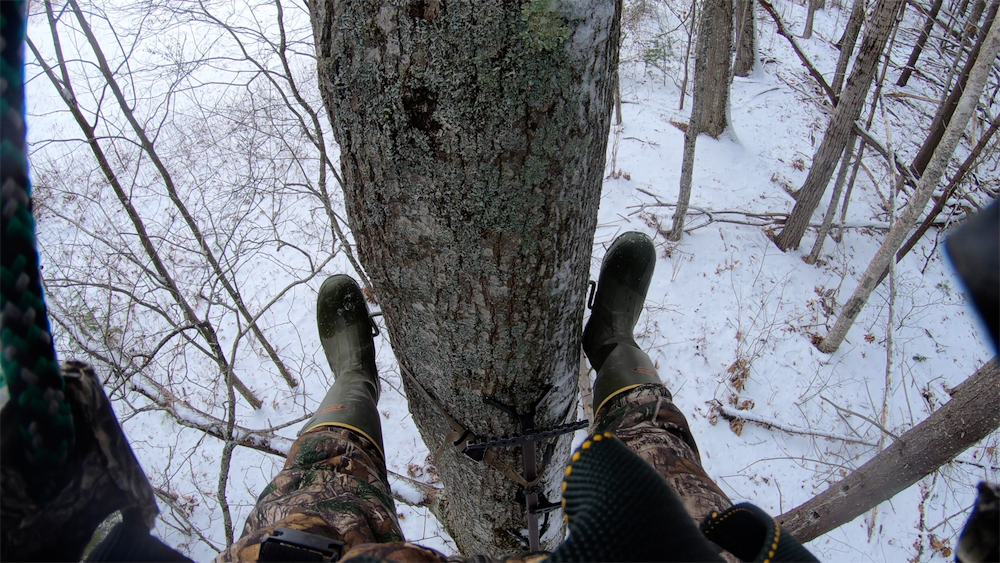
There are two main types of saddle hunting platforms; ring of steps platforms and single-piece platforms. Examples of both of these styles are shown in the following sections. With the exploding number of saddle hunters, a lot of new saddle hunting platforms have come onto the market. We’ll be diving into the many examples so you can determine which style of saddle platform is best for you.
This post contains Amazon and other affiliate links, which means I’ll receive a commission if you purchase through my link, at no extra cost to you. Of course, you are not obligated to use my links, but it does help fund these posts in hopes of bringing more value to you!
Saddle Hunting Platforms
Saddles are used in combination with platforms. Saddle hunting platforms are a must-have piece of saddle hunting gear. The purpose of the platforms is to give your feet something to rest and maneuver on while you’re in your saddle. Without a platform, you will not be able to effectively hunt out of a tree saddle.
Ring of Steps Platforms
Ring of step platforms are objects that are placed around the diameter of the tree (in a ring) at the height you want to stand. These objects are radiate out from the tree about 90º and are generally 4-7 inches long.
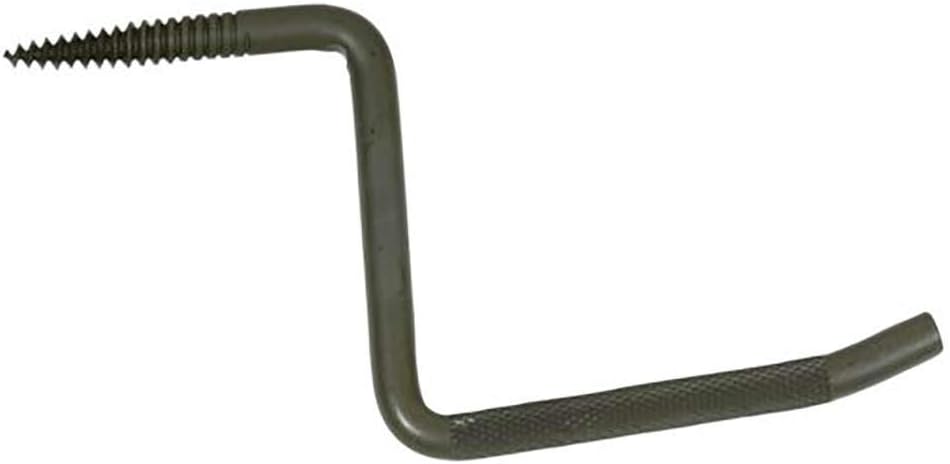
Ameristep Ring of Steps Platform (Screw-in)
These screw-in steps are a little noisy but are small and lightweight making them easy to carry. You only need 2 or 3 if you’re using them in combination with climbing sticks, they take up very little space compared to other saddle hunting platforms. These are ideal when you can get permission to use them.
I like the Ameristep screw-ins because they have a lot of foot room and a good grip. They usually screw in very easily with one hand, but a downside is periodically you’ll get a bad one and you’ll have to use some effort to get it started.
Tree Saddle Hunting Climbing Platform – Ameristep Ring of Steps
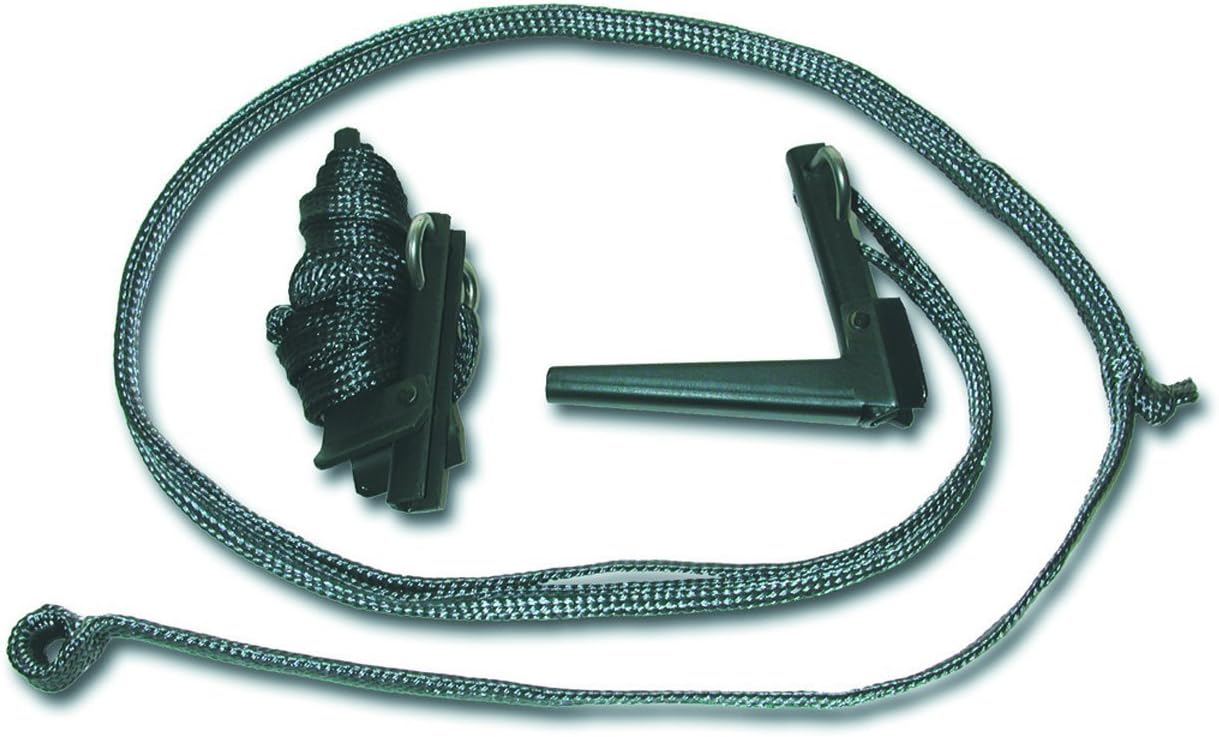
These rope-style Cranford steps will work if you’re looking for a lightweight option on public land. Since they fold up, they are compact. You’ll only need 3 or 4 if you’re using the top of your climbing stick as a step. These are really lightweight and packable options for creating a platform. They won’t be as stable as their Ameristep screw-in cousins.
The SteppLadder steps can also be used to make a ring of steps platform. They use cam-over technology to get a really good grip on the tree without needing a buckle or strap. Compared to the Amieristep and Cranmore steps they are bulkier but do offer increased foot surface area. It can be time-intensive to place multiple steps because it is done one at a time to create a platform.
Bullman Outdoors Silent Approach Ring of Steps Platform
Bullman Outdoors ring of steps is one of the more popular rings of steps. They’re a little bulky but are pretty lightweight because they’re made of plastic. Once ratcheted down to the tree they provide a good amount of surface area compared to other rings of steps. They also have teeth for additional grip on your boots.
Eastern Woods Outdoors – Ring of Steps Platform (Squirrel Steps)
Eastern Woods Outdoors has a very popular ring of steps as well. These are small and lightweight steps that are made of aluminum. You can purchase silencing tape with the steps to keep them from making noise and is highly recommended. Another nice feature of these steps is that they use an over-center buckle (OCB) instead of a ratchet strap so you can get them really right without the noise.
Eastern Woods Outdoors Squirrel Step Ring of Steps. Photo from here
The over-center buckle (OCB) is a great option for those who don’t like the noise a ratchet strap makes (I’m in that camp). These buckles cam over one time but will tighten down just about as good as a ratchet strap. They’re great for a ring of steps because they tighten down well, are easy to set up, and are quiet.
Eastern Woods Outdoors Over Center Buckle OCB Buckle. Photo From Here
Cranford Saddle Scaffold Set Ring of Steps Platform
Cranford recently started making a ring of steps option. These steps are interesting because they fold up so they’re compact and they are a little more ‘winged’ so they are less apt to move with side pressure. They come with a ratchet strap, but you can buy an OCB buckle and replace the ratchet strap if you desire.
Cranford Saddle Scaffold Set – Ring of Steps. Photo from Here
One-Piece Saddle Hunting Platforms
One-piece platforms are newer to the market than the older-school ring of steps. There are now a handful of companies that make these platforms. As the years progress these companies have continued to innovate their products. With each new version, these platforms become better and easier to use. Some of the best options on the market are listed below:
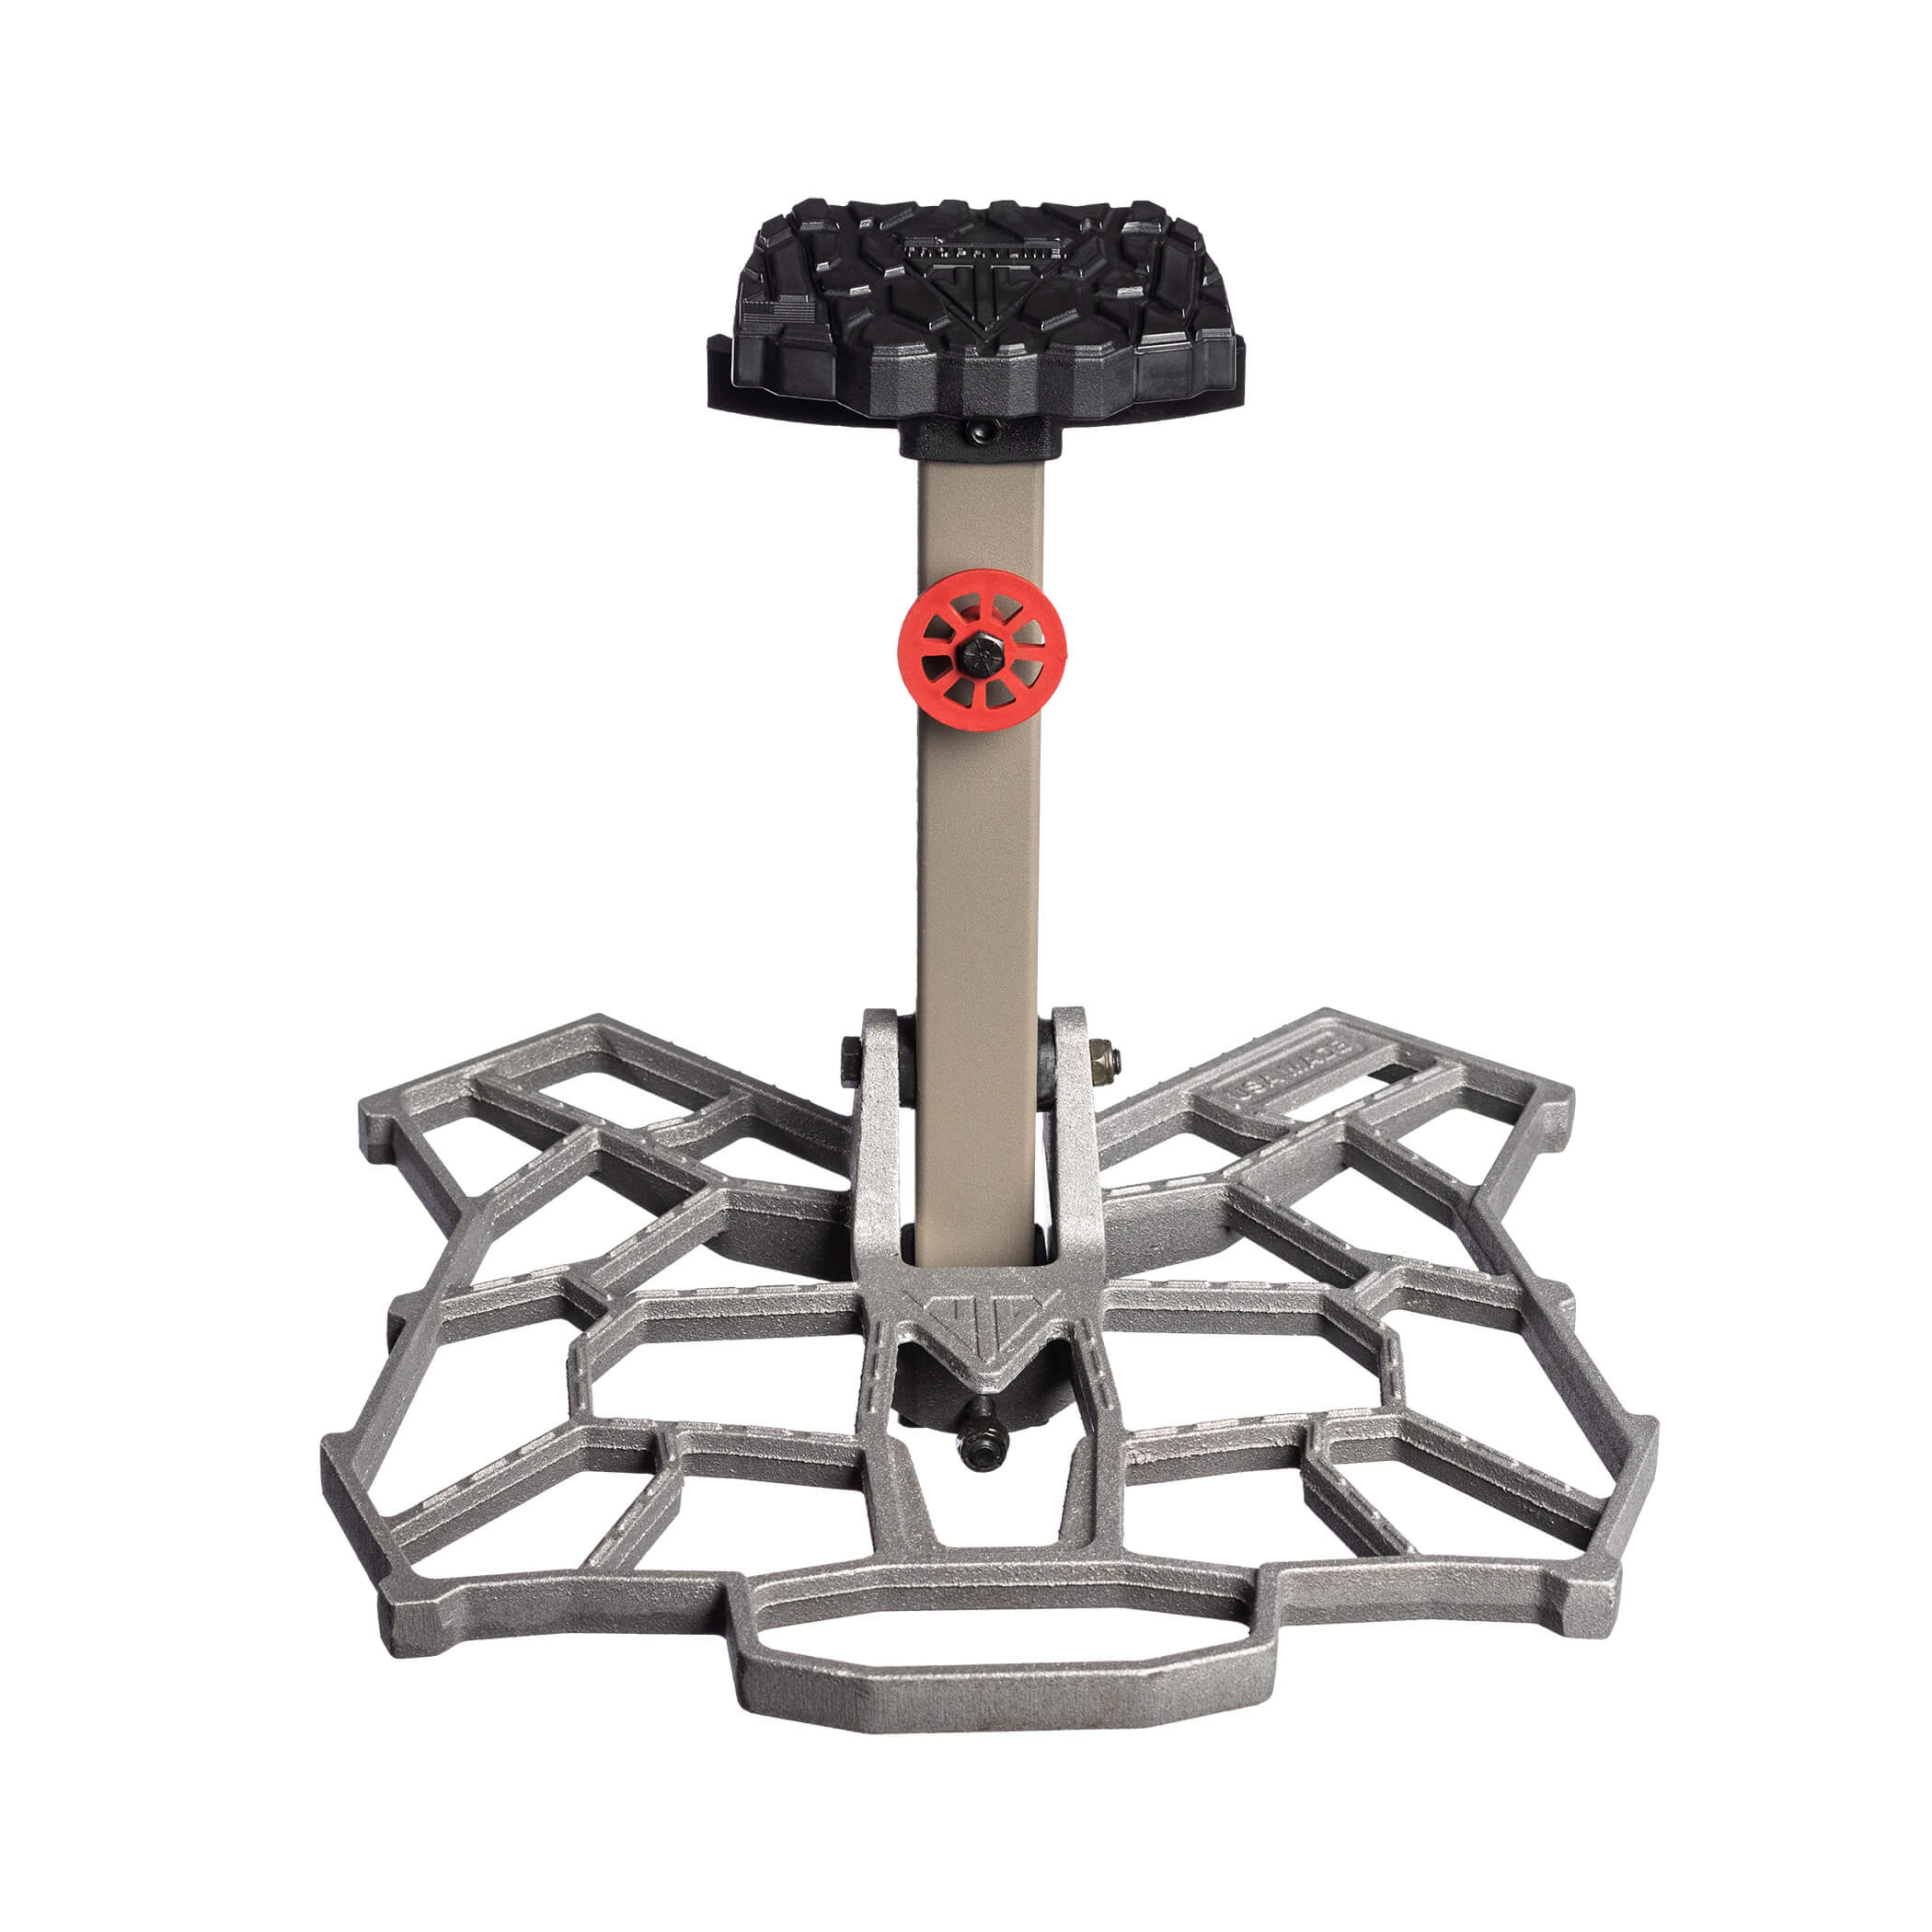
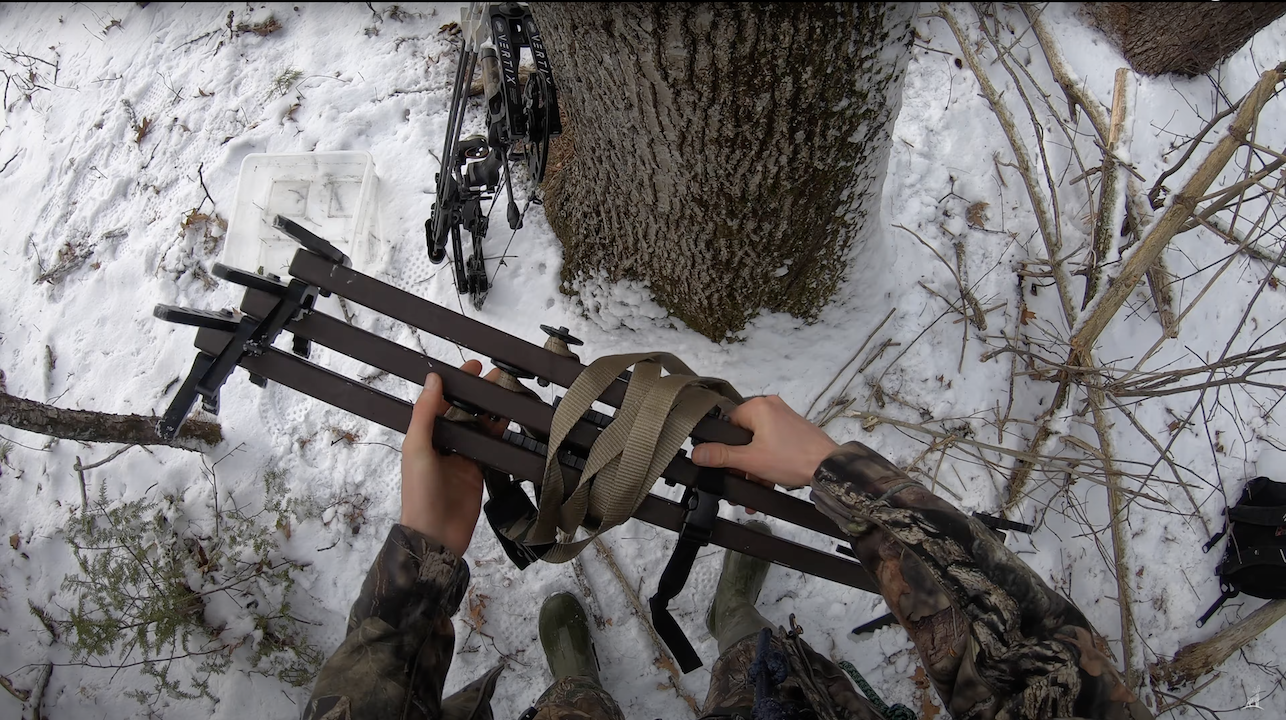
Lone Wolf Custom Gear – The Kuhnert’s Ambush Platform
The Kuhnert platform uses cam-over technology to get extra tight to the tree. This is the largest platform in this review. The platform size is 16.5 x 14.5 inches and weighs 4.81 lbs with a weight limit of 300 lbs. You are able to angle the platform to your desired angle with the leveler. This platform also pairs well with Lonewolf climbing sticks, the platform has little tabs that allow you to use the platform strap to secure climbing sticks when on the move. A unique feature of this platform is that it comes with backpack straps making it very easy to carry.
The Kuhnert’s Ambush Saddle Platform. Photo from here
Out On A Limb – The Ridge Runner Platform
The Ridge Runner Platform is a new and great design. Because of its innovative shape, you can maneuver all the way around this platform so you can shoot at all angles (360º) easier than other platforms on the market. It’s also easy to get secure to the tree because it uses cam-over technology. It’s 18 x 8 inches and weighs 3.5 lbs. The traction on this platform is great, it has large notches that grip boots well, and utilizes an anti-skid finish. This platform also has a leveling system to get your platform where you like it.
Out on a Limb Ridge Runner Platform for Saddle Hunting. Photo From Here.
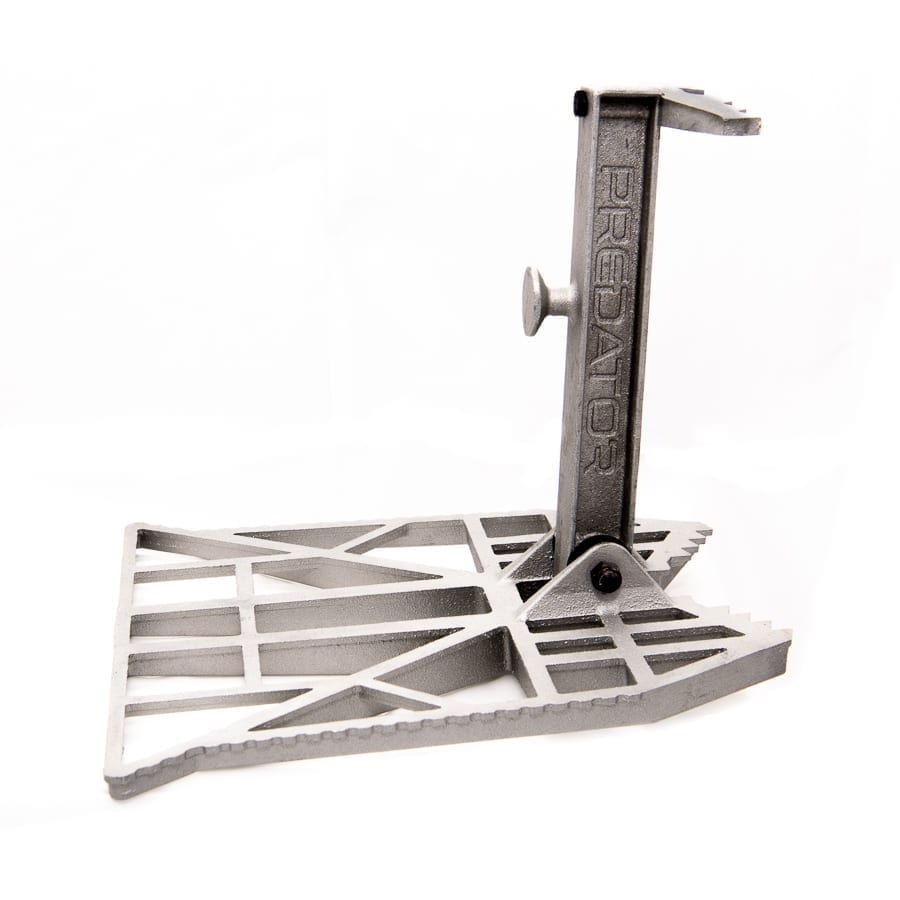
Tethrd – Predator Platform
The Tethrd Predator is one of the most well-known saddle hunting platforms on the market. It works well, it’s lightweight, and it’s sleek making it a favorite among saddle hunters. It uses cam-over technology to get extra tight to the tree. This platform is 12 x 13 inches and is 3 inches tall when packed up and weighs 3 lbs. The sides of the platform are grooved and have a small wing allowing for good side control and potentially shooting 360º around the tree. There is a way to level the platform which adds to the comfort.
Tethrd Predator Saddle Hunting Platform. Photo From Here
Trophyline – The EDP Platform
This platform comes in at 13.5 x 13 inches and weighs 3.81 lbs and has a 300 lbs load limit. It has a small step above the versa button for extra maneavering. Having a small step here allows you to maneauver for side shots and rest your feet while keeping the platform secure. The Lone Wolf Kuhnert also has this feature but is smaller. Overall it’s a very similar platform to the Tethrd Predator in shape and weight.
Trophyline The EDP Platform For Saddle Hunting. Photo From Here
XOP Outdoors – Ultra Series Edge Saddle Platform
This platform is 13.75 x 11 inches which is pretty compact. However, somehow it is the heaviest platform in this review, coming in at 5.4 lbs. This is over a half-pound more than the 16.5 x 14.5 Lone Wolf Kuhnert Platform. Although this platform is heavy, it has a weight rating of 350 lbs which is more than any other platform in this review which can only hold 300 lbs. The layout of this platform is very similar to the Kuhnert’s Platform but is probably 1/3 smaller. The notching of this platform gives it a solid bite on your boots when maneuvering. It also has an easy hand-tightening leveling system.
The Apex platform is 12 x 11.77 making it the smallest overall in this review. Although it is the smallest platform it comes in at the 3rd lightest platform at 3.6 lbs and it is rated to 300 lbs. The build of the Apex is very similar to the Tethrd Predator platform. Unlike the Tethrd Predator though, this platform does not have much for grip and doesn’t have any winged protrusions to aid with 360º shooting. Other reviews also mention that this platform is not able to handle side-pressure as well as the Tethrd. That said, this platform is very affordable compared to other platforms. You can often find it for under 100$.
Climbing stick companies have started creating their own platforms that are specifically designed to be used in conjunction with the tops of their climbing sticks. This makes the platform installation faster and easier than before. This style of platform is new to the market and it will be interesting to see how these evolve as saddle hunting continues.
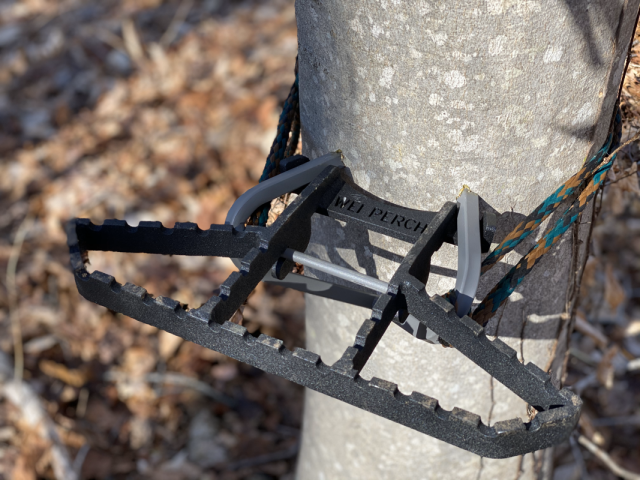
Wild-Edge Inc. – WEI Perch Platform Attachment
This platform is an attachment that can be purchased separately for the Wild-Edge SteppLadder climbing steps. The platform fits like a puzzle piece into the SteppLadder step. This platform a convenient if you’re already using the SteppLadder steps. These attachments turn regular Wild-Edge SteppLadder steps into a mini-version of the Ridge Runner Platforms.
Wild-Edge Inc. Perch Platform Attachment. Photo From Here
Eastern Woods Outdoors – The U.P. Ultimate Platform Attachment
The U.P. Ultimate Platform by Eastern Woods Outdoors is a good example of a climbing stick company that has created a top-of-stick platform for their line of climbing sticks – the Ultralight Feathersticks. These sticks were one of the best climbing sticks in my comparison review of 17 climbing sticks.
One of the best things about saddle hunting is there are seemingly endless combinations of saddle hunting gear. This allows you to fully customize your saddle hunting setups to what will work best for your style of hunting. Additionally, more saddle hunting companies are coming into the market and more innovations are occurring. It’s an exciting time to be a saddle hunter!
Hopefully, this article has helped you find some useful saddle hunting gear for your setup. You can find more saddle hunting resources below:
This article covers saddle hunting gear and accessories that will allow you to maximize your saddle hunting setup. There are a handful of ways to hunt out of tree saddles, and each way requires slightly different gear.
There are also gear add-ons, attachments, and modifications that can be implemented for an even more customized saddle hunting experience. We’ll be diving into those in this article so you can pick and choose what will best suit your personal style.
This post contains Amazon and other affiliate links, which means I’ll receive a commission if you purchase through my link, at no extra cost to you. Of course, you are not obligated to use my links, but it does help fund these posts in hopes of bringing more value to you!
Table of Contents
Saddle Hunting Gear For Climbing A Tree
Mobile Climbing Sticks
There are many ways to climb a tree using a tree saddle. Climbing sticks are a great option, especially on public land. They are lightweight, mobile, very easy to use, and only take a few minutes to get high up into a tree. There are many climbing sticks to choose from and each has its own set of pros and cons. The best climbing sticks for you will depend on your own style. Climbing sticks are probably the most common way to climb a tree when saddle hunting.
Ameristep Screw-In Rod Steps
Ameristep screw-in steps are another option for climbing trees when saddle hunting. However, they shouldn’t be used on public land or without permission on private land.
These steps are great for stands that are productive year after year. You can prepare trees ahead of hunting season using these screw-in steps. This way you don’t need to carry or set up climbing sticks during the season. This makes getting set up in a tree saddle much faster, quieter, and easier.
On average it usually takes about 12 steps to make one treestand plus 4 more for the platform ring for a total of 16 steps.
Cranford rope steps are a good lightweight alternative to Ameristeps when you don’t have permission or are hunting public land because they use a rope system to cinch to the tree. These are a very lightweight option for climbing trees.
These are compact climbing steps that work great for saddle hunting. They are innovative in that to secure these steps to trees they use simple cam-over technology. Additionally, they are compact and fit inside of each other for easy portability. There are many ways to use these steps with mods and add-ons (more on that later) which makes them an interesting choice.
One of the most common mods for climbing sticks by saddle hunters is to replace the bulkier strap and noisier buckle with a very small AmSteel rope. This cuts back on noise and makes climbing sticks easier to transport. A great place to get these relatively inexpensive mods is through Custom AmSteel Products. They have solutions for many climbing sticks. You’re also able to choose the thickness of the rope and the length.
Climbing stick companies have started creating their own platforms that are designed to be used in conjunction with the tops of their climbing sticks. This makes the platform installation faster and easier than before. Below is an example of this with the Wild-Edge Steppladder step used in conjunction with Wild-Edge’s WEI Perch Platform.
Wild-Edge Inc. Perch Platform Attachment. Photo From Here
Stealth Strips
Stealth Outdoors is a go-to for many hunters that are looking to silence their treestands or climbing sticks. They use a product called stealth strips that is well-known in the mobile hunting community. Stealth strips are fabric adhesive strips that are attached to noisy hunting equipment to prevent noise. They have kits put together for specific climbing sticks and treestand platforms so you get the exact amount of stealth strips.
Stealth Strips For Silencing Saddle Hunting Gear. Photo From Here
Saddle Hunting Climbing Aiders
Climbing aiders help hunters get extra height per climbing stick but with very little additional bulk or weight added. There are a lot of different methods of using climbing aiders. I suggest watching some YouTube videos to determine a style you might like.
Ladder Aiders
If you want to get high in a tree with the least possible climbing sticks, ladder aiders are a good choice. With multiple loop steps, you can really max out how far you can climb. I would recommend buying one set and figuring out a way to move it up with you for each ladder section, rather than buying one set for each climbing stick. There are a lot of YouTube videos on different climbing methods with ladder aiders.
Another option is cable aiders, these are fixed cables that are attached to the bottom of a climbing stick. The cable aider is a loop that you use as an extra step. This gives you extra height out of each stick. The cable aiders can often be pushed back into the climbing stick or conveniently wrapped around the stick when not in use so it’s out of the way. The nice thing about cables is that they are easy to get your feet into because they stay open.
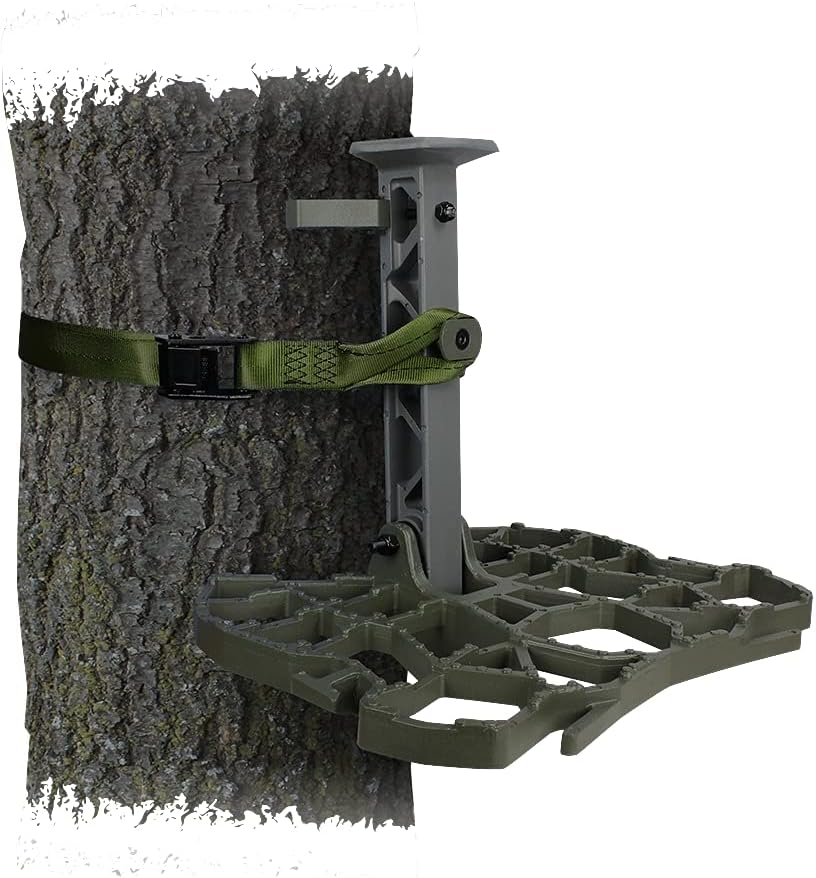
Saddles are used in combination with platforms. Saddle hunting platforms are a must-have piece of saddle hunting gear. The purpose of the platforms is to give your feet something to rest and maneuver on while you’re in your saddle. Without a platform, you will not be able to effectively hunt out of a tree saddle.
There are two main types of saddle hunting platforms; ring of steps platforms and single-piece platforms. Examples of both of these styles are shown in the following sections.
Ring of Steps Platforms
Ring of step platforms are objects that are placed around the diameter of the tree (in a ring) at the height you want to stand. These objects are radiate out from the tree about 90º and are generally 4-7 inches long.
Ameristep Ring of Steps Platform (Screw-In)
In addition to using the Ameristeps to climb a tree, you can also use them to create a ring of steps. They are a little noisy but are small and lightweight making them easy to carry. You only need 2 or 3 if you’re using them in combination with climbing sticks so they take up very little space compared to other saddle hunting platforms.
Tree Saddle Hunting Climbing Platform – Ameristep Ring of Steps
Bullman Outdoors Silent Approach Ring of Steps (Strap on)
Bullman Outdoors ring of steps is one of the more popular rings of steps. They’re a little bulky but are pretty lightweight because they’re made of plastic. They use a ratchet to tighten down to the tree, so you may want to look into an OCB buckle for more stealth. This ring of step option provides a good amount of surface area compared to other options.
An over-center buckle is a great option for those who don’t like the noise a ratchet strap makes (I’m in that camp). These buckles cam over one time but will tighten down just about as good as a ratchet strap. They’re great for a ring of steps because they tighten down well, are easy to set up, and are quiet.
Eastern Woods Outdoors Over Center Buckle OCB Buckle. Photo From Here
One-Piece Saddle Hunting Platforms
One-piece platforms are newer to the market than the older-school ring of steps. There are now a handful of companies that make these platforms. As the years progress these companies have continued to innovate their products. With each new version, these platforms become better and easier to use.
These are probably the most comfortable style of saddle hunting platforms on the market. The tradeoff is, they’re bulky and heavy compared to a ring of steps. You also don’t have the same maneuvering freedom as you would with a ring of steps.
This is an example of a single-piece platform looks like, and it has pretty good reviews on Amazon. However, I would make sure to check out all of the options above.
Gear hangers are essential for saddle hunting. You’ll still need a place to hang your bow, quiver, and any other tools you like to bring with you to the field.
Strap-On Gear Hangers
Strap-on gear hangers for saddle hunting meet public land standards. You can hang multiple gear and gadgets from this tool below including your bow and quiver. Each hook slides so you can position it best. There are no ratchet straps involved, the buckle is small but strong, and quiet.
Screw-in hooks work well because sometimes you need to have your equipment in a specific spot that strap-on hooks can’t fit into. It’s also very easy to place your bow to raise your bow on these hooks. These are very inexpensive garage hangers you can find at any hardware store.
Having the right clothes when saddle hunting is important. You might want to make a few adjustments in your clothing arsenal before saddle hunting to ensure comfort.
Coveralls
Coveralls are great clothing options for saddling hunting because when you’re in a saddle clothes tend to ride up or down. This causes your skin to eventually show which is not good in warm or cold weather. You might spend a lot of time fidgeting unless you’re wearing coveralls. Scentlok makes great lightweight early-season coveralls, and I’ve linked a great cold-weather coverall below.
Clothes with many pockets are good for saddle hunting because, as you’ve seen in this post, there is a lot of pocket-sized gear that you’ll need to carry with you when hunting. For example, gear hangers, bow string, ring of steps, brush shears, rangefinder, bow release…etc.
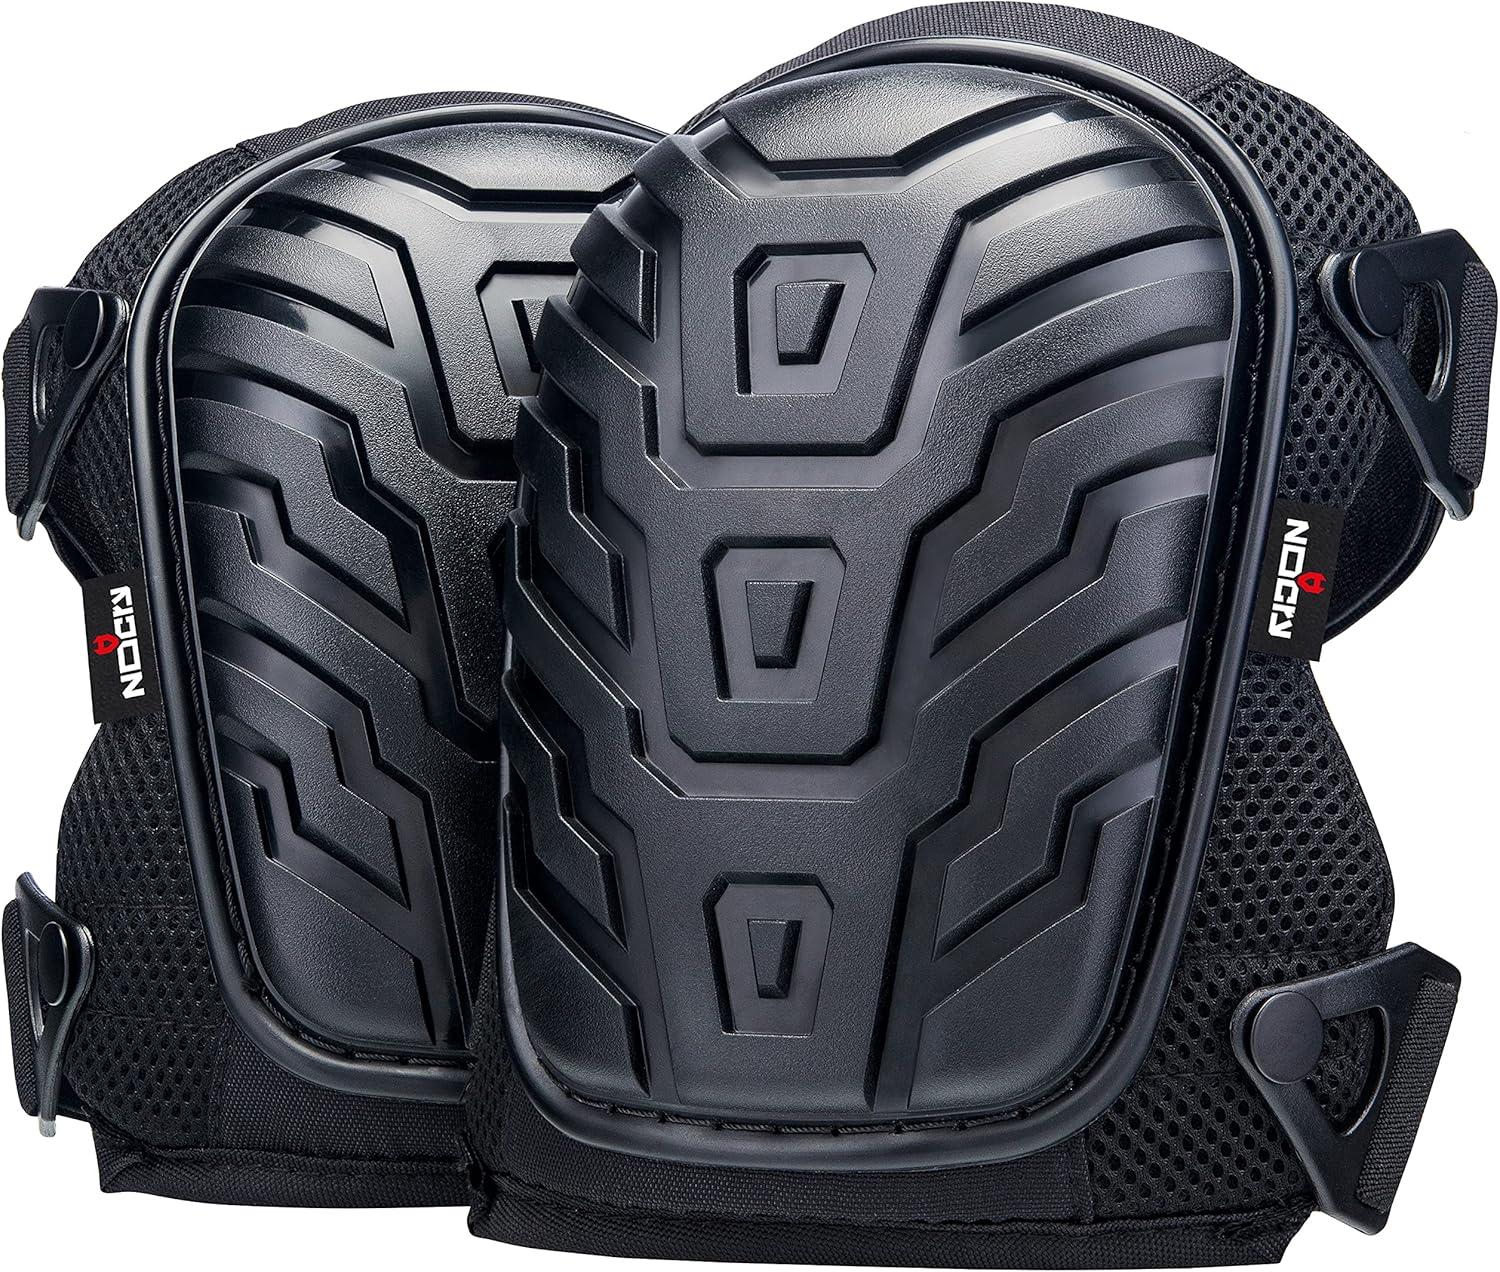
Knee Pads
Some saddle hunters like knee pads because when your knees are pressed against a tree for many hours they can get sore. Especially, when the tree has rough bark. You might need to try a few pars to see what works best, but I’ve linked to a comfortable foam pair with good reviews below:
One of the best things about saddle hunting is there are seemingly endless combinations of saddle hunting gear. This allows you to fully customize your saddle hunting setups to what will work best for your style of hunting. Additionally, more saddle hunting companies are coming into the market and more innovations are occurring. It’s an exciting time to be a saddle hunter!
Hopefully, this article has helped you find some useful saddle hunting gear for your setup. Is there anything you think should be added to this list? Let me know in the comments below.
This Athlon Midas ED review will help you determine if these binoculars are worth the money. I also compare these binoculars to the next generation model Midas binoculars (the Athlon Midas G2’s) so you know which are the best value for the money.
Table of Contents
This Review’s Credibility
I am not affiliated with Athlon in any way. I bought these binoculars with my own money and have loved using them. Because I liked them so much I wanted to do a review of them. I did an initial review of these binoculars (and 13 others). The Athlon Midas binoculars were my favorites for the money.
I felt a longer-term review would be helpful to add to that initial review. So this review reiterates my initial findings as well as my experience with the binoculars for about one year.
This post contains Amazon and other affiliate links, which means I’ll receive a commission if you purchase through my link, at no extra cost to you. Of course, you are not obligated to use my links, but it does help fund these posts in hopes of bringing more value to you!
How These Binoculars Were Tested
As I mentioned, I did a much more in-depth initial review of 14 binoculars (which includes the Athlon Midas ED’s and Athlon Midas G2 UHD’s). These 14 binoculars were all at different price points ($200 to $2500). I compared them to see which were the best value. You can also watch my YouTube review of these binoculars here:
14 Binocular Video Review (Includes Midas ED’s and UHD’s)
Athlon Midas ED Review
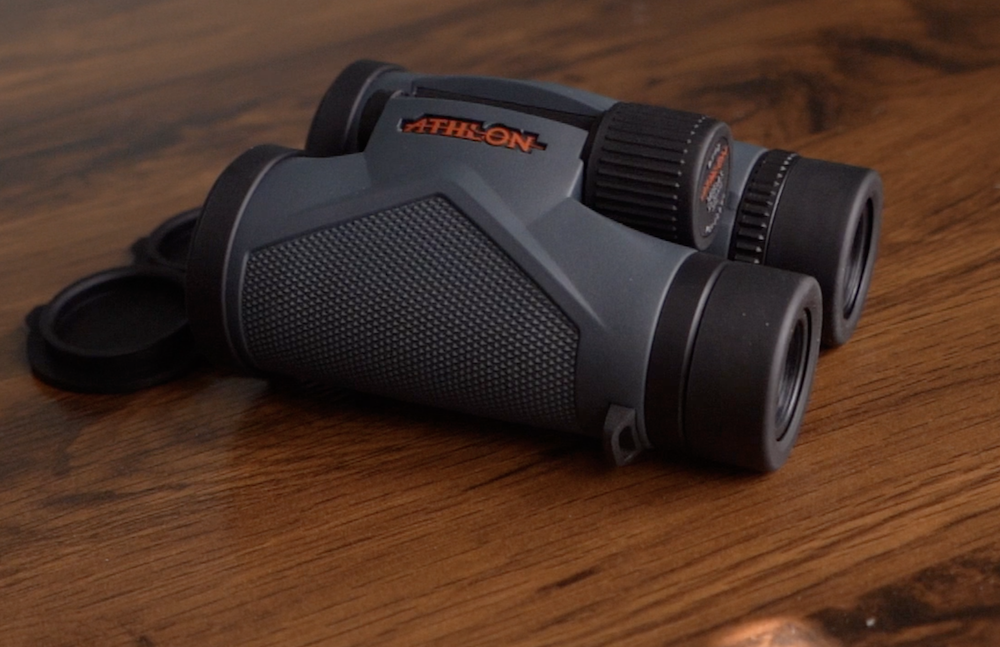
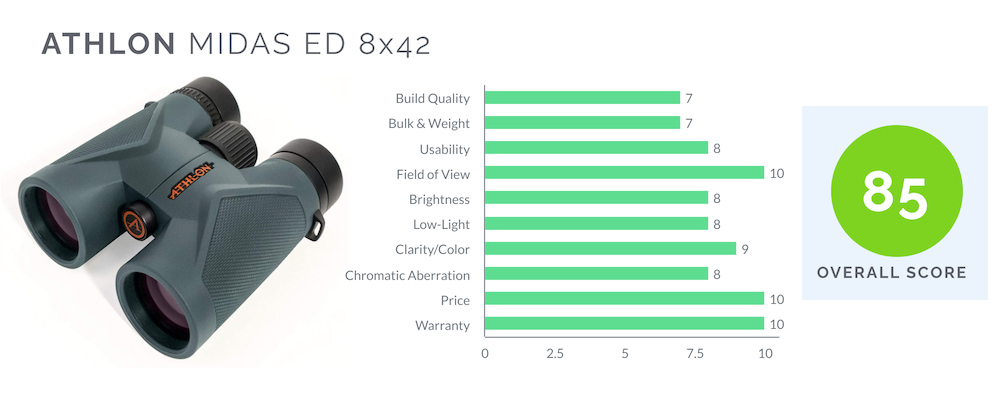
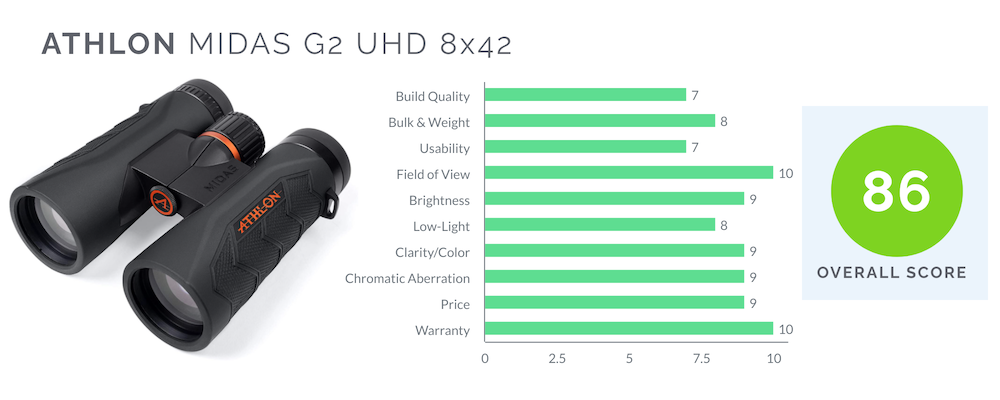
The Athlon Midas ED binoculars were amazing and outperformed even the most expensive binoculars. For the price, I could not tell the difference between the hyped direct-to-consumer Maven C1’s in the picture quality. They also did the same, and even better in most cases, in low light situations than the 350-500$ tier binoculars.
The image from these binoculars is incredibly clear, crisp, and bright. The adjustable diopter is very precise, and the focus knob is easy to turn with one finger, which I appreciate for finding focus fast and when I have cold hands. The wide field of view is very convenient and helpful in many hunting situations
These binoculars are incredible, they’re light and convenient and come in a great carrying case, have great lens caps that stay attached to the objective lenses, and the twist-up eyecups have the perfect settings for me. Absolutely fantastic pair of binoculars and they have a small price tag compared to the other binoculars in this test.
Athlon Midas Long-Term Durability
In this initial review of 14 binoculars, long-term use was not covered because the purpose of that review was to compare many binoculars that I only had a short time with. Thus, I was only able to gather first impressions of build quality.
Now that I’ve owed the Athlon Midas ED binoculars for almost a year, and through one hunting season, I can talk more about their long-term durability and performance.
Basically, I am still just as happy with these binoculars as the day I bought them. They perform just as I thought they would based on my initial review. Additionally, they are holding up really well in the outdoors. I haven’t dropped my binoculars and I haven’t abused them drastically in the field. However, they have held up just as I would have expected them too.
Athlon Midas ED Review – Field Notes
Build Quality
Average, feels sturdy in hand.
Bulk & Weight
Slightly better than average, lower-profile
Usability
1 finger focus knob adjustment, everything works well
Field of View
426 FOV, very wide
Brightness
Excellent, bright white, amazing for the price
Low-Light
Excellent comparable to more expensive binos
Clarity/Color
Edge to edge is very well done for wide FOV
Chromatic Aberration
Slightly better than average, not very noticeable
Price
Inexpensive, one of the more affordable options, especially for what you get
I tested both the Midas ED (predecessor, above) and the Midas G2 UHD’s. I gave these two binoculars a very similar score. The ED’s were a little bit more comfortable while these G2 UHD’s had an ever so slight advantage in clarity and low-light performance.
The Midas G2’s were also amazing for the price, just like Midas ED’s. When compared to the hyped direct-to-consumer Maven C1’s I could not tell the difference in the picture quality.
The image from these binoculars is incredibly clear, crisp, and bright. The wide field of view is very convenient and helpful in many situations. I wish the twist eyecups were more comfortable like the Midas ED’s, but they still work just fine.
Overall these binoculars are truly incredible, they’re light and convenient and come in a carrying case with lens caps that stay attached to the objective lenses.
I compared both Athlon Midas binoculars to 12 other binoculars (see video above). It was clear after conducting this review that both the Midas G2 UHD and Midas EDs were the best value binoculars, for the money they were unmatched.
You can’t go wrong with either one for the price. When compared to the Swarovski’s, there was a difference, but for hunting applications, there wasn’t a 10x difference in price. For the price difference, the Midas’s had, in my opinion, 80% of what the 1000$+ binoculars had to offer.
If you’re interested in how to choose binoculars, you might like my post below:
This post covers the best camera arms for hunting currently on the market. Each camera arm is different and has pros and cons. The best camera arm for you will depend on your hunting style. This post will help you choose which camera arm is right for you by comparing each of these camera arms.
I got my hands on the Muddy Hunt Hard, Muddy Outfitter, and Fourth Arrow Stiff Arm to try out. The other camera arms I have not been able to use, at least not yet. However, I’ve been able to consolidate reviews to make a good argument for the pros and cons of every camera arm in this review.
This post contains Amazon and other affiliate links, which means I’ll receive a commission if you purchase through my link, at no extra cost to you. Of course, you are not obligated to use my links, but it does help fund these posts in hopes of bringing more value to you!
Table of Contents
How To Choose Camera Arms For Hunting
The main specifications to look for when choosing a camera arm are:
Price
Weight/Bulk
Camera Weight Capacity
Arm Reach
Level Bubble
Fiddle Factor
Levels Bubbles Are Important Features For Camera Arms To Ensure A Level Shot
We will be going over each of the specs in the post below, and I have created a spreadsheet that will help you compare each camera arm so you can find the best camera arm for you.
Use Camera Arm Ratchet Strap Quietly
Camera arms usually come with ratchet straps to securely attach to the trees. Ratchet straps are loud if you don’t know how to operate them properly in hunting situations. Fortunately, ratchet straps can be used quietly so that you don’t spook animals when you’re setting up your camera.
The trick to using your ratchet strap quietly is to make sure the locking plate does not slip in the gears when ratcheting or when reloading the ratchet. You can do this by pulling up on the locking plates as you tighten the ratchet. It’s not perfectly quiet, but it’s so much quieter than ratcheting regularly.
Attaching Camera To A Camera Arm
In the list of camera arms for hunting below, the companies often will have a camera head/mount that you can buy as an additional option with an additional cost. If you would like to purchase your camera head mount you can buy anything that will fit the thread size of the camera arm.
Camera Heads For Filming Hunts
Fluid heads are the go-to choice for filming hunts because they offer fluid motion and are good at keeping the camera in place when you’re going for the shot with the right friction settings. I’ve linked to a good-quality one below that won’t break the bank.
The Muddy Hunt Hard Camera Arm is one of the less-expensive options on the market but still offers a lot of features. Also, unlike most camera arms, it comes with a camera mount. This means it is hunt-ready right out of the box and no other items will need to be purchased to start filming.
It comes with a ratchet strap and a tree base so it has no issues securely attaching to trees. It has adjustments so that you can level the camera when it’s attached to the tree, a level bubble is included so you can be sure you’ve got a leveled camera shot.
Muddy Hunt Hard Grip Twists Which Locks The Camera In Place
Cons
It is a fairly heavy camera arm for its size coming in at around 5 lbs. The camera friction head has also been known to loosen when turning to the left because it loosens the screw on the camera mount. This makes it hard to keep your camera aimed in one spot on the left axis. You might need to do some simple DIY fixes to get it to perform optimally.
Muddy Hunt Hard Camera Swivel Loosens
Trade-Off
The trade-off here is cost vs quality. This camera arm is very cheap which is great, but it might not perform perfectly in some cases until some changes are made.
The Muddy Outfitter Camera Arm is one of the most popular camera arms for hunting. This camera arm is Muddy’s mid-sized camera arm. There are a lot of fine-tuning adjustments so that you can always get a perfectly leveled shot. This camera arm comes with a ratchet strap to secure the large tree-base attachment and is heavy which prevents camera ‘wobble’ or ‘shake’ for very stable footage.
Using The Muddy Outfitter Camera Arm To Hunt Deer
Cons
Because the base of these camera arms is bulky they can be less portable compared to other camera arms. They are also more awkward to hang in trees because of their bulk.
Muddy Outfitter and Hunt Hard Camera Arm Box Size Comparison
Trade-Off
The trade-off with having a lot of adjustability and steadiness comes at the cost of increased weight and bulk.
The Fourth Arrow Stiff Arm is one of the most popular camera arms for hunting. This camera arm is comparable to Muddy’s Outfitter arm in weight, both coming in at 4.5 lbs. The Fourth Arrow Camera Arm has increased in popularity in the hunting community because it is more compact and has less fiddle factor. The tree base attachment is well thought out.
Fourth Arrow Stiff Arm, Muddy Hunt Hard, and Muddy Outfitter Unboxing Comparison (left to right)
Fourth Arrow Stiff Arm, Muddy Hunt Hard, and Muddy Outfitter Tree Base Attachment Comparison (left to right)
Cons
Because this camera arm can be a little more jittery when it is fully extended from the tree compared to the heavier models. That said if you make sure to fasten it down snug to the tree it is very stabilized, especially with light to mid-weight cameras. It is also noticeably louder because of its rougher finish. This brushing against this finish really echos inside the hollow camera arm.
Trade-Off
The trade-off for this camera arm is that you’re sacrificing stability to have a less bulky and more compact camera arm setup.
Fourth Arrow Stiff Arm Pro
Fourth Arrow Stiff Arm Pro
Pros
This pro camera arm is the big brother to the Stiff Arm. It is bigger and heavier than all of the other camera arms in this review for very stable video and that can support very heavy camera rigs. If you’re looking for the next step up in video quality and are using heavy equipment, this is the camera arm you’ll need. It’s still a very straightforward set up just like the regular Stiff Arm.
Cons
This arm is heavy and bulky, making it more difficult to set up and carry on long trips to the treestand. It is the heaviest camera arm in this review coming in a 7.25 lbs with everything included. This camera arm is for professionals with heavy camera rigs.
Trade-Off
The trade-off with having a lot of adjustability, steadiness, and the ability to hold very heavy camera rigs comes at the cost of increased weight.
The biggest features of the camera arm are how lightweight, low-profile, and innovative compared to other camera arms on the market. Coming in at 1.6 lbs with everything included, it is by far the lightest camera arm in this review and was designed with the mobile hunter/filmer in mind.
This arm also has a very unique way of attaching to the tree without needing a large tree base. For example, once the strap is around the tree and connected to the base you will hand-tighten a screw located at the top of the base. This will push the camera base away from the tree, resulting in more pressure being placed on the strap. This results in a lot of leverage on the strap creating a very snug and sturdy fit against the tree.
Cons
Because the camera arm is very lightweight it can’t hold heavy cameras, it is only rated to 5 lbs. This camera arm has the smallest weight capacity of any of the arms in this review. It is also a fairly pricey camera arm for its size, so you will have to determine if the pros outweigh the cons for your hunting style.
Trade-Off
The trade-off with having a lightweight and portable camera arm comes at the cost of price and weight capacity in this case.
Conclusion
Hopefully, this post helped you gain some clarity on the right camera arm for you. By clicking on different headings of the Camera Arm Comparison Chart you will be able to filter the camera arms so you can easily compare specs.
You might also like my other hunting camera gear-related posts:
In this post, we are going to cover when bucks use signpost rubs. Information in this article is based on one trail camera left over a signpost rub from July 31st to December 31st to see what buck activity was like for these four months. I got some interesting information with this trail camera.
This signpost was on a black ash tree that has been rubbed for many years and I was curious to see the buck activity of this signpost throughout the Maine hunting season. I left a camera in the woods for the entire hunting season without checking them until the season was over.
When Do Bucks Use Signpost Rubs?
Based on trail camera information and observations while tracking bucks in the snow it appears signposts were used by bucks for the entire 4-month observation period. That said, as the months progressed, there were some changes to how bucks used signpost rubs.
Do Bucks Use Signpost Rubs In August and September?
Surprisingly, bucks were found using the signpost rubs during the early part of the season frequently. That said, these bucks were young. It appears that younger bucks were more active at this time of year and often visted the signpost rub, even in velvet. For the most part, they didn’t rub their antlers on the signpost at this time but were scent checking it.
It also appears that the young bucks that did visit the signpost were repeat visitors. It’s likely this signpost was located in these smaller buck’s core area because many pictures were taken of the same few small bucks.
When Do Bucks Use Signpost Rubs In October and November?
Local bucks started actually rubbing the signposts starting on October 1st. Before this, they were scent-checking by sniffing the tree.
New bucks (non-local bucks) did not show up until the last week of October for the most part. The signposts were then used by non-local bucks periodically for the entire month of November.
Bigger bucks seemed to only become active starting during the last week of October. Based on this information it is unclear if big bucks prefer to only move and check signposts during the rut or if the signpost I was observing was not in a big bucks core area during the early part of the season when bucks don’t move much.
My hypothesis is that big bucks were in the area and just preferred not to travel until the start of the rut (last week of October). This is unlike younger bucks which frequented the signposts much more often and throughout the entire 4-month period. I think bigger bucks know to conserve their energy for the right time of year.
Unlike early in the season, none of the bigger bucks were captured on camera a second time. So it appears these bigger bucks were using the signpost to gauge deer activity while they were in the area briefly.
Do Bucks Use Signpost Rubs In December?
Signpost scent-checking by non-local bucks declined in December. With the rut winding down it appears there was less interest in the signpost. It appeared to still be used for scent checking but the signposts were not rubbed on and no big bucks were observed during the month of December.
Signpost Rubs and Daylight Activity
It also appears that the biggest bucks used the cover of darkness to their advantage when checking signposts. I expected to see big bucks using signposts just as often in the daylight as dark during the rut in the big woods. More data will need to be collected to determine if big bucks prefer to use signposts at dark.
Conclusion
I think more trail cameras on different signposts are needed to get a better idea when bucks use signpost rubs. That said, it is clear that bucks will use signposts all year long because they are a communication rub for bucks in the area. They also seem to act as communication hubs for new bucks entering an area during the rut. It also seems like big bucks are less likely to use signposts until the rut starts in late October.
Signpost Rub Trail Camera Photos (July 31st – Dec. 31st)
Below is every trail camera photo that was taken by the Moultrie trail camera I had placed over the signpost from July 31st to December 31st. I chose to keep every photo so you can see exactly how deer use the signpost rub throughout the year (This has been deleted because there were too many photos, please see YouTube video above for this information).


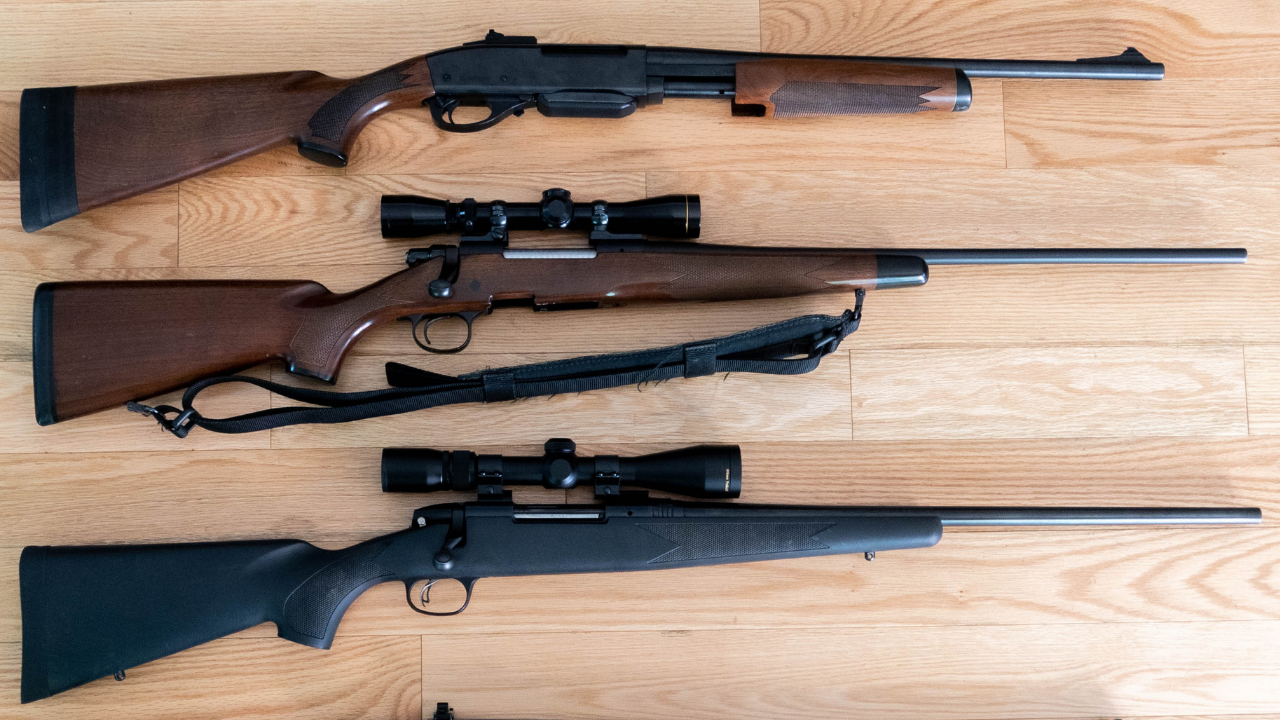


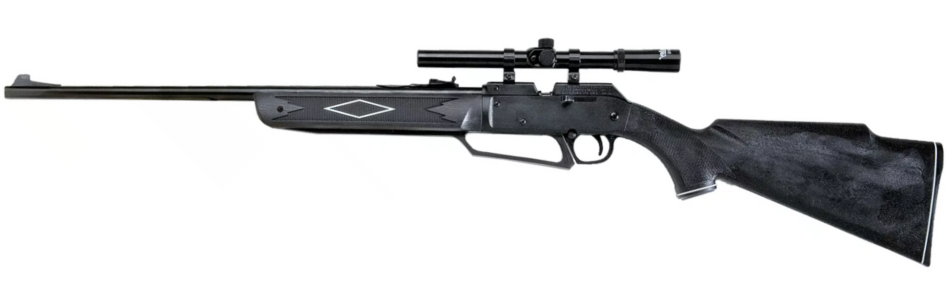
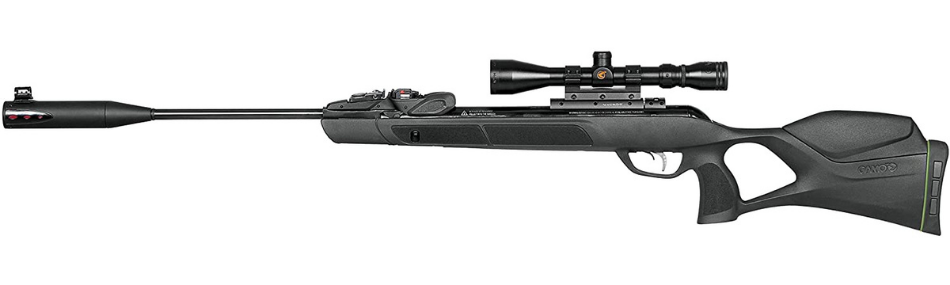
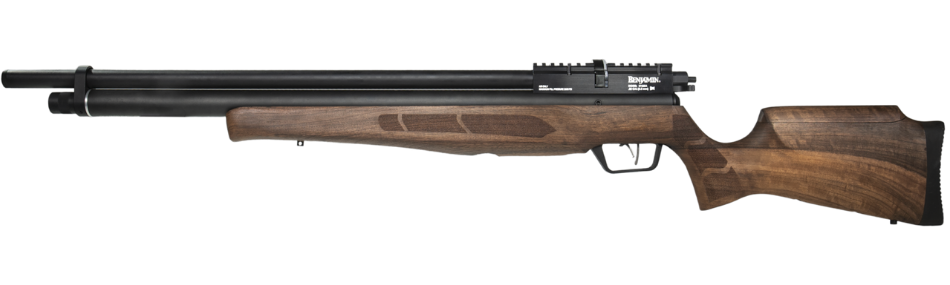


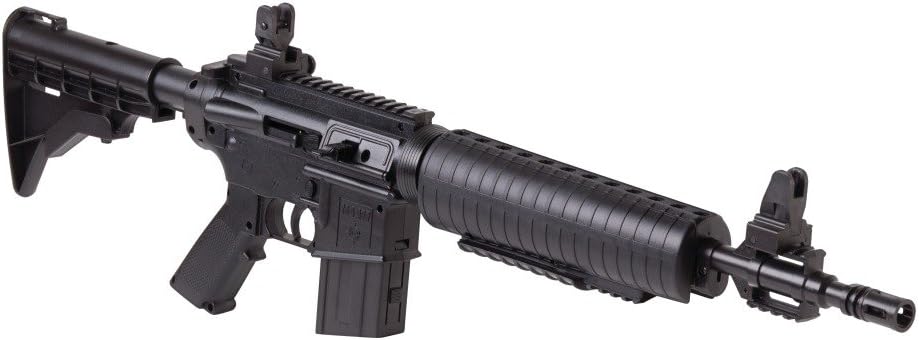
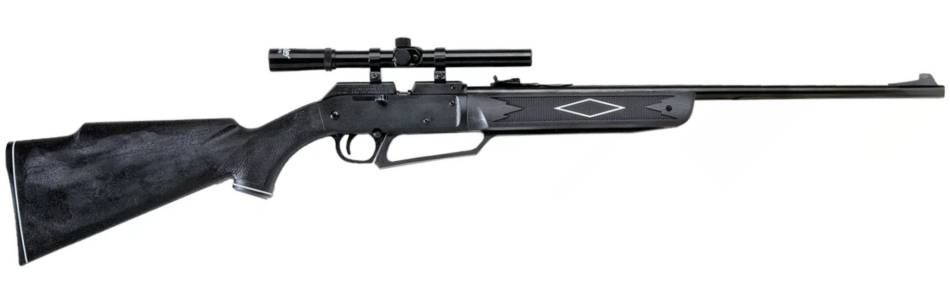


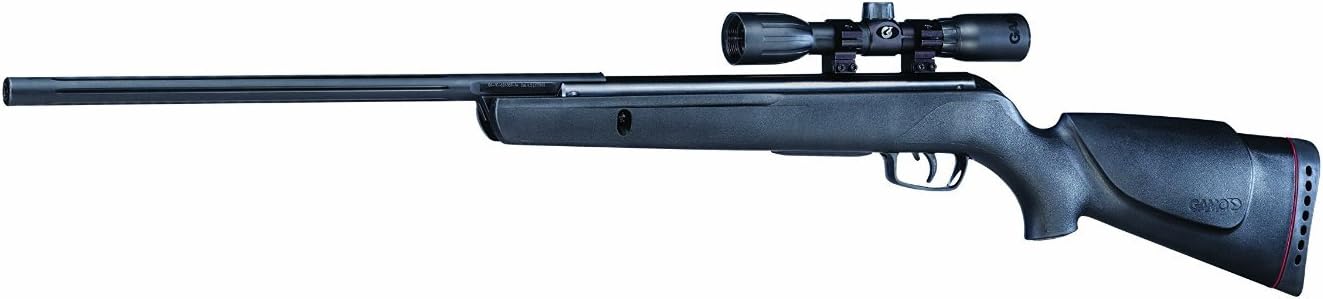


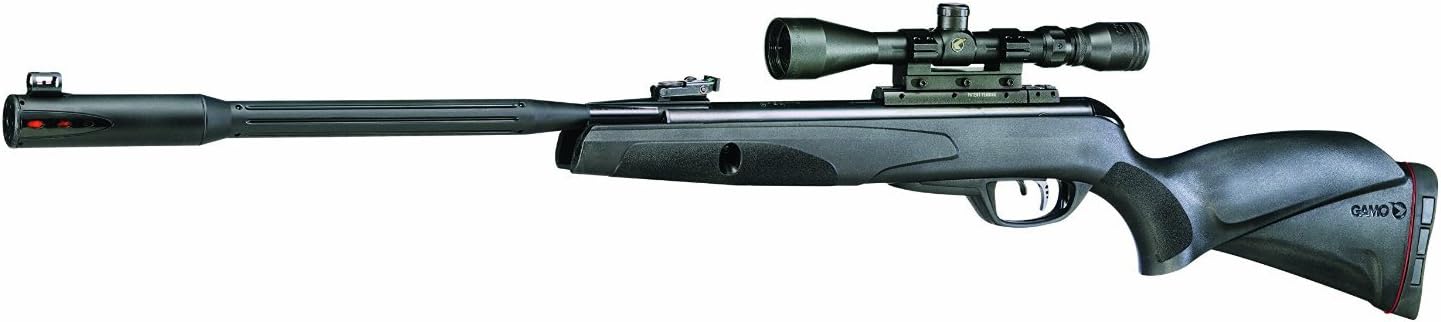


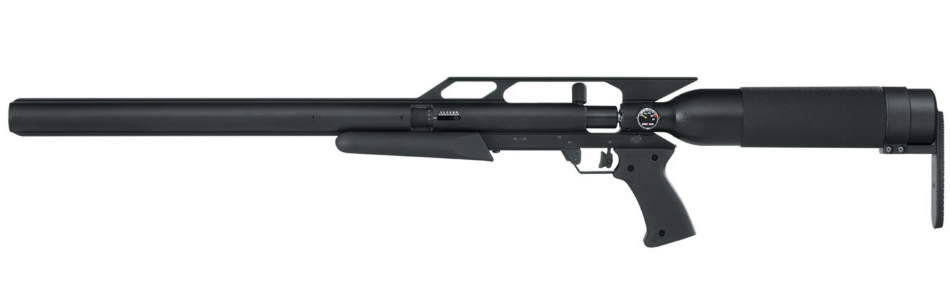

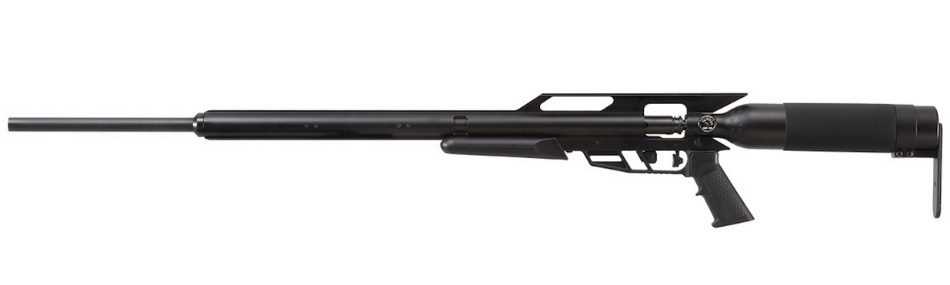


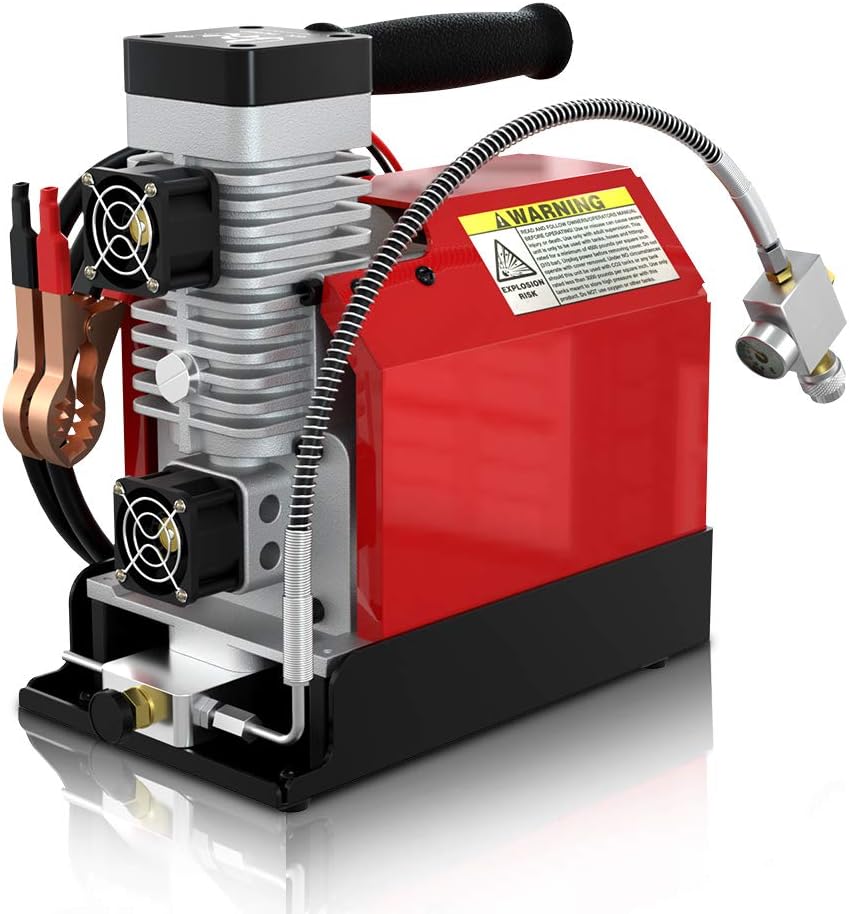
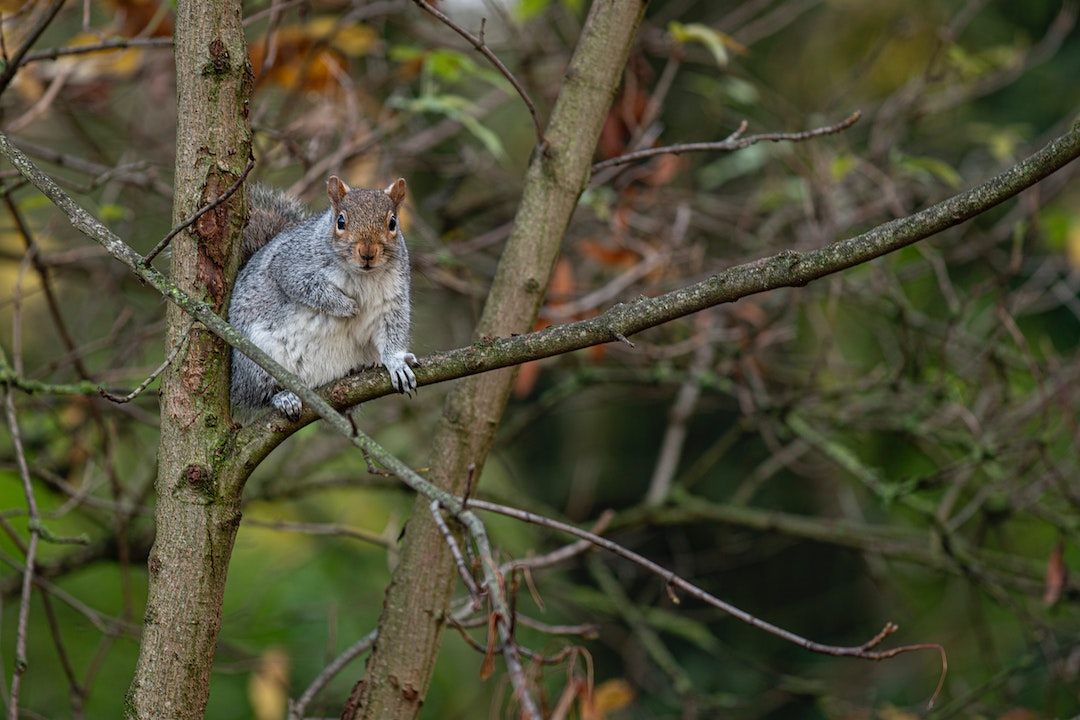
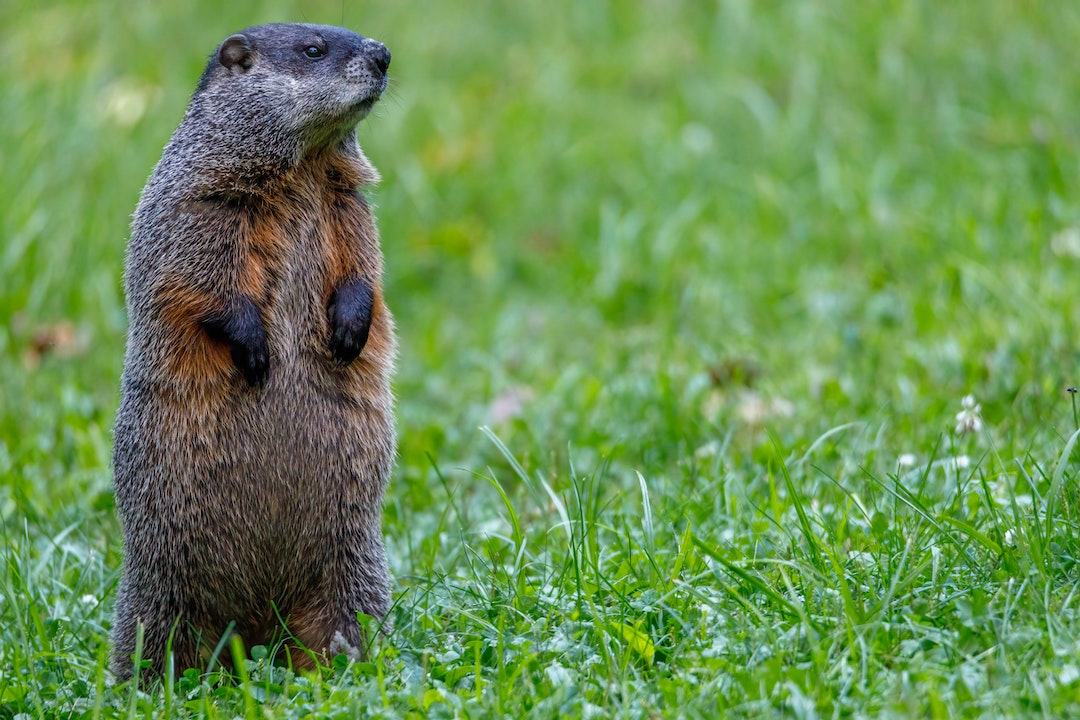

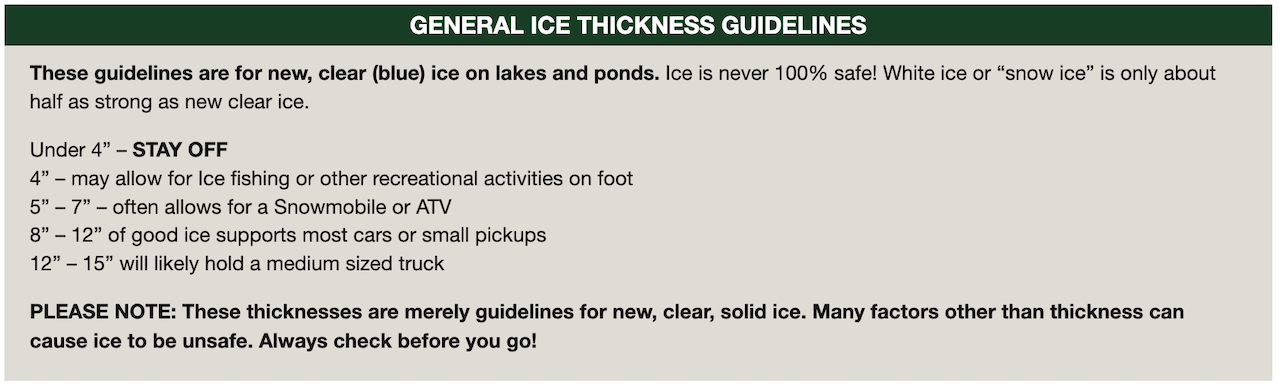
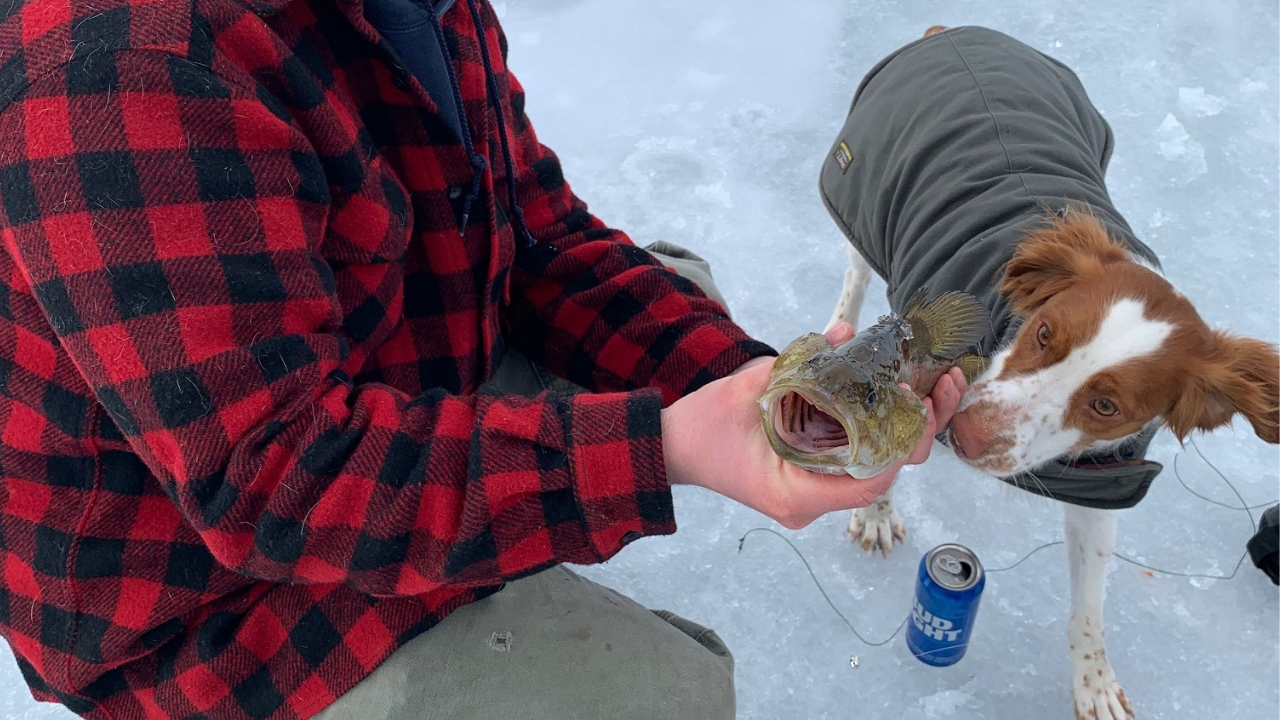
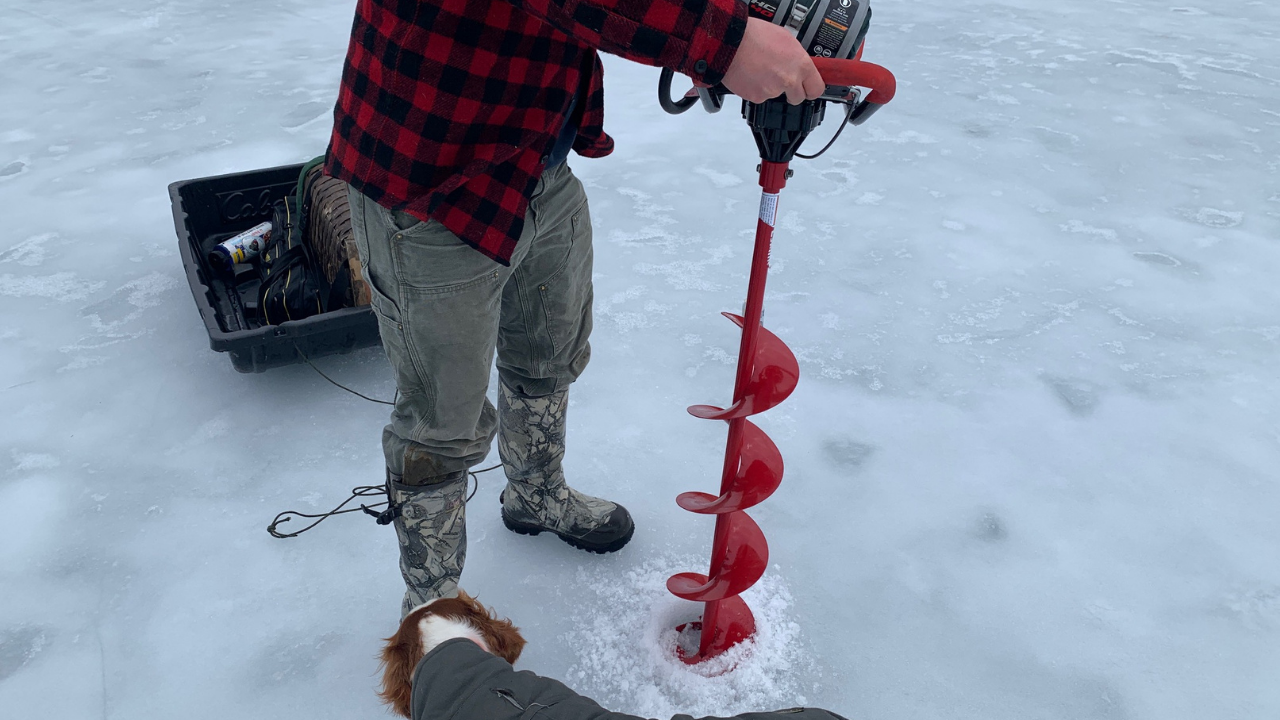
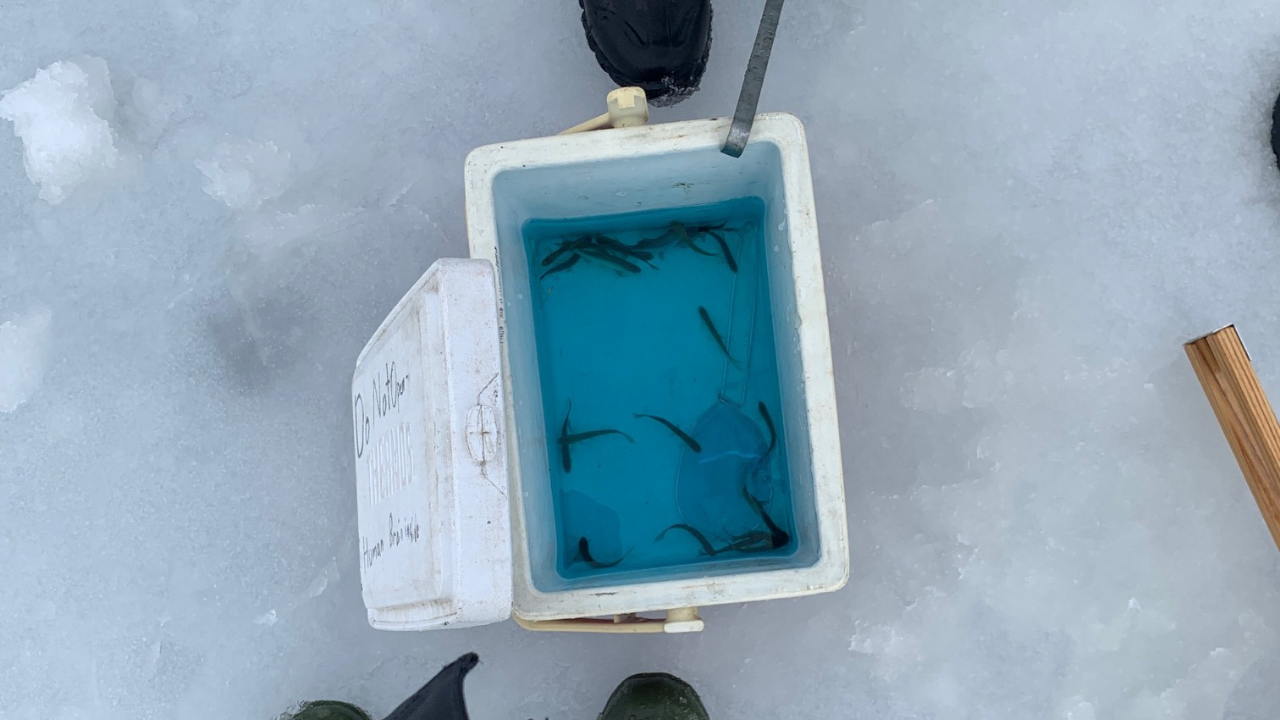
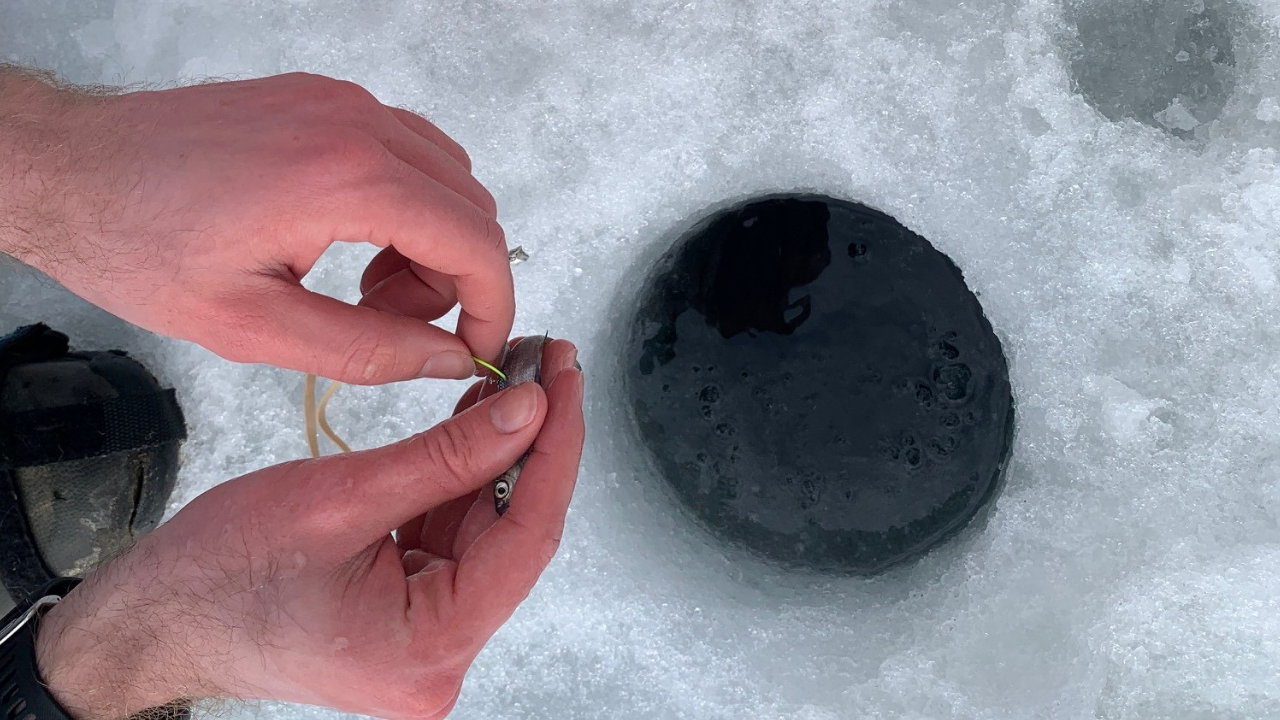
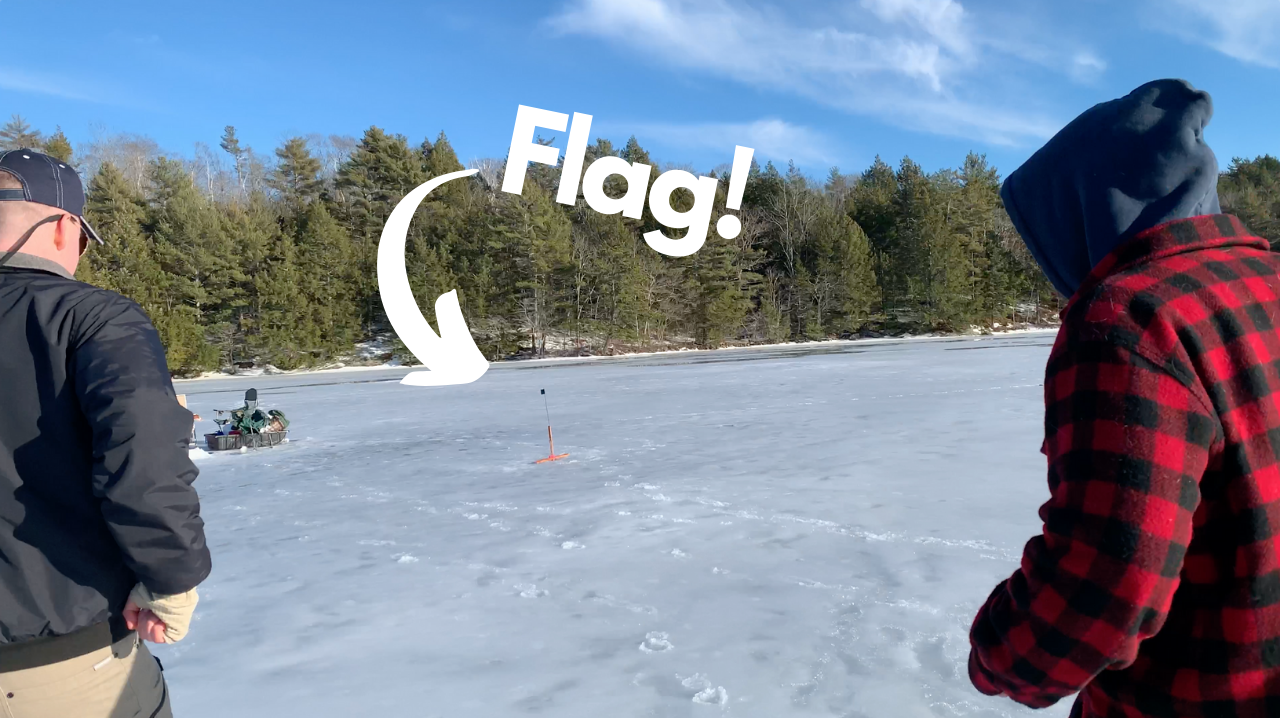
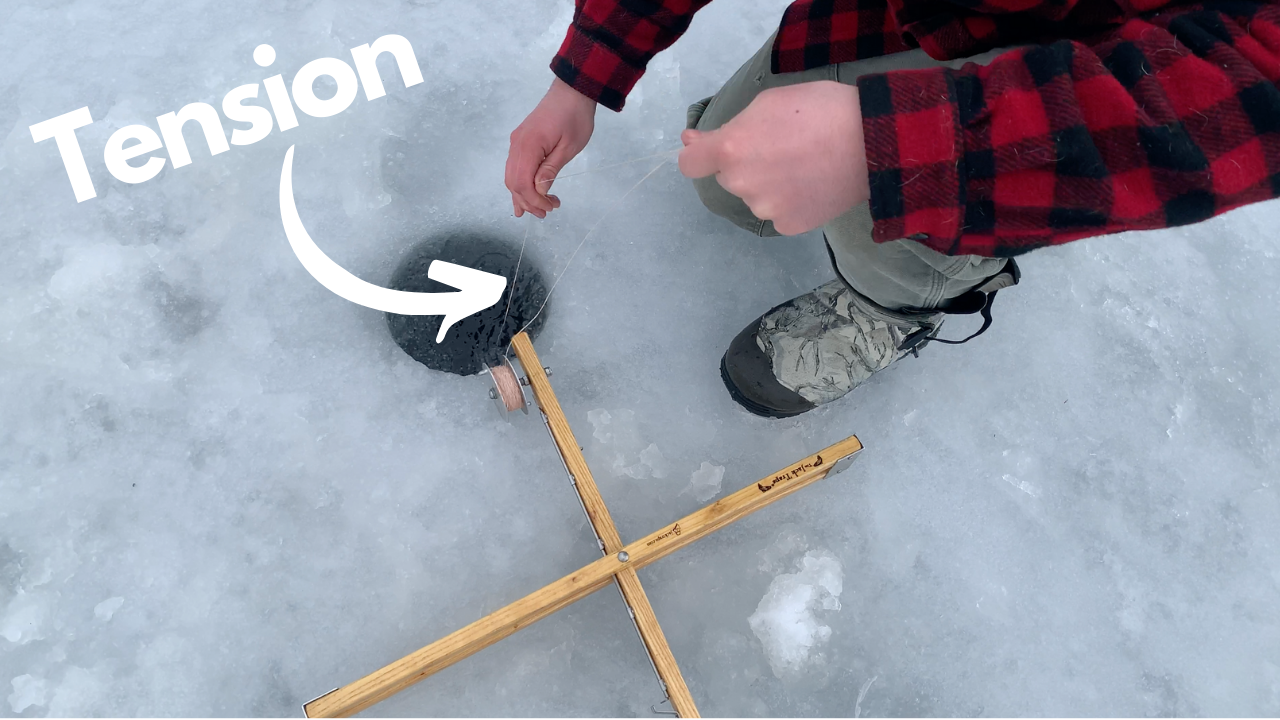
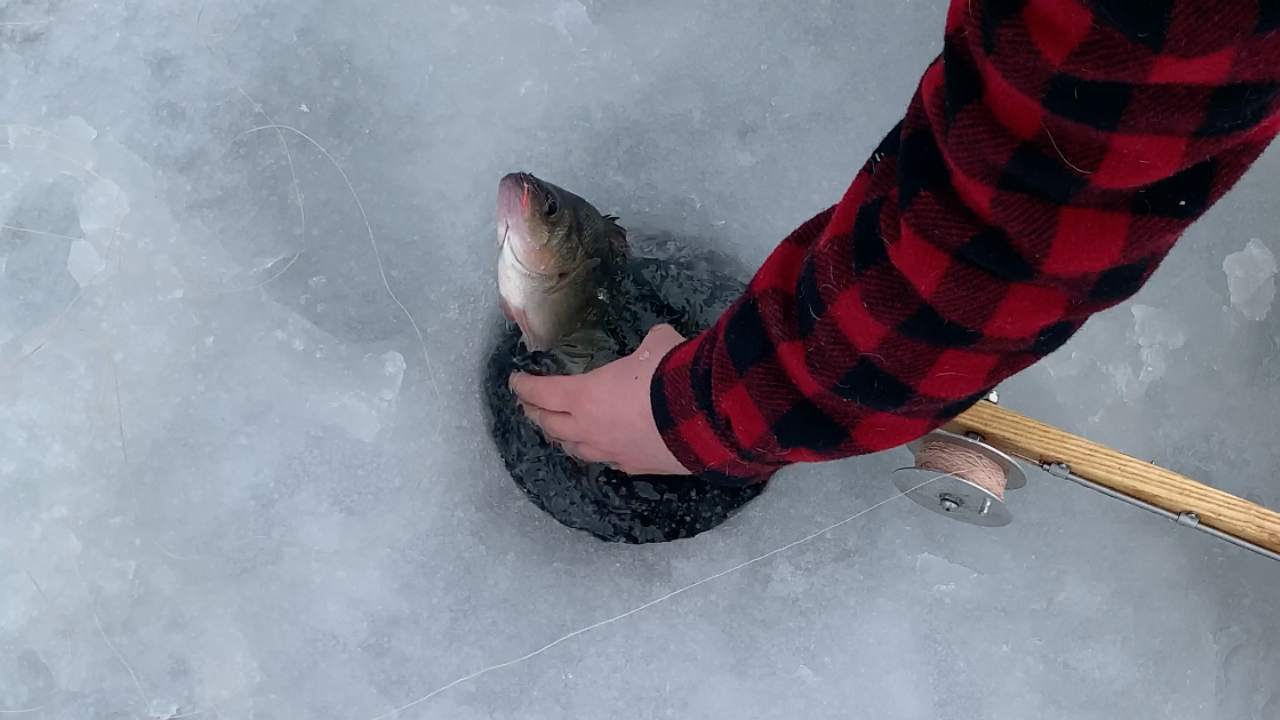


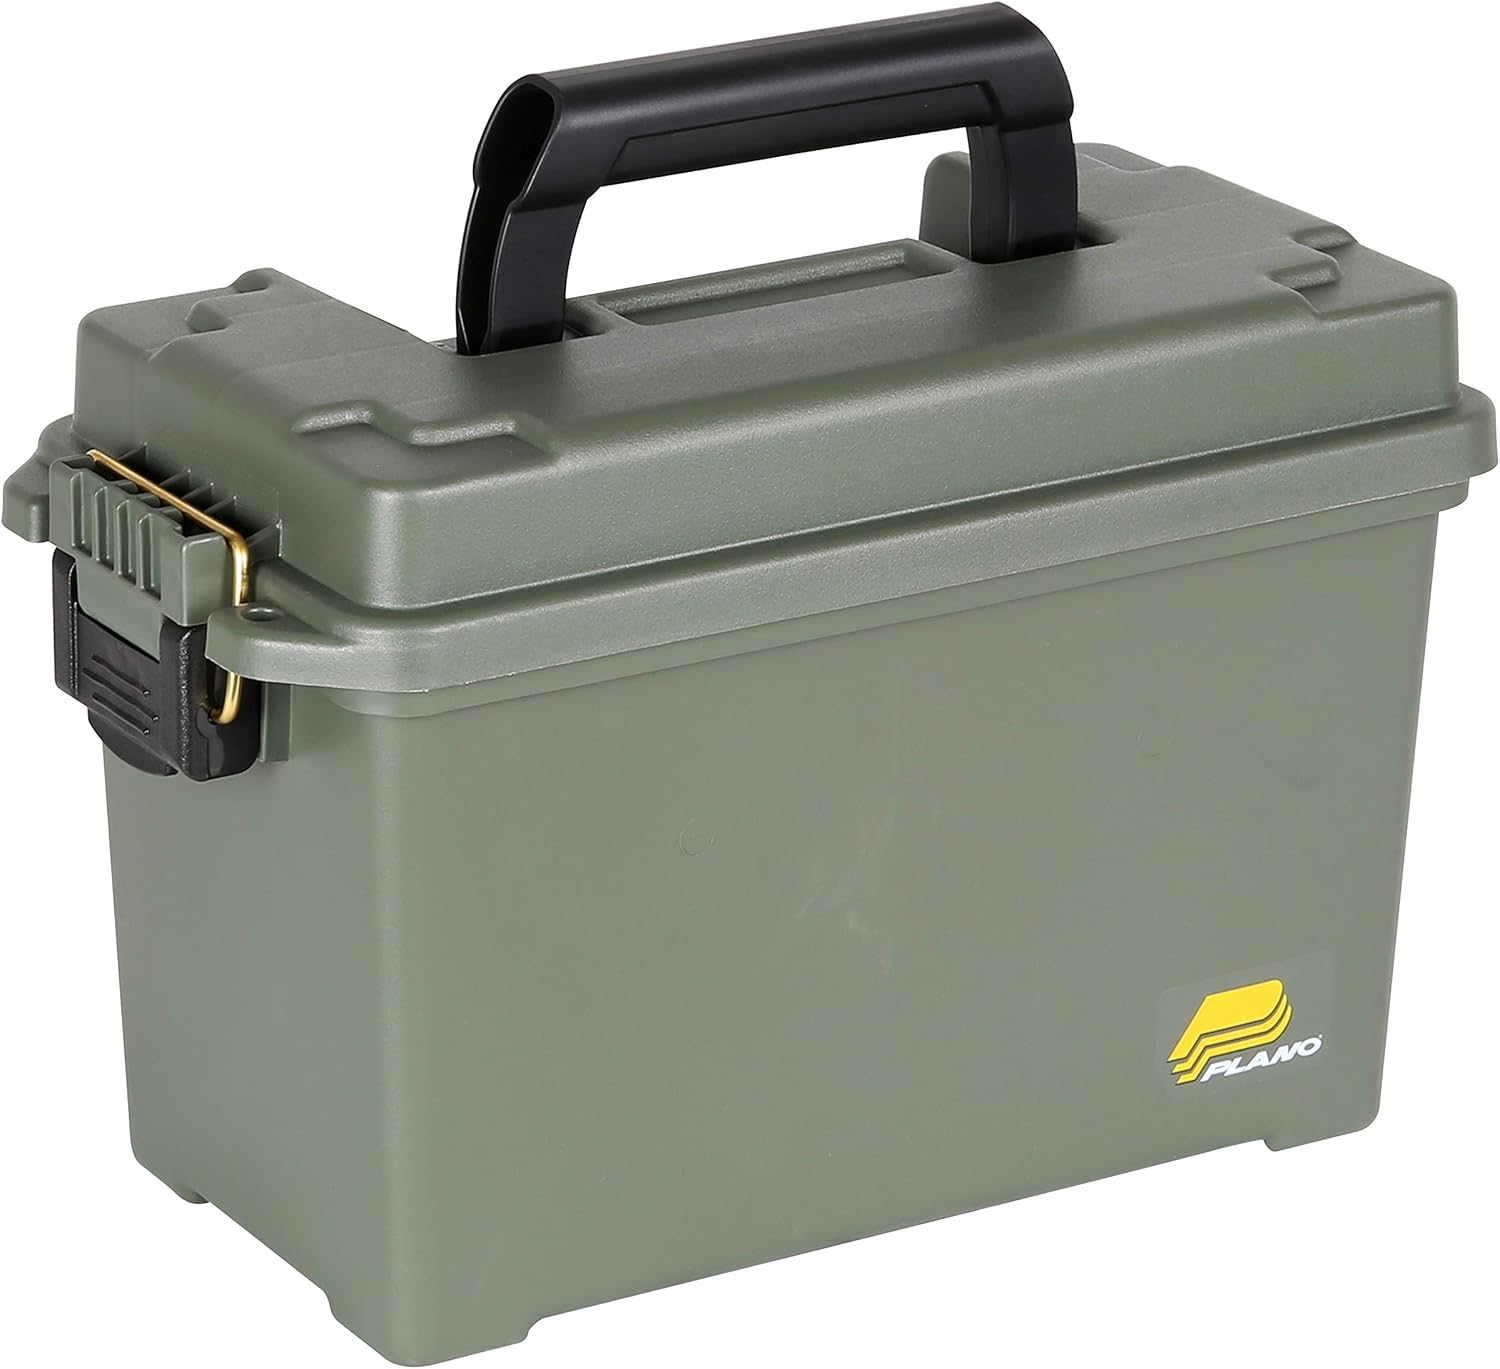
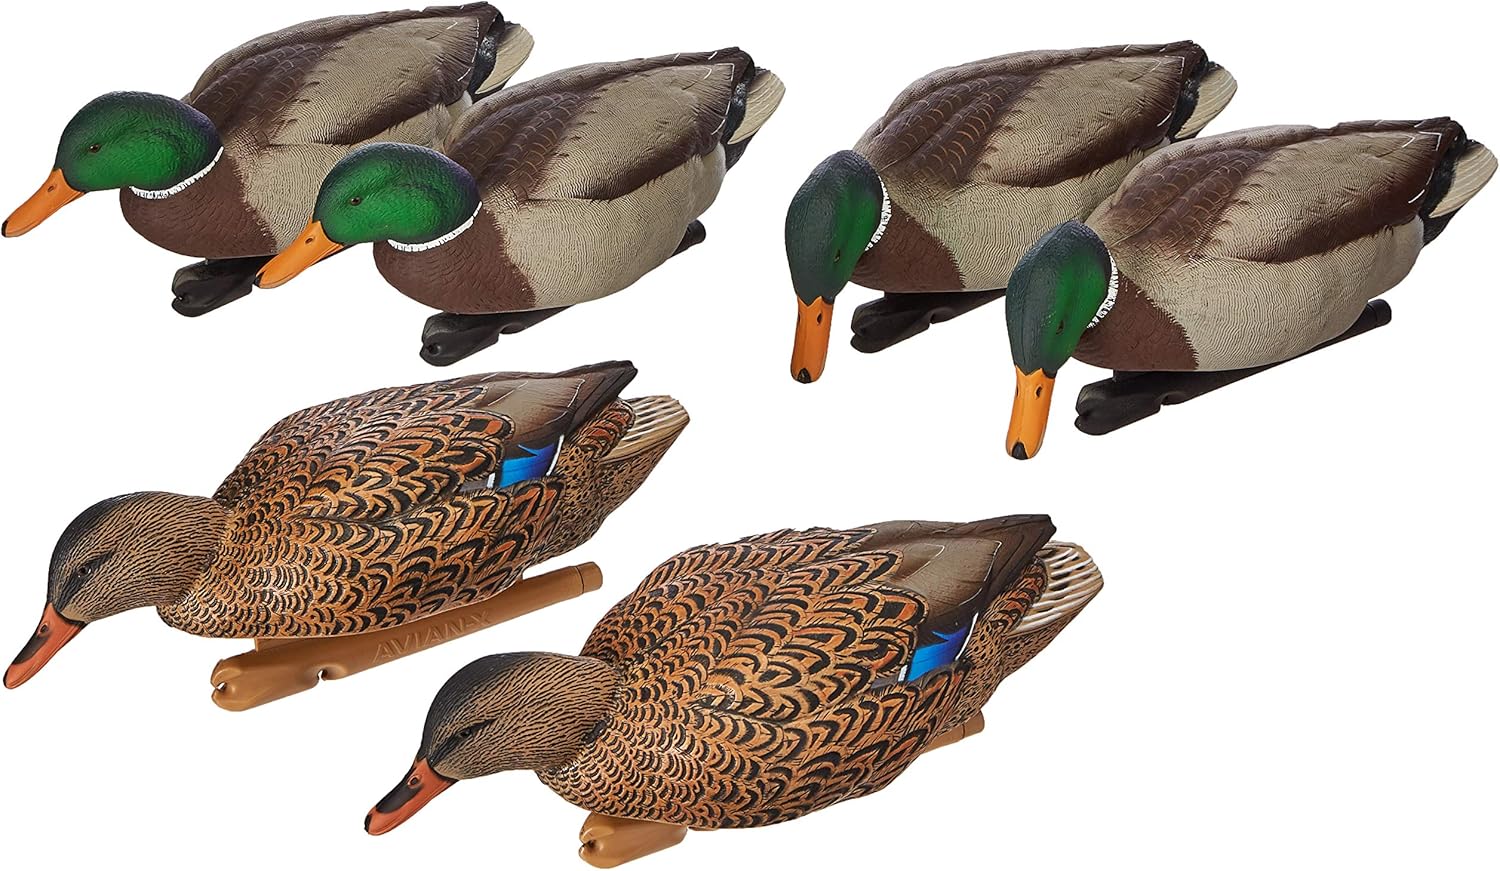
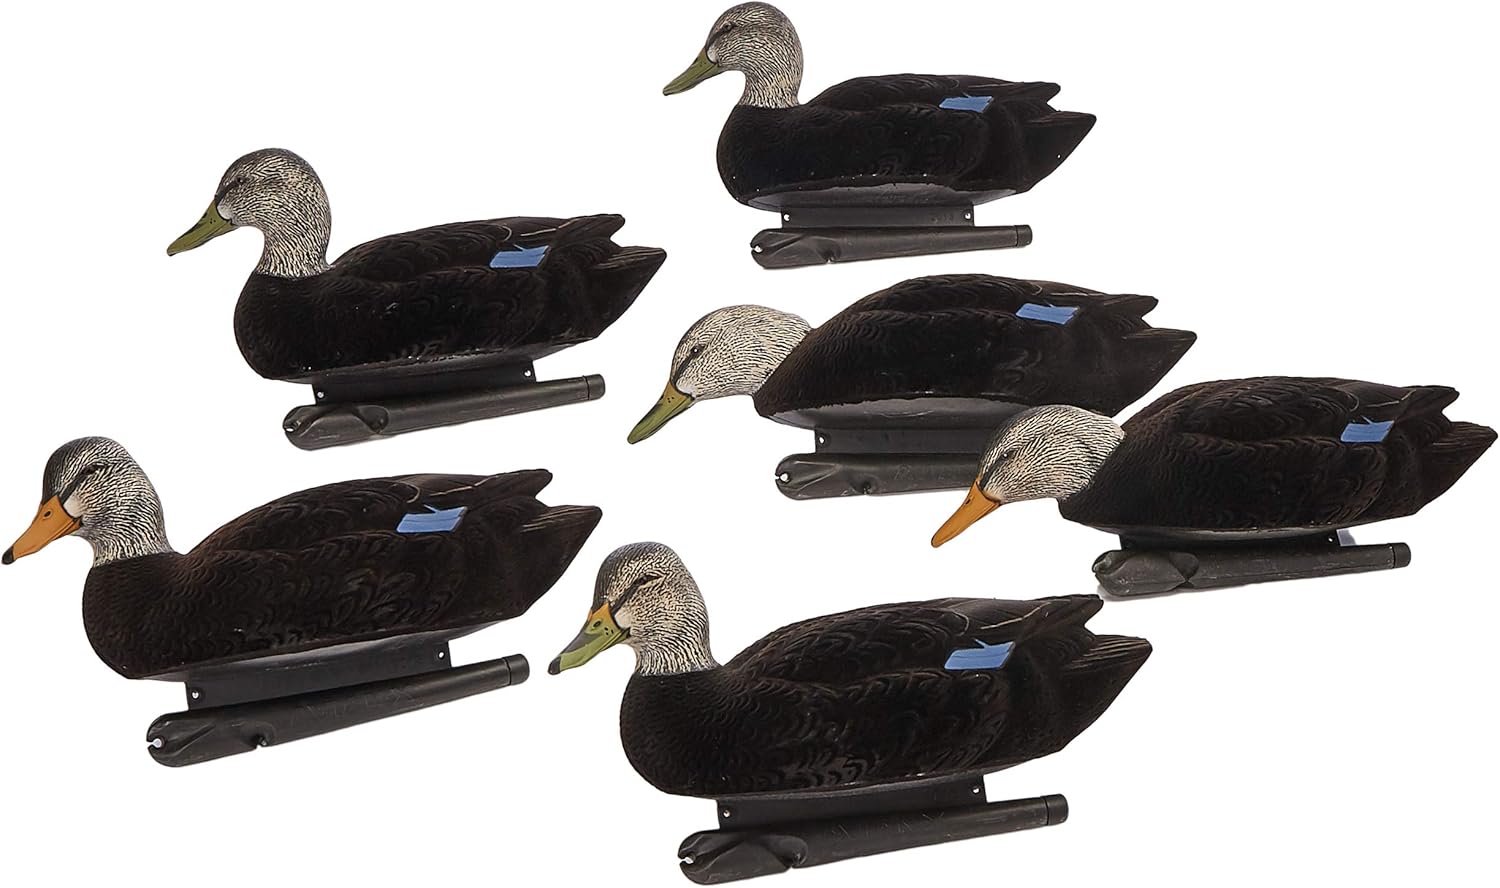
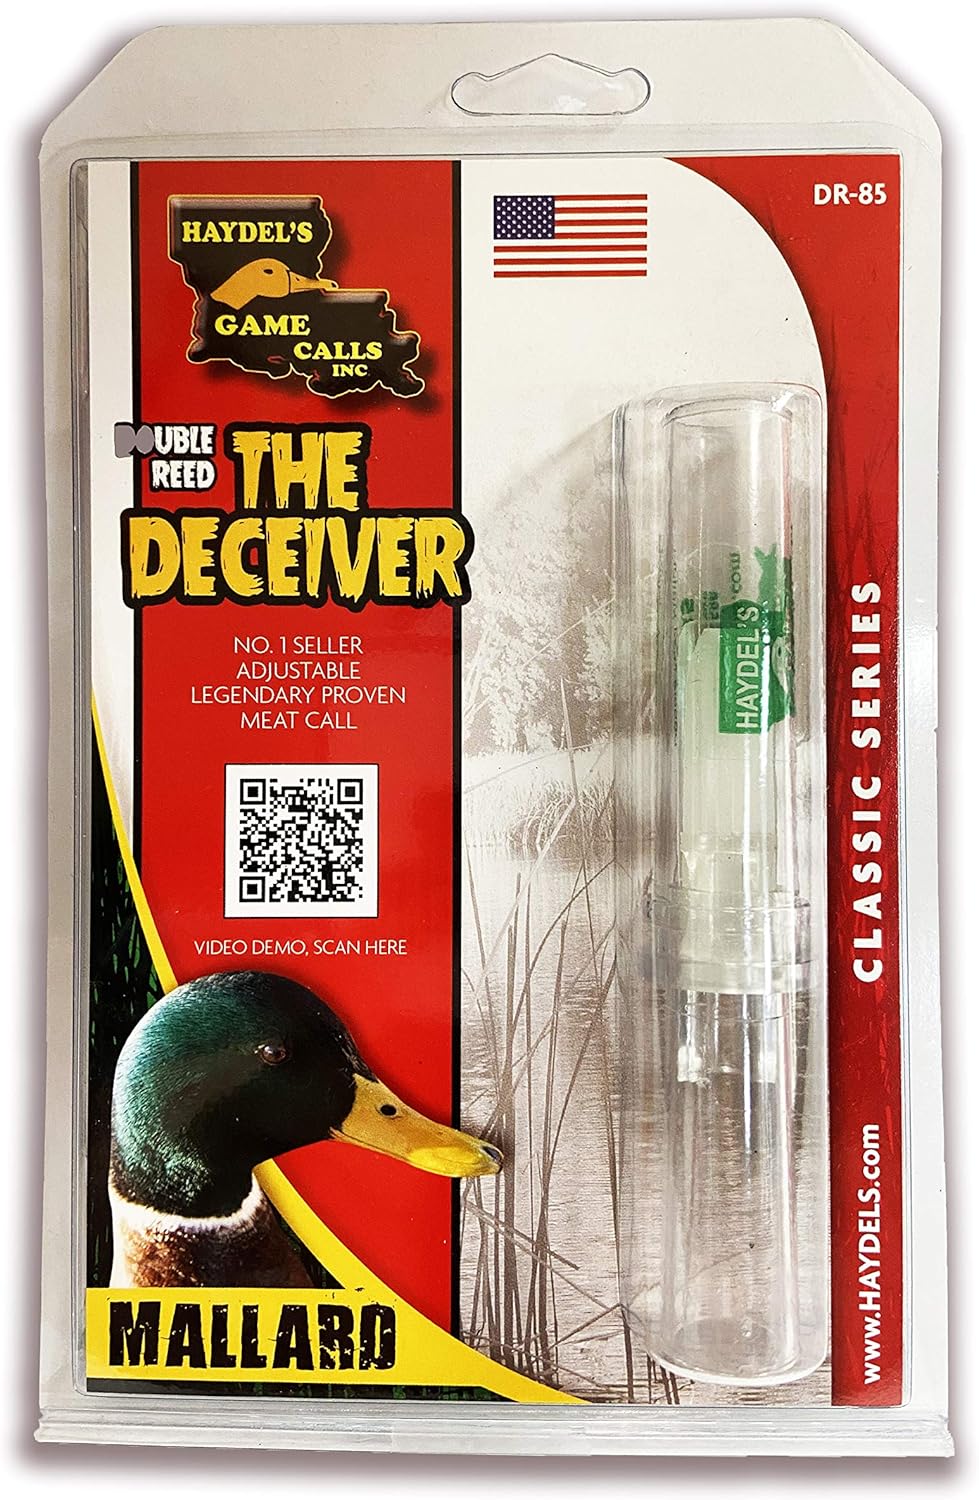
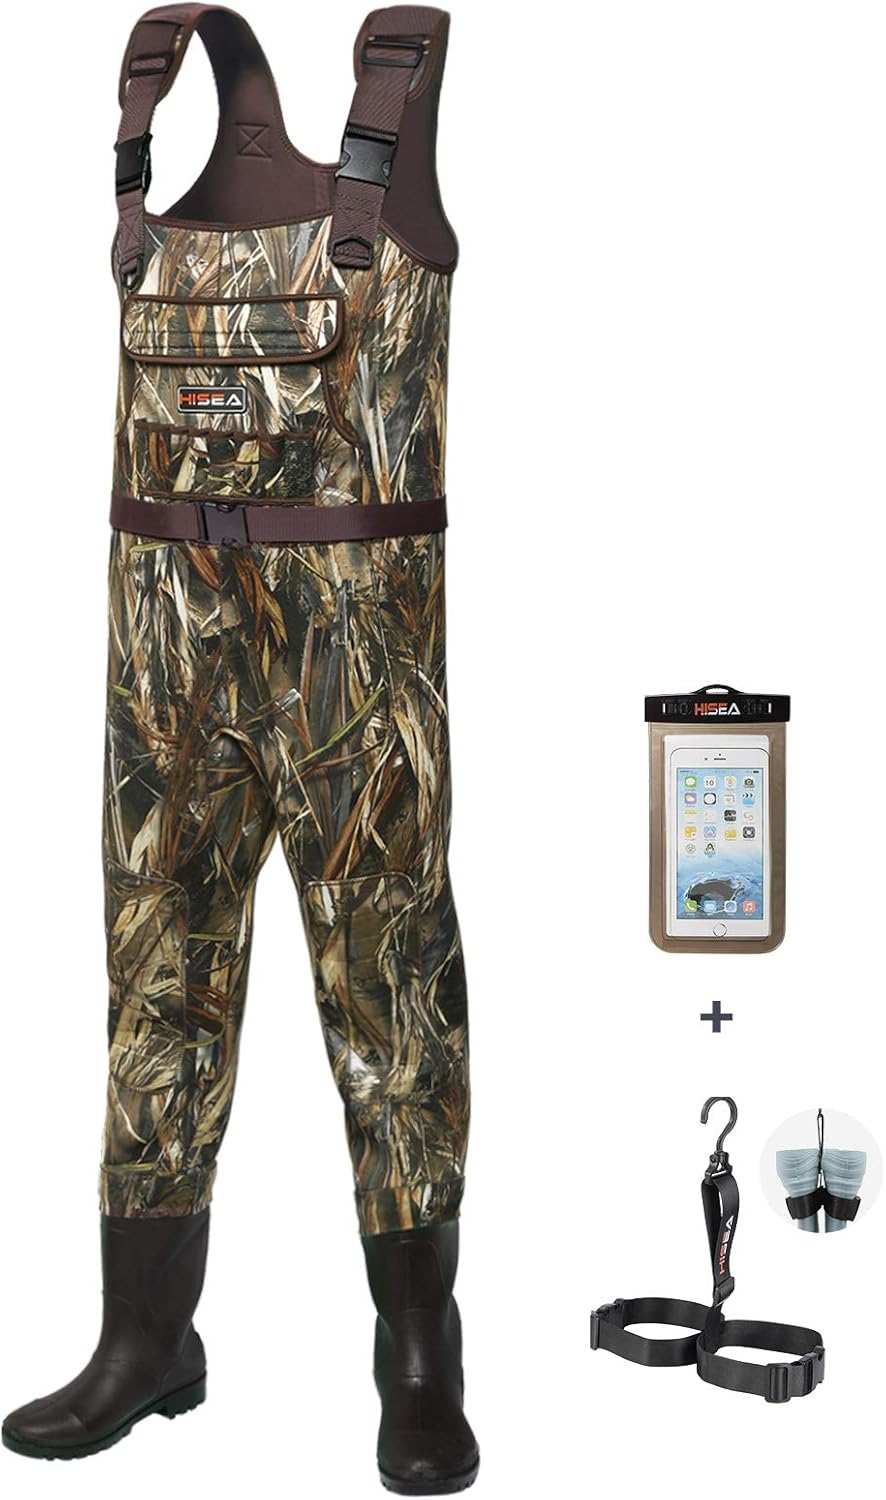

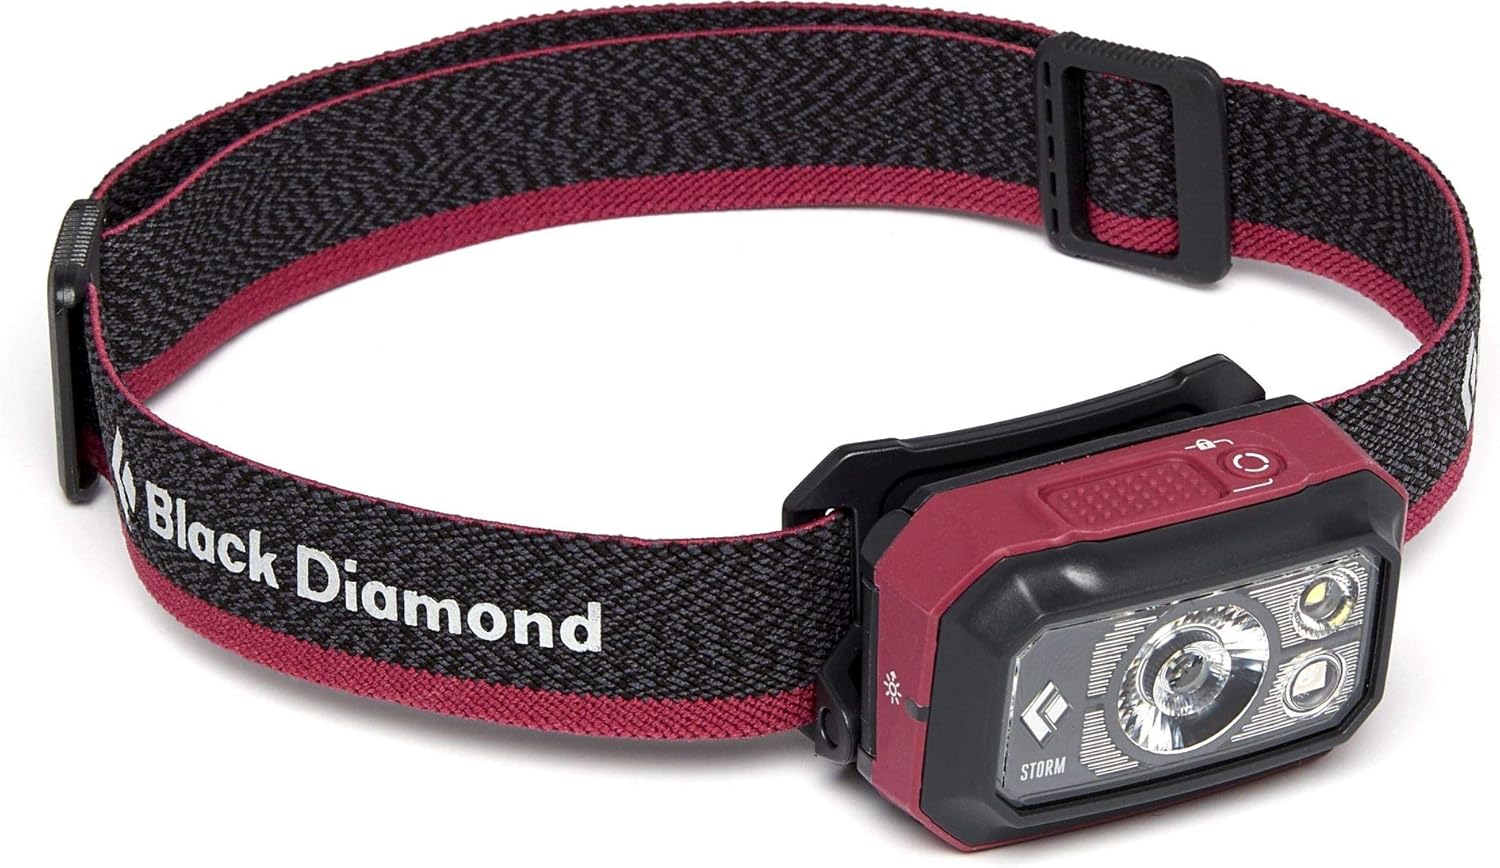
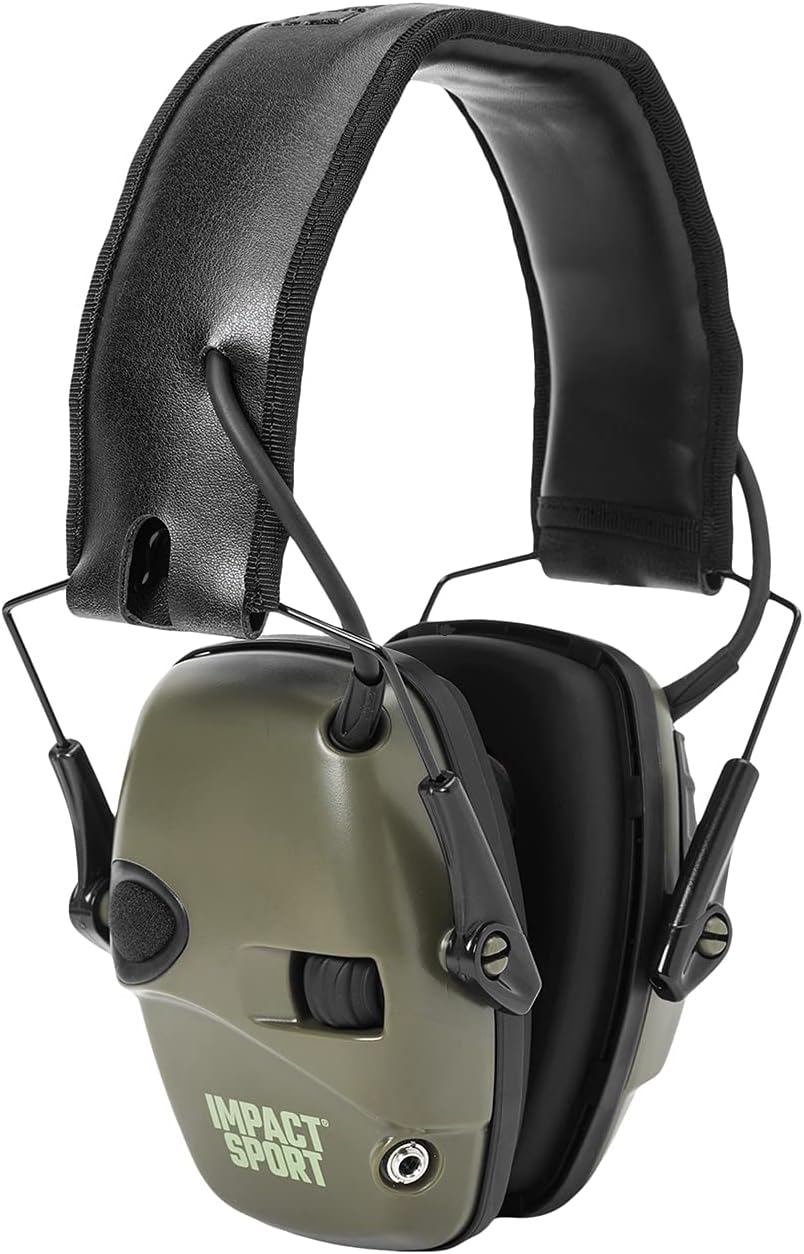

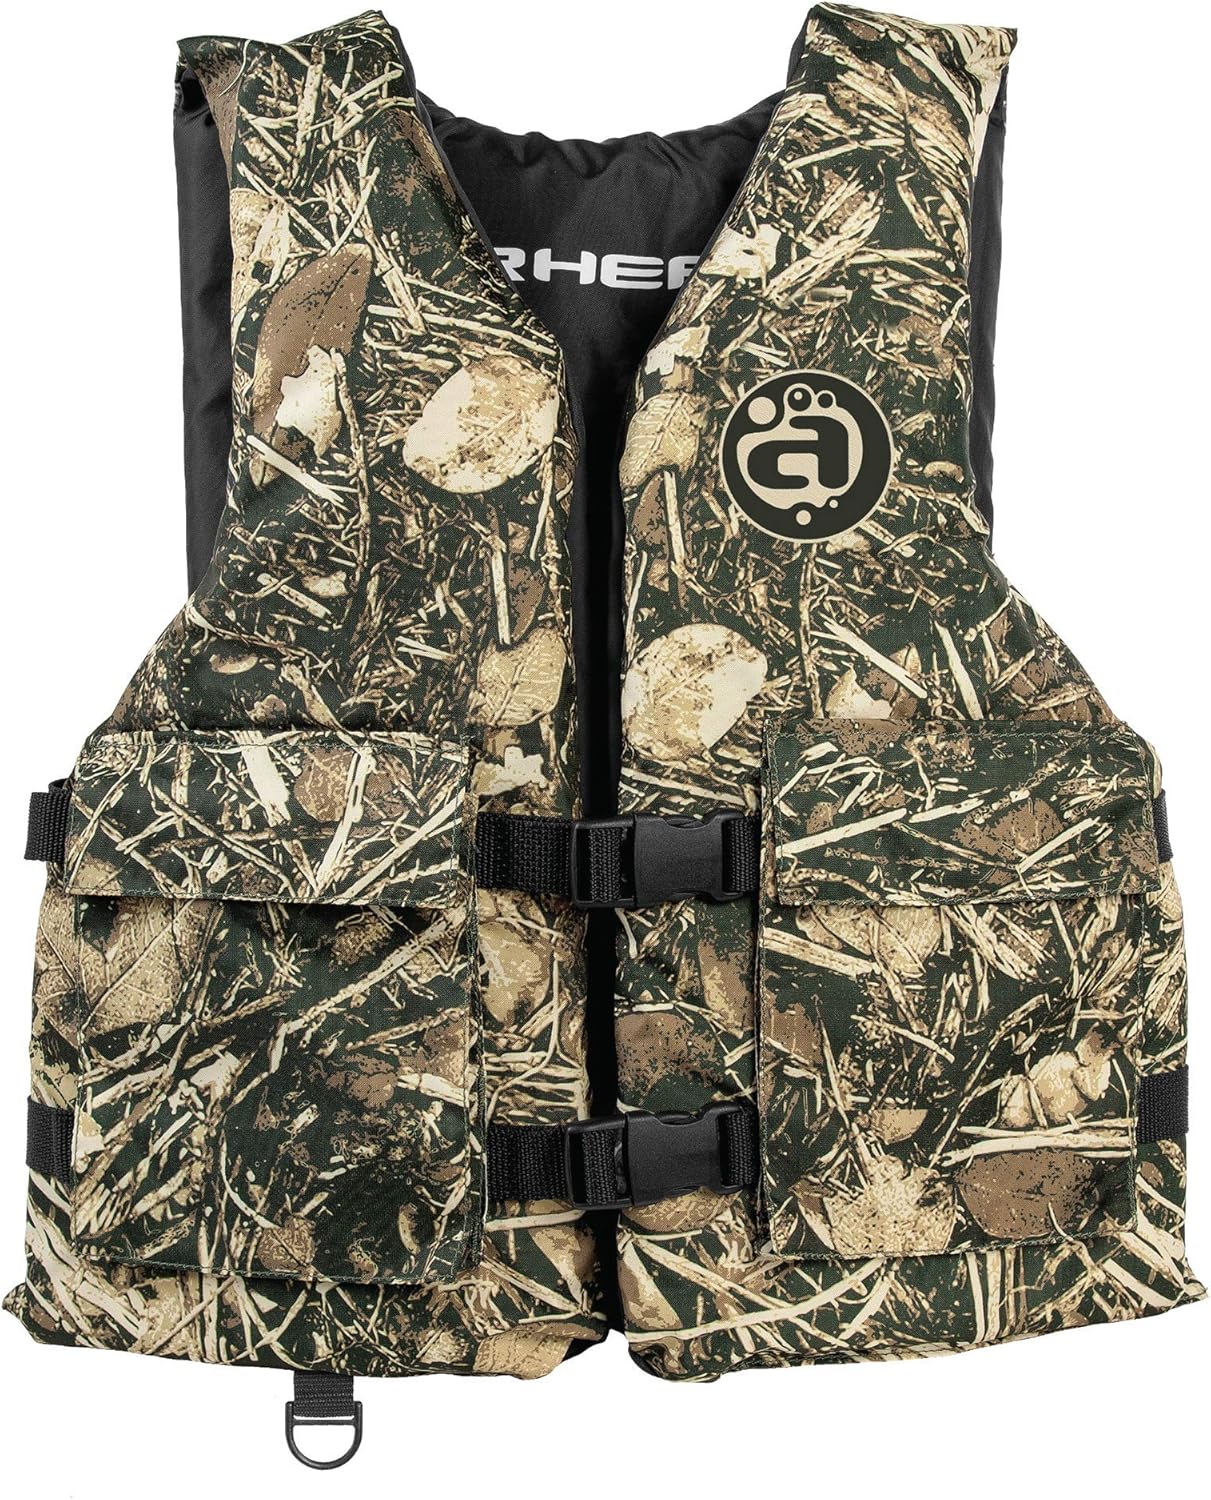
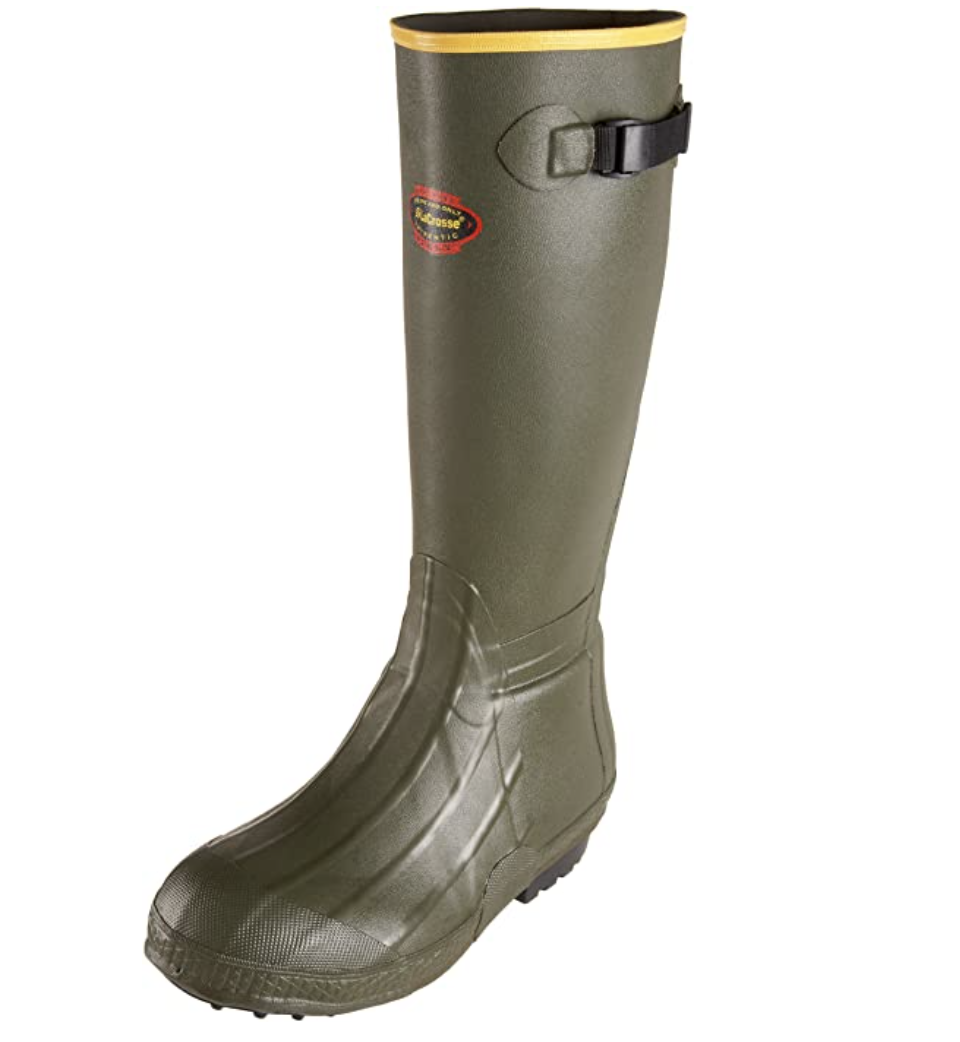
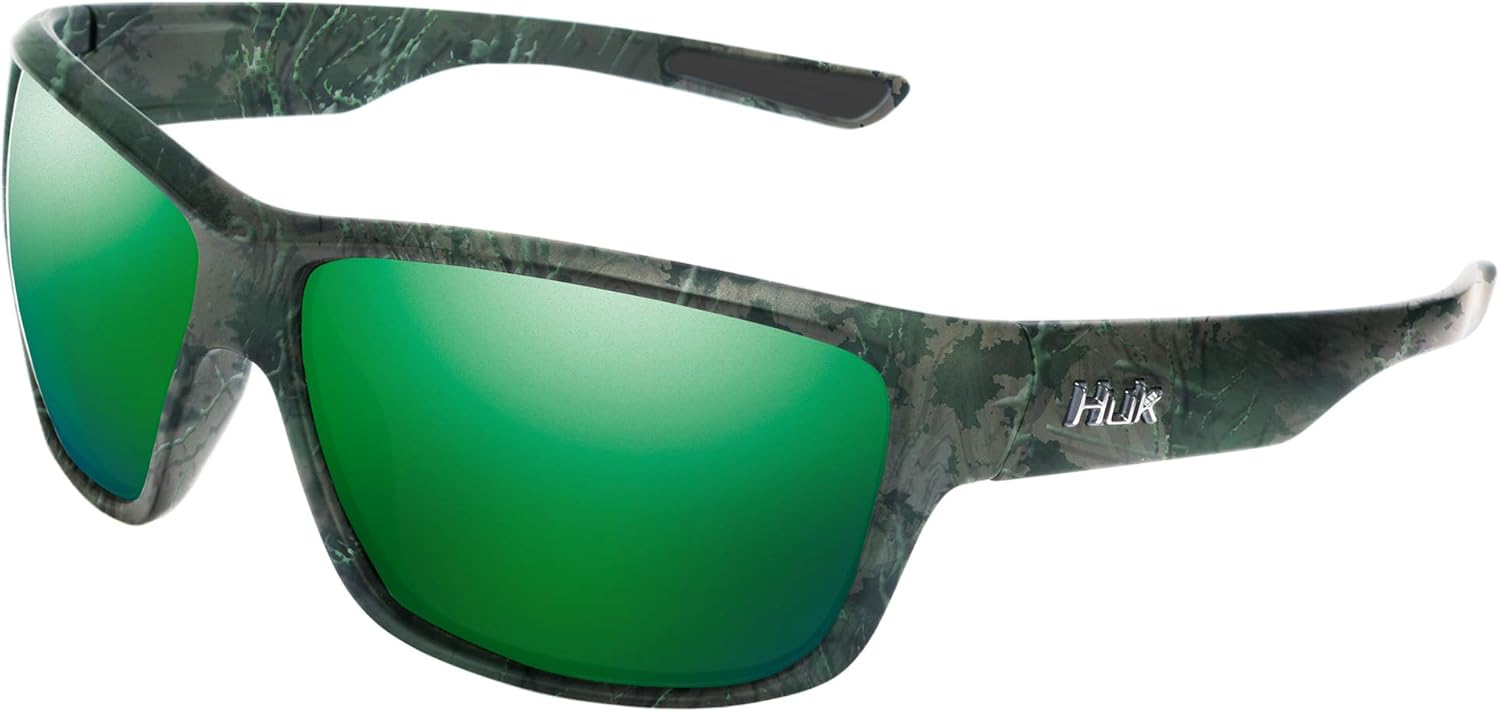
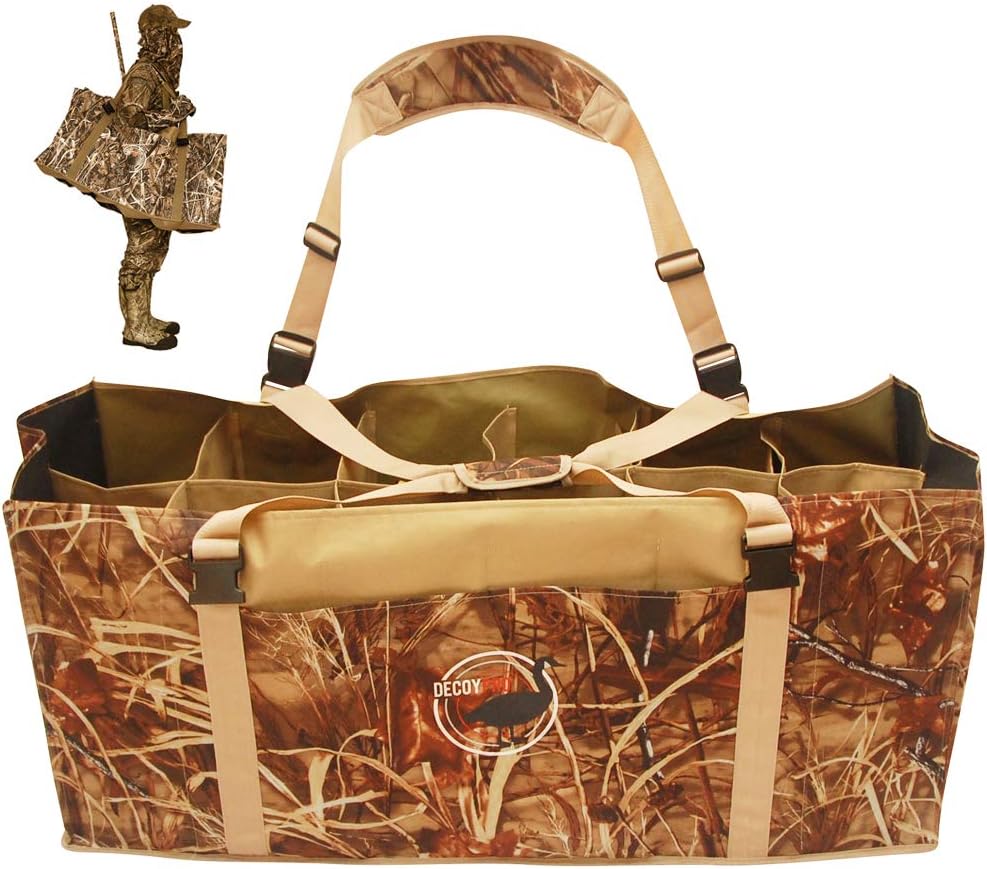

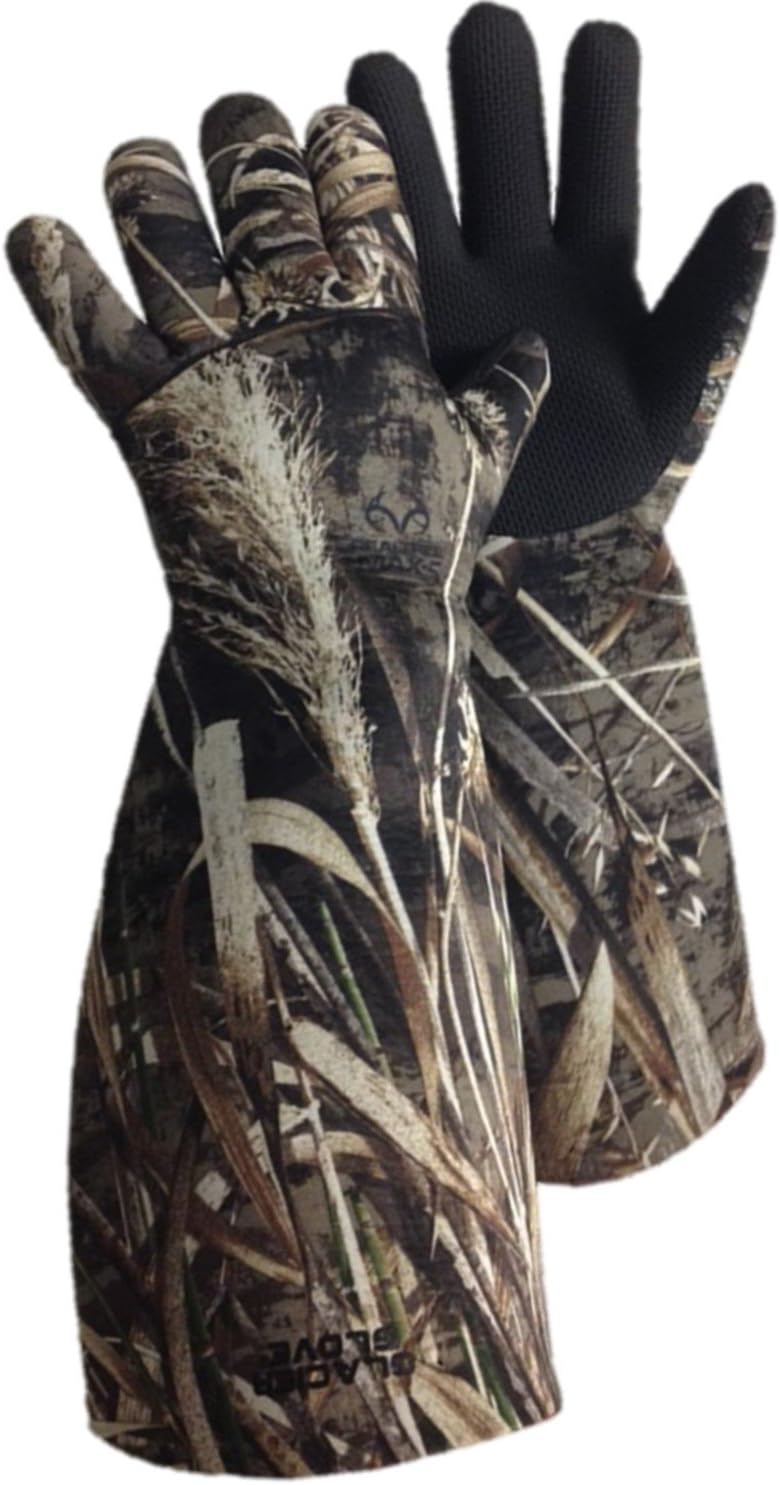


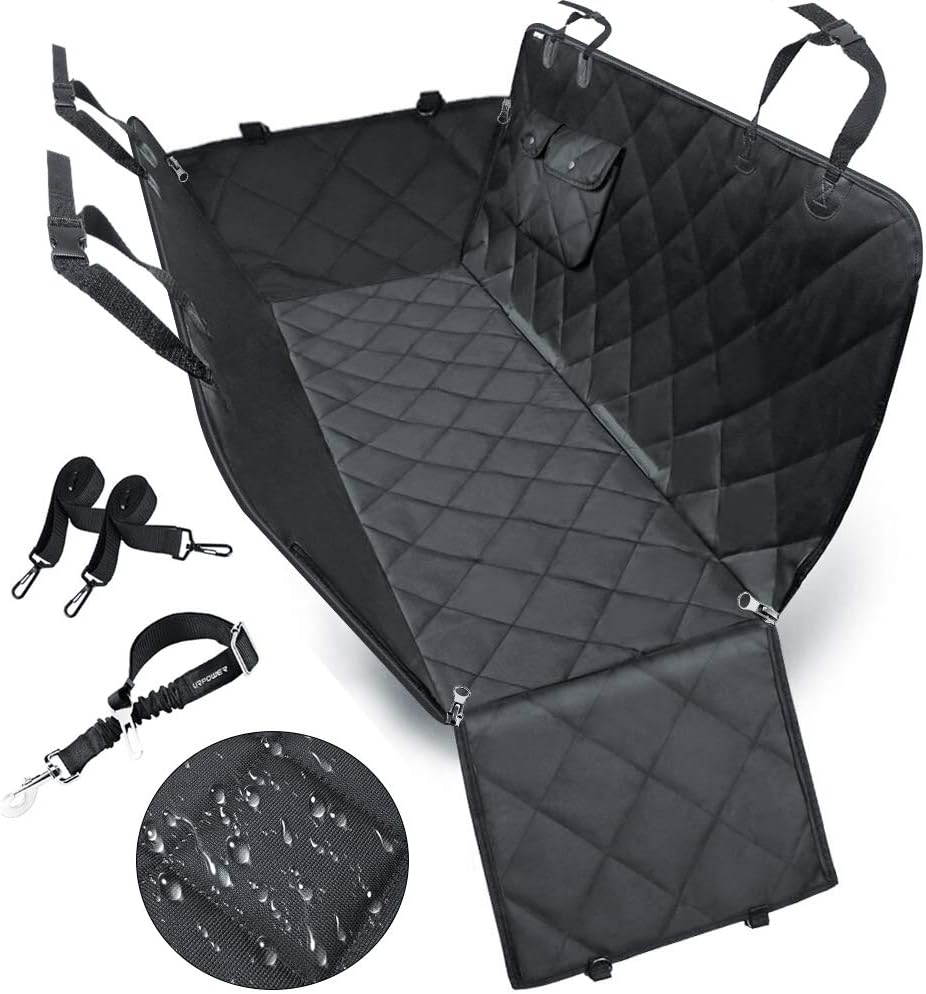
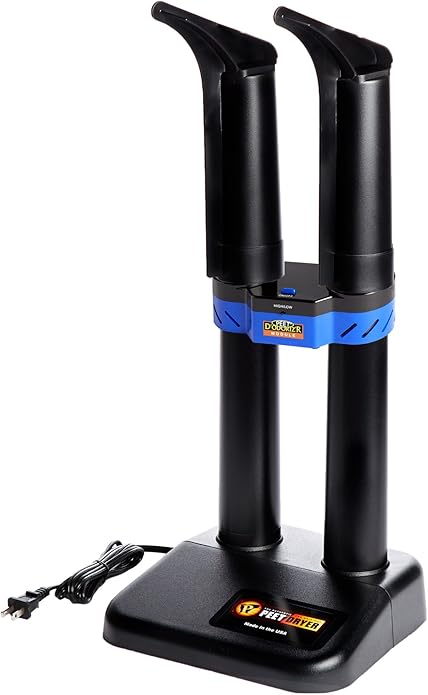
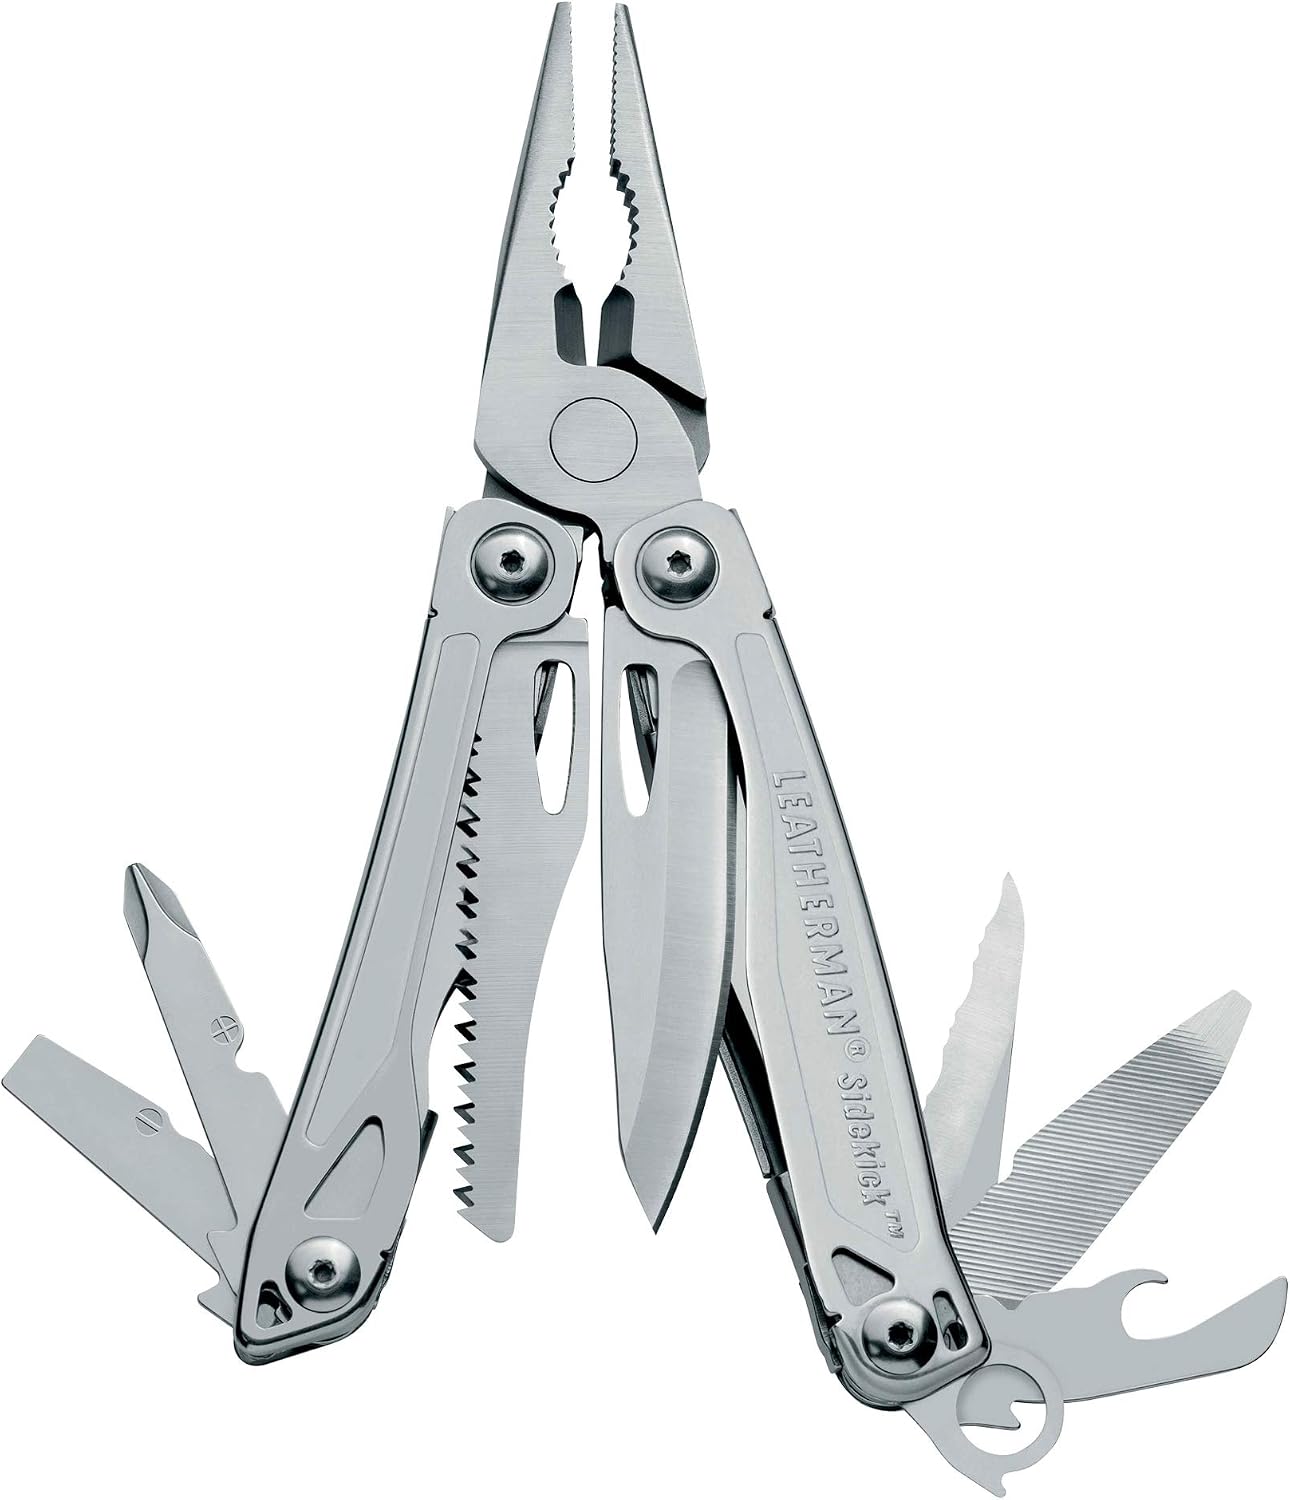
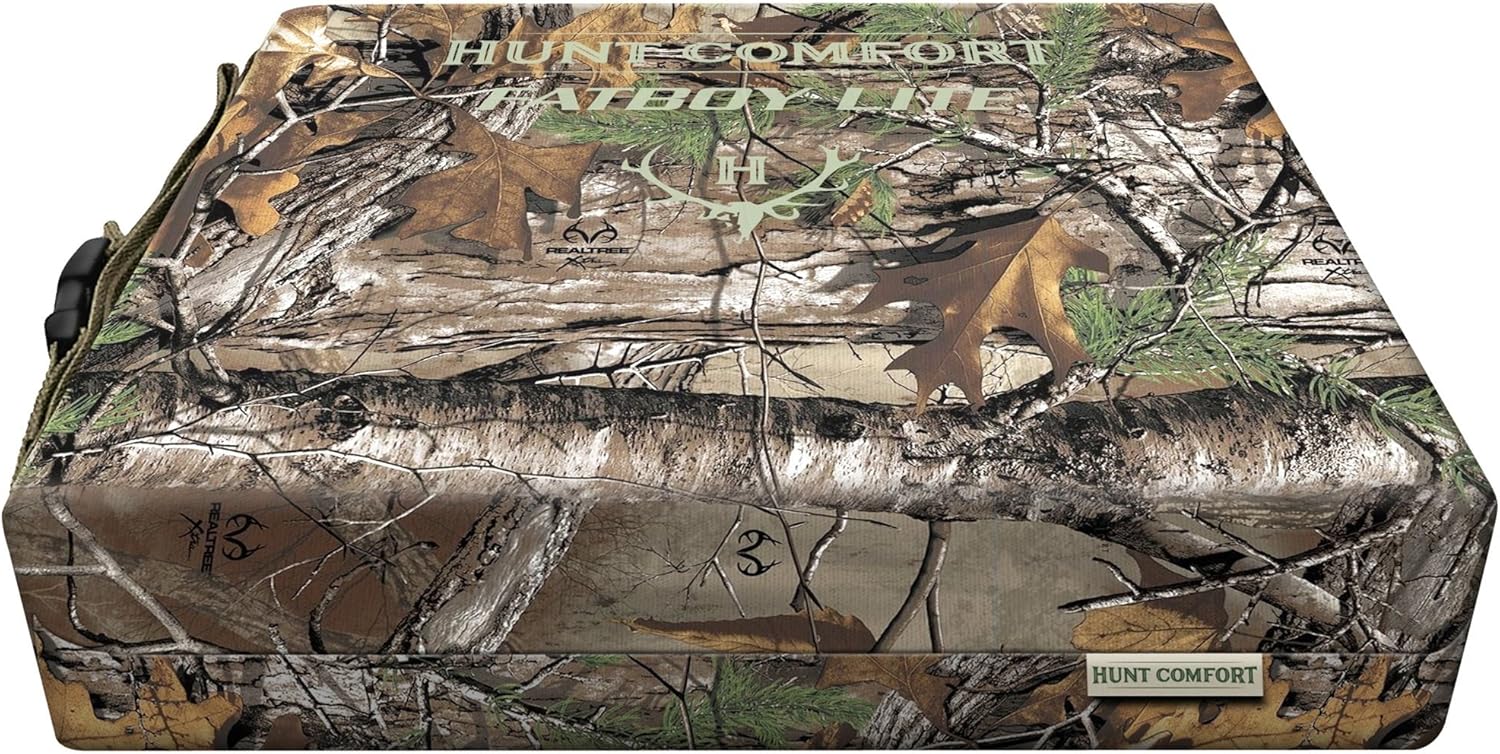
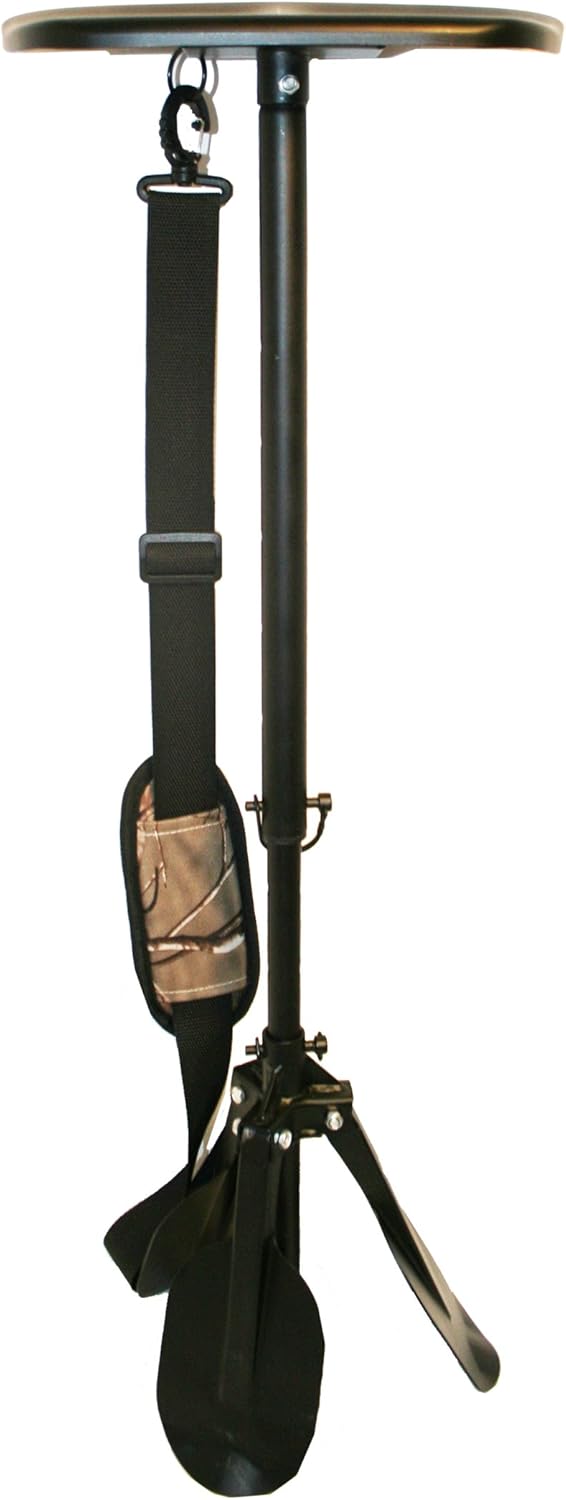

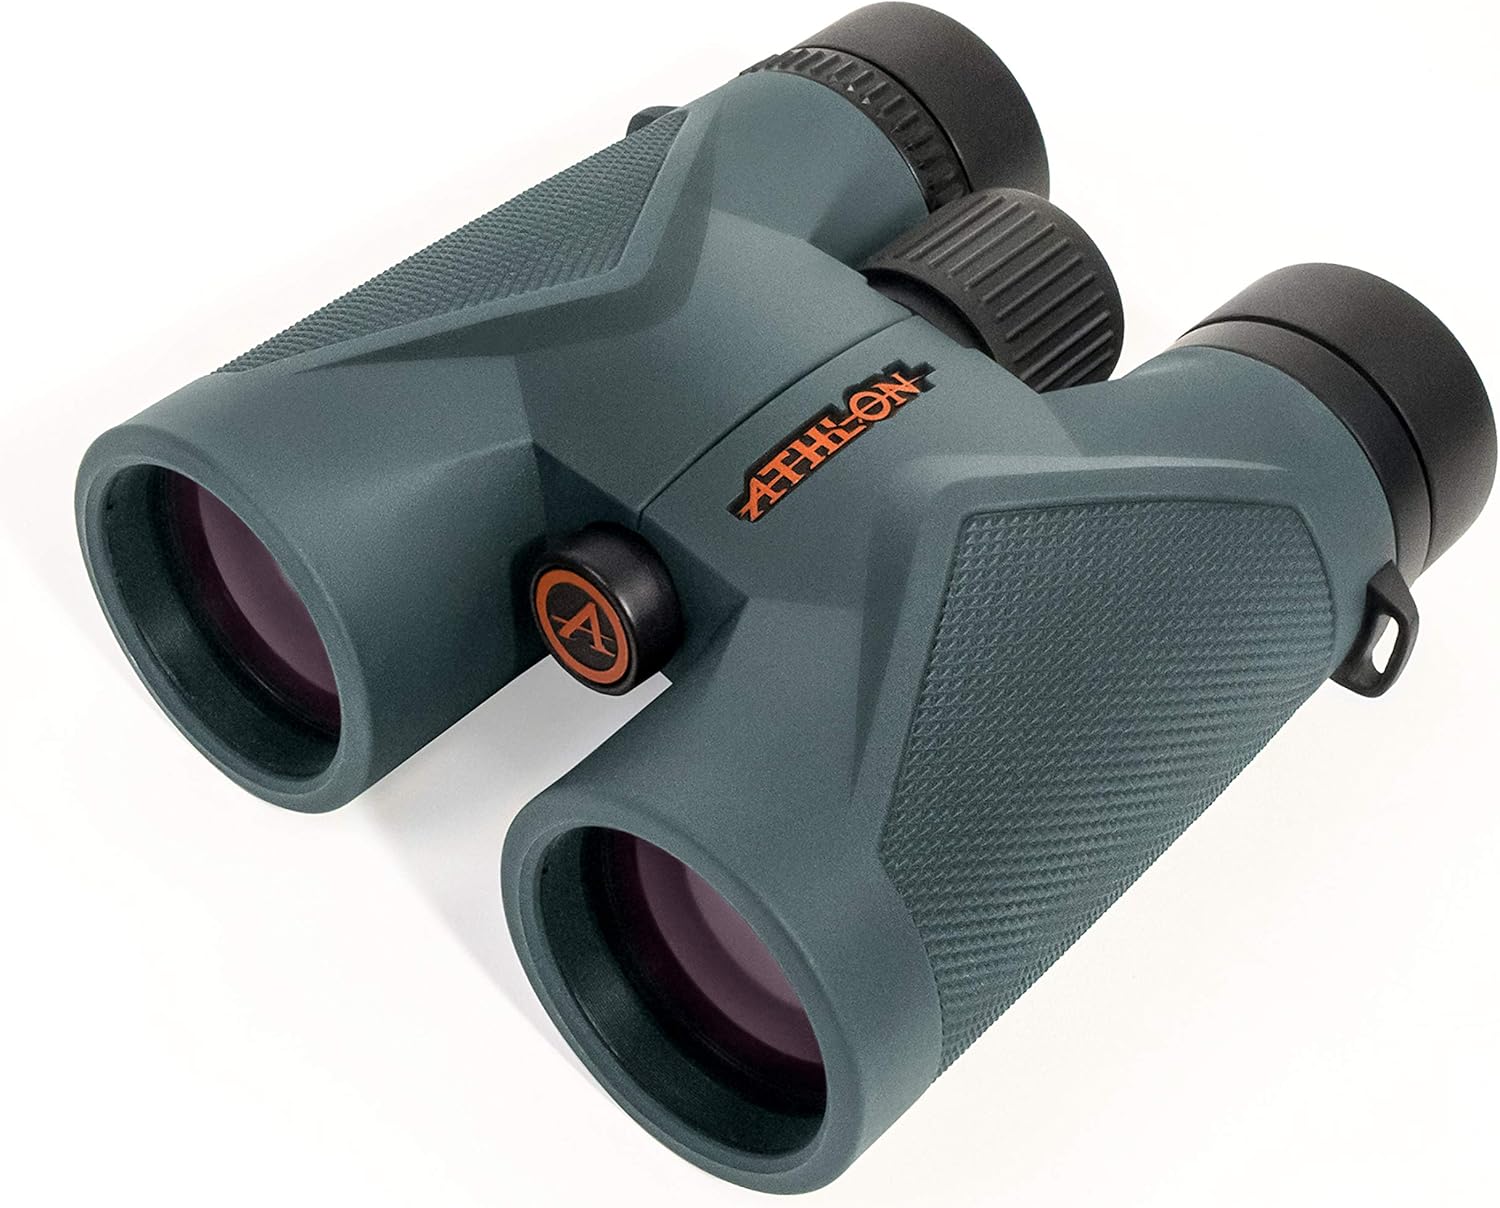
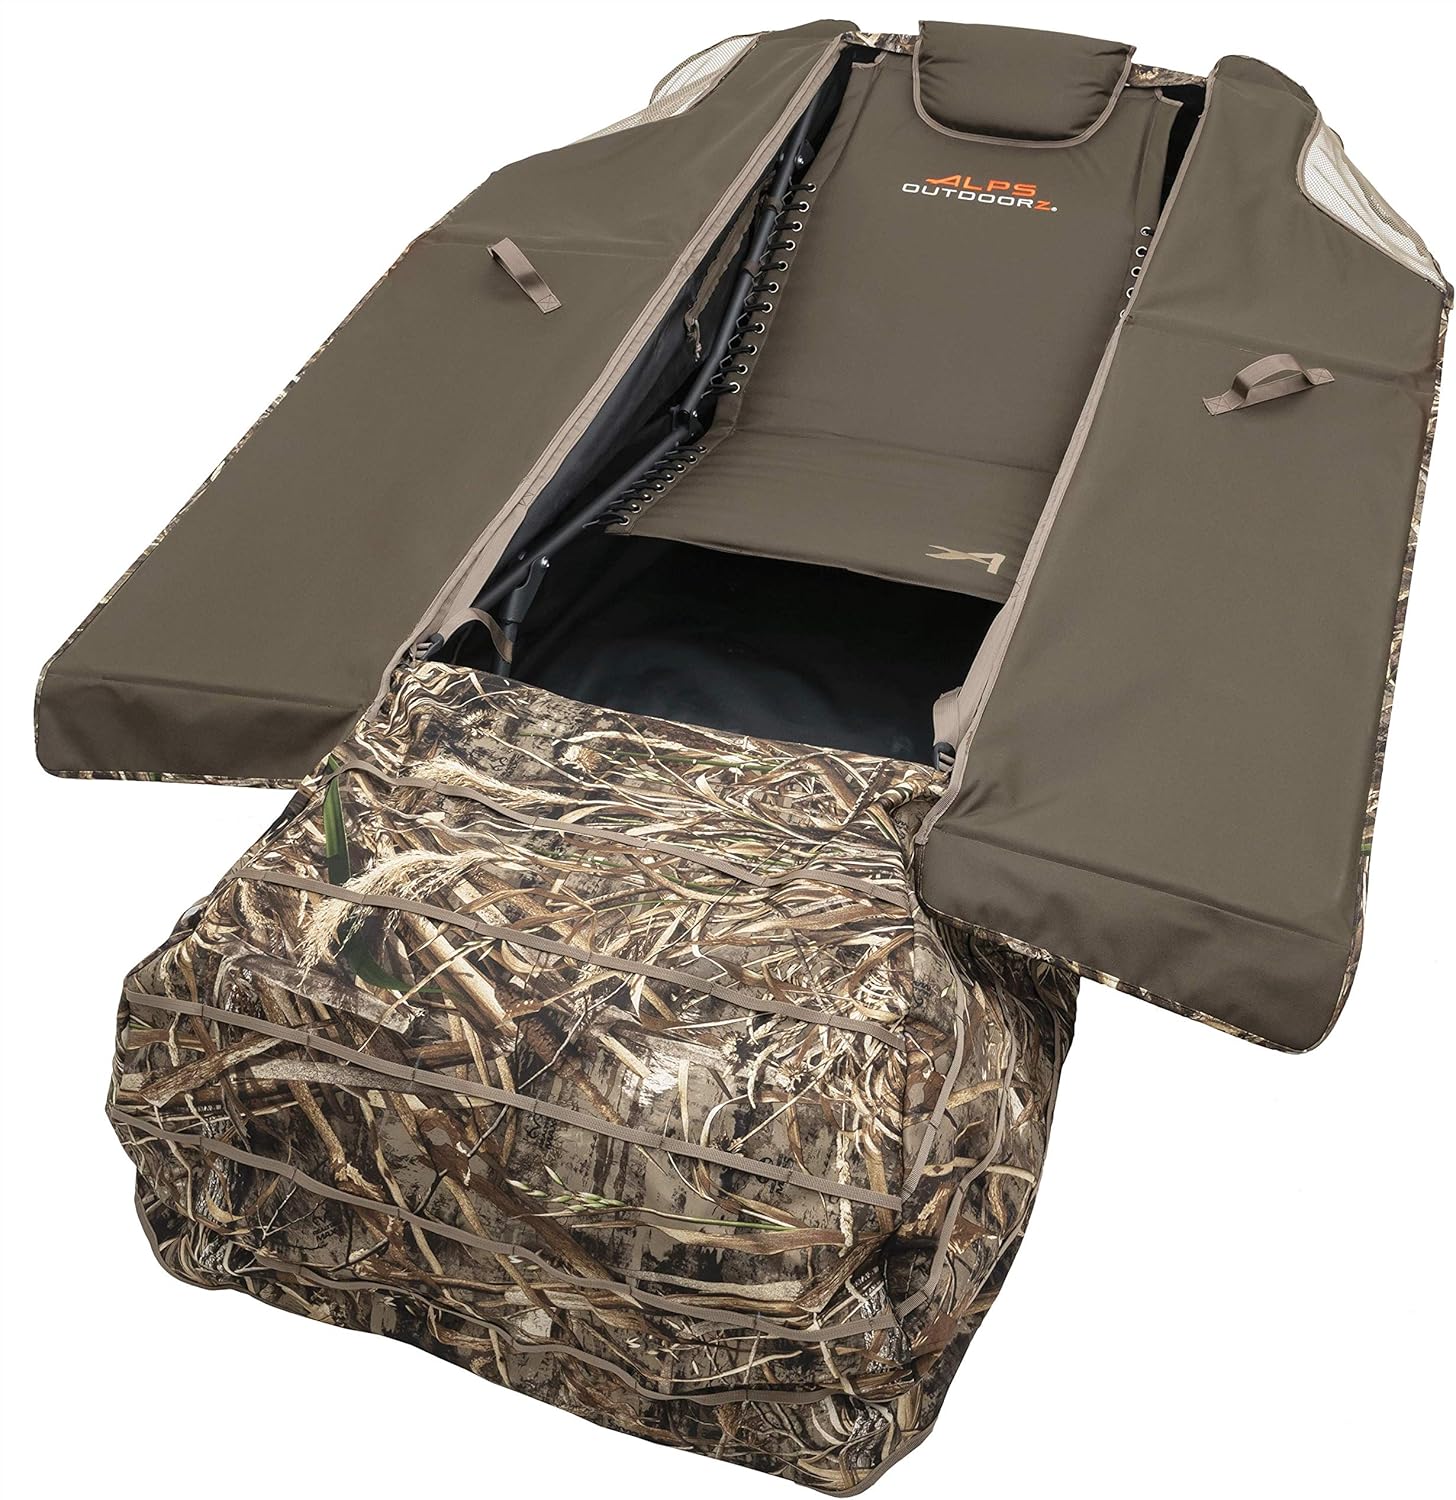
")