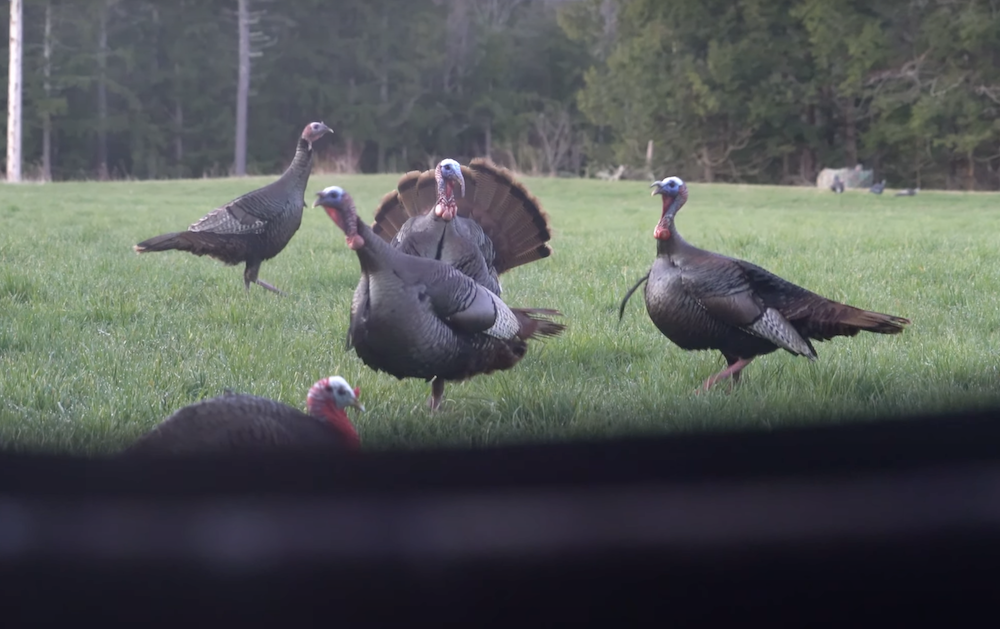
Turkey hunting decoy setups can make or break a turkey hunt. Learn how to set up, position, and combine decoys to maximize hunting success. Positioning turkey decoys is an art, not a science. It’s not difficult once you learn the concepts behind the placement. This post explains the strategy of how to maximize your chances of bringing turkeys into your decoys.
This post contains Amazon and other affiliate links, which means I’ll receive a commission if you purchase through my link, at no extra cost to you. Of course, you are not obligated to use my links, but it does help fund these posts in hopes of bringing more value to you!
Table of Contents
How Many Decoys Should You Use?
The number of decoys you should use depends on how many turkeys are in a group. I usually don’t hunt groups of turkeys that exceed 10 birds at a time. For this reason, I use a max of 3 decoys.
Make Your Decoys Approachable
I like my decoys to feel approachable by larger groups of turkeys as well as single birds. Fewer decoys will allow for a larger group of turkeys to want to merge with your decoys or at least feel comfortable enough to check your decoys out. If you have too many decoys then groups of birds, as well as individual birds, will feel intimidated and stay outside of gun range.
If you’re seeing groups of turkeys regularly that exceed 10 birds in a group then you can add another decoy, but 3 seems to be a pretty good number regardless. Single toms will still decoy with 3 decoys because they don’t feel overwhelmed but you still can pull in those larger groups.
If I know I am hunting a single tom, I will use less than 3 decoys because I want that tom to feel as comfortable as possible coming into the decoys. In this case, I will use two decoys.
How To Position Turkey Decoys
There are strategies for positioning turkey decoys to improve your chances of success. When you’re placing decoys there are a few things to think about:
Direction Turkeys Are Coming From
A lot of hunters, including myself when I first started turkey hunting, place turkey decoys right in front of them and don’t take into consideration where turkeys are coming from. One trick I use almost every time is by placing my decoys 20 yards in the opposite direction of where I think the turkeys will be coming from. For example, if turkeys are roosting or frequently off to your left, then your decoys should be placed 20 yards or so to your right. This will make birds cross directly in front of you to get to your decoys. This is mostly a tactic I use with hen decoys. This is explained further below:
Toms vs Jake vs Hen Decoy Positioning
Hen Decoy Positioning
I will almost always place hen decoys off to the side about 20 yards. I do this for the hens because toms and jakes rarely run straight into hen decoys and will often hang up just out of range.
Jake Decoy Positioning
However, toms and jakes will often come right into a jake decoy. This is usually because they are more comfortable and/or territorial with other male turkeys. For this reason, I place jake decoys closer to me. I still position the jake decoy off to the side, just closer.
Tom Decoy Positioning
I don’t use tom decoys very often because they are too intimidating. I’d rather use a jake decoy. However, I’ve had success with tom decoys and would use them in the same way as a jake decoy.
Facing Your Decoys Realistically
If you know which way the turkeys are coming from, then you probably can guess which way they want to go. Don’t face your decoys towards where you think turkeys are coming from because they will subconsciously make turkeys think they don’t have to come to you – because your decoys are already going to them.
Instead, face your decoys in the direction turkeys will naturally be traveling. This will also help pull those birds a little more in front of you.
Placing Decoys For The “Hang Up”
Additionally, a lot of times birds are hesitant when coming into decoys and will “hang up” just outside of gun range (like around 20 yards). Placing your decoys 20- yards in the opposite direction of where you think the birds are coming from it will help you bag those pesky toms that hang up like this.
Effective Turkey Decoy Setup Combinations
The Single Hen Decoy Setup
Unless you plan to be highly mobile (running and gunning), you’ll almost always want at least one decoy with you. Even then, I will often still bring one decoy. This should always be a hen decoy because when you call you’re mimicking a hen. So to not have a hen decoy in your decoy setup will look unrealistic to turkeys. Also, gobblers are looking for hens at this time of year, so there is almost no reason for not having a hen decoy.
I like this setup when hunting pressure is high, I feel like a single decoy seems more legit to real turkeys because other hunters are often using more than one decoy.
1 Tom + 1 Hen Decoy Setup
A hen is used as an attractor for toms and jakes. They can be used alone or with other male decoys. When placed with male decoys, a jealously and territorial trigger button will be pushed within male birds making them want to come into the decoys.
A tom turkey in strut when placed next to a hen decoy is used to get another dominant tom fired up and aggressive so that he will want to attack the decoy, thus bringing the bird into shooting range. Jakes will often be scared of a tom decoy so keep that in mind. Less aggressive toms may also shy away. For this reason, I rarely use this setup.
1 Jake + 1 Hen Decoy Setup
A jake turkey decoy that is semi-puffed up or even better – in full-strut – with hen decoys nearby will make a tom want to put the jake in its place by letting him know who’s boss. This will make the tom angry and want to come in and take the jake out of the picture so he can have the hen (your decoy) to himself. Additionally, other jakes will feel comfortable coming to join. This jake decoy can bring in any age male turkey. I use this setup a lot.
A semi-puffed jake decoy with a hen decoy will make toms angry. This is one of my favorite turkey hunting decoy setups.
The 2 Hen Setup
Two hen decoys are good for larger groups of gobblers because a bigger group of male turkeys will feel more comfortable coming to a party of two. Two hen decoys are very non-threatening so you can attract any male turkey. However, although not threatening, a single male turkey may be intimidated and feel outnumbered, especially jake.
2 Hens + 1 Jake
A jake turkey that is semi-puffed up with two hen decoys is very similar to the 1 hen + 1 jake decoy setup. This setup will make a tom want to put the jake in its place by letting him know who’s boss. This will make the tom angry want to come in and take the jake out of the picture so he can have the hens (your decoys) to himself. Additionally, other jakes will feel comfortable coming to join. This jake decoy can bring in any age male turkey. This is another one of my favorite turkey hunting decoy setups.
Conclusion
I hope you’ve found this article on turkey hunting decoy setups helpful. Reach out if you have questions, the best place to reach me is on Facebook. If you’re looking for more turkey hunting information, check out my other Turkey Hunting Posts.
In this post, I discuss how to hunt Maine moose during the rut. The Maine moose rut is an exciting opportunity but it’s still challenging. With only a week to hunt and basically a once-in-a-lifetime tag, there is a lot on the line. These hunting tips and lessons learned will no doubt help reduce your odds of going home empty-handed.
I assume you came across this article because you got pulled in the Maine moose lottery and want to put the odds in your favor as much as possible when your one-week Maine moose rut hunting season rolls around in September.
Eating your Maine Moose tag is no fun. Learn from my experiences over the last couple of years hunting September bulls in the North Maine Woods.
I’ve been fortunate to go on a few moose hunts over the last few years and have learned a lot about Maine moose hunting. In this post, I share what I’ve learned to help you maximize your odds of shooting a Maine moose.
When Is The Maine Moose Rut?
The moose rut in Maine occurs during the last week in September which aligns with the first moose hunt of the year here in Maine. Bulls are likely to be rutting to some degree prior to the opening day of moose season as well. Drawing a September moose hunt can be a lot of fun because bulls are on the move, and are never more callable than during this time of year. Hunting the Maine moose rut can be exhilarating for this reason.
Where To Find Bulls During the Rut in Maine
Find the food, and you’ll find the cows. When you find the cows, you’ll find rutting bulls. But don’t forget to take hunting pressure and temperature into account.
During the Maine Moose Rut Bulls Will Be Found Close To Cows
Food = Cows = Bulls
Finding the food is key for finding bulls because this is where the cows will be. Cows and their calves are trying to put weight on as they can for winter so they’ll be found in the food.
It’s common to see cows in cuts in the mornings and afternoons. It’s not uncommon to see them in cuts during the day too but at a lower frequency. Keep an eye out for bulls that are chasing these cows.
What Moose Eat In Maine
There are a few good food sources for moose in the Maine woods:
Active Cuts
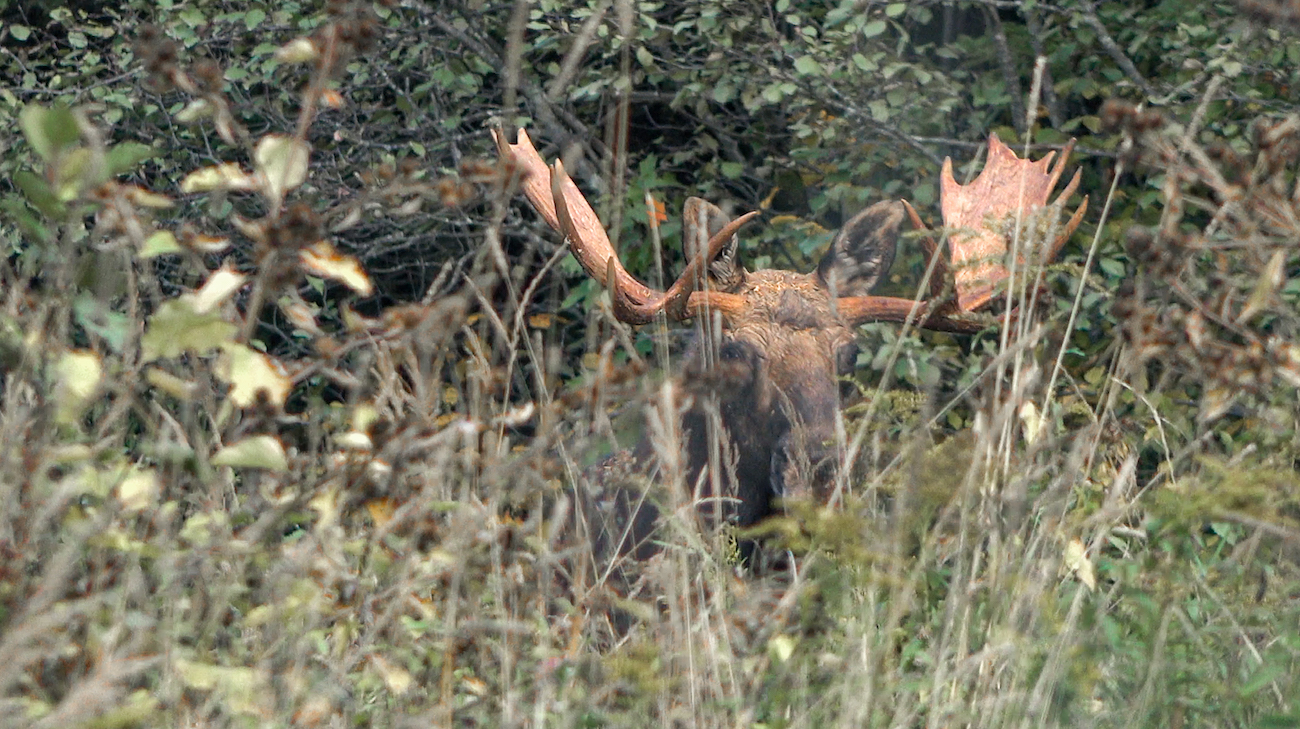
Active cuts are great places to find cows because the fresh cutting brings fresh high-quality vegetation scraps to the forest floor where moose can reach it. For this reason, cows and calves will gravitate to these areas. If you’re seeing cows in calves in these areas bulls will not be far away during the rut.
New Aspen / Hardwood Regeneration
Cuts that are a few years old are also good bets. These cuts will have vegetative regeneration at about waist height and sometimes higher. These young shoots provide better nutrition which is why moose are often seen in cuts, it’s basically a remote wilderness food plot. These cuts will harbor cows and calves, thus bulls will follow during the rut.
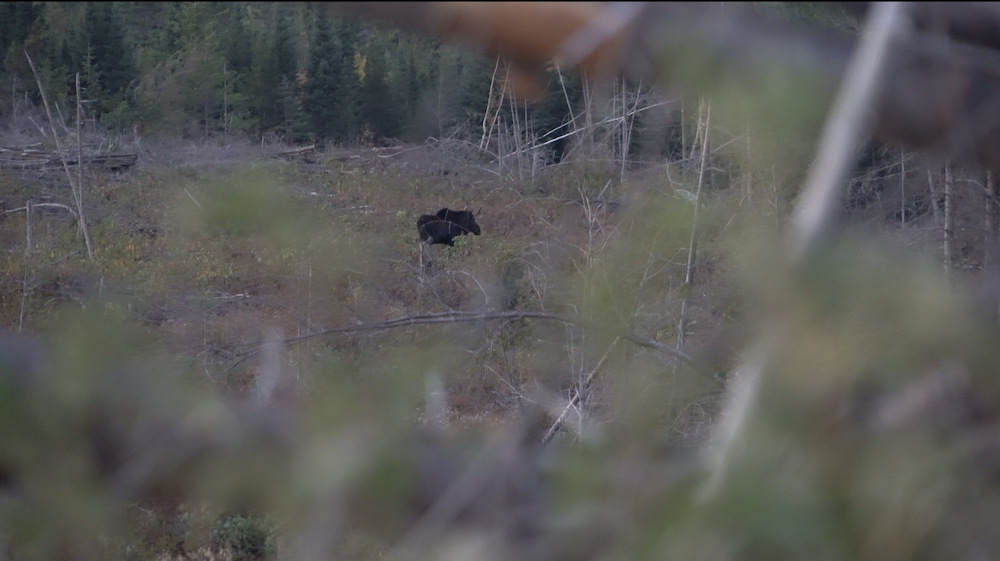
Maine Bull Moose In Recent Cut – Aspen Regeneration
We shot this moose in a recent cut that was reestablishing with young vegetation. It had aspen and maple regeneration which moose will eat.
What’s The Temperature?
Warm Weather Bulls
Temperature plays a big role during the moose rut. If temperatures are warm bulls will do a lot of rutting at night when things cool down. Big-bodied animals like moose don’t have the same ability to cool off as smaller animals do.
For this reason, moose have to be careful not to expend too much energy during hotter times of the day. Your best bet for seeing a bull in these hot temps is during rainy or windy periods or at dawn and dusk.
During warmer periods you can find moose in cooler places like in shaded areas near water during the day. They’ll likely be bedded so it will be hard to find them. However, they won’t be in just any place where there is water. They will still want to be bedded near the cows.
Cool Areas
If you find high-quality cuts with cows, there’s likely a bull nearby that may not be showing himself because he is conserving his energy in a cool shaded area. It can be worth slowly hunting and calling in these cooler areas to get one out of its bed. This may be a dense shaded canopy that follows a stream – that is also near cuts and cows.
Find Bulls Away From Hunting Pressure
If you’re looking for bigger bulls it is recommended to hunt away from the competition. Finding cuts that aren’t hunted hard, or getting on foot to walk to places where you can get a vehicle can be beneficial. These bulls also have likely heard less calling from hunters and will be more willing to come into a call.
Driving During The Rut
Driving is an excellent way to find bulls, in fact, it may be the most effective way. This may or may not be what you want to hear, and trust me I’d rather shoot a bull that I called in too. But the fact remains that there is a fair distance between pockets of moose. So if you’re walking it may take you a long time to get from pocket to pocket.
When you drive you can get from pocket to pocket quickly, and during the rut, and you are likely to find cruising bulls on the road at any time of day, especially with good temps. That said, it may be harder to consistently find bigger bulls from the road but it’s still very possible, I’ve seen 40″+ bulls every time I’ve been moose hunting while driving.
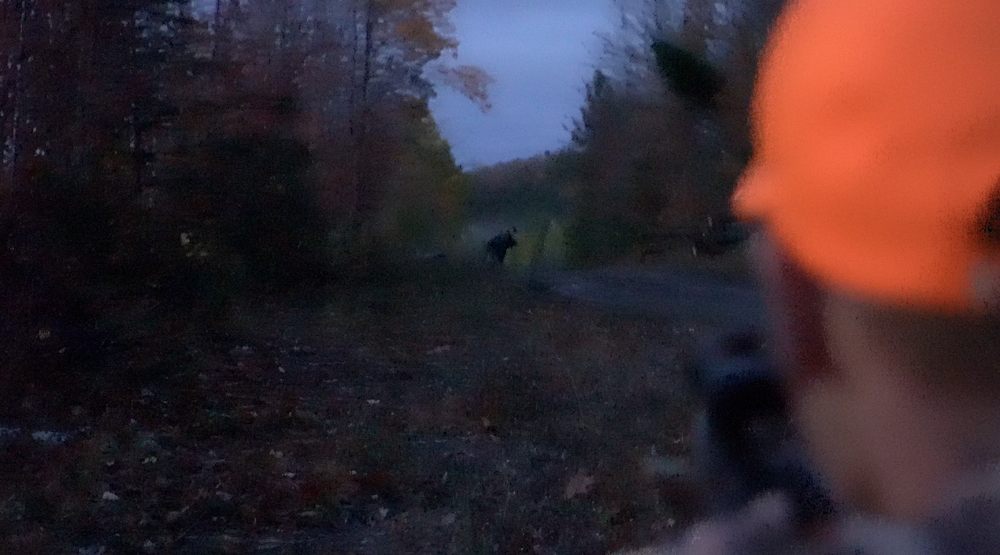
A Big Maine Bull Moose Steps Out Onto The Road During The Rut After Pushing A Smaller Bull Across The Road
The Shooter Shouldn’t Drive
Having the shooter drive is a big mistake. The half-second it takes for the driver to shut the truck off, load the gun, and set situated to shoot is very often the difference between a moose on the ground and a moose that got away. Have someone else drive so they can shut the truck off while you load your gun, this way you can be at the ready at all times.
Know When to Call & When To Drive
Depending on the weather conditions, it may be more advantageous to drive and look for moose than be on foot. I think most people would agree they’d rather call in a big moose in ideal weather conditions. However, if you’re looking to get a bull on the ground knowing when to drive and when not to drive will help you put a bull on the ground.
For example, if it’s raining I would be driving because the moose are likely up and running around due to the cooler temps. However, calling won’t help you in these situations very often because bulls can’t hear you. By putting more miles on i
Hunting Pressure And Maine Bull Moose Activity
Know The Hunting Pressure Of Your WMD
Different MWD’s will have different amounts of hunting pressure depending on how many tags are issued. If there are a lot of tags given for your WMD then try to find places where other hunters won’t be.
Know The Hunting Pressure Of Where You Plan To Hunt
It’s a good idea to do some homework on the hunting pressure on the area you’ve decided to stay in. If you’re camping in an area where there is a lot of other moose hunters it might not be a bad idea to get up earlier than other hunters and get to more remote spots further from camp and other hunters.
Don’t Overcall In Areas With Higher Hunting Pressure
Overcalling is a big mistake when bulls are pressured. If you are seeing a lot of moose hunters in the areas you’re hunting don’t call as much later in the week. Bulls are likely to have smartened up, and some light calling may be more effective. A good rule of thumb is to mimic the frequency and volume of real cows.
There’s nothing quite as exhilarating as calling in a big bull out of the thick brush in close quarters, but don’t force it.
Keep Expectations Realistic To Avoid Frustration
Don’t get me wrong, you should be excited you drew a September Maine moose tag but don’t think it’s going to be easy going into it. It’s better to expect to hunt hard and long for 7 days from dawn to dusk and be pleasantly surprised to get one sooner because that is often the reality. If you go into it thinking you’re going to shoot a 40-50″+ bull in the first couple of days you’re not going to want to keep hunting later in the week.
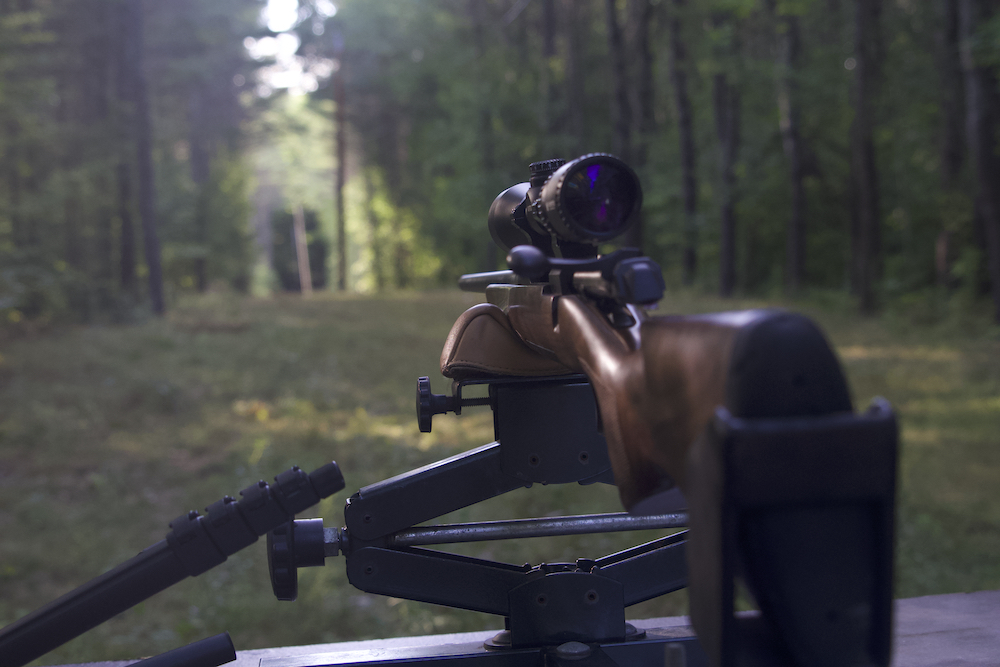
Target Practice
Practicing before the season starts is a very good idea. Once you get your rifle sighted in, start practicing real-life scenarios. Some scenarios I suggest practicing are:
Getting out of the truck and loading your gun quickly, then taking a quick free-hand shot at 50-100 yards.
Getting out of the truck, loading your gun, then shooting your gun rested on the open window.
Taking 100-200 yard shots off a tripod or shooting sticks like you would in a fast-paced hunting situation.
Taking 300-yard relaxed shots to replicate shooting a feeding bull far away in a cut.
Scouting and Calling Right Before The Season
If you’re scouting before the season it is best not to go right into a spot and mess things up by leaving scent and calling. Calling may be the worst thing because it is smartening bulls up for the actual hunting season. If you call a bull in, then spook it, he may not be willing to make the same mistake twice and could leave the area.
A better alternative is to scout from a distance if possible. If this is not an option and you need to get into a thicker area to scout, then just don’t call. Instead, do a speed scouting mission looking for bull rut sign, then get out of there.
Checking a handful of cameras and honing in on bulls that are active on the cameras within a week or two before the season is a great way to see what caliber bulls are in the area.
Scout As Much As Possible From A Distance Right Before The Season
Although getting right into the middle of an area you suspect is a good place to hunt and scouting right before the season is not recommended, it is highly recommended to scout right before the season at a distance. Moose have seasonal patterns, and scouting too early or too late will give you poor intel on what is actually happening in the moose world.
If possible, taking a week before moose season starts to scout is a very good use of time. By driving around and glassing for moose at dawn and dusk is a good way to get an idea of where the bigger moose are hanging out. Finding good habitat on aerial imagery and then cruising those areas quickly for bull sign can give you a good idea if an area is worthwhile to hunt during the season.
Scouting From A Distance Is A Great Way To Reduce Pressure Until The Season Starts
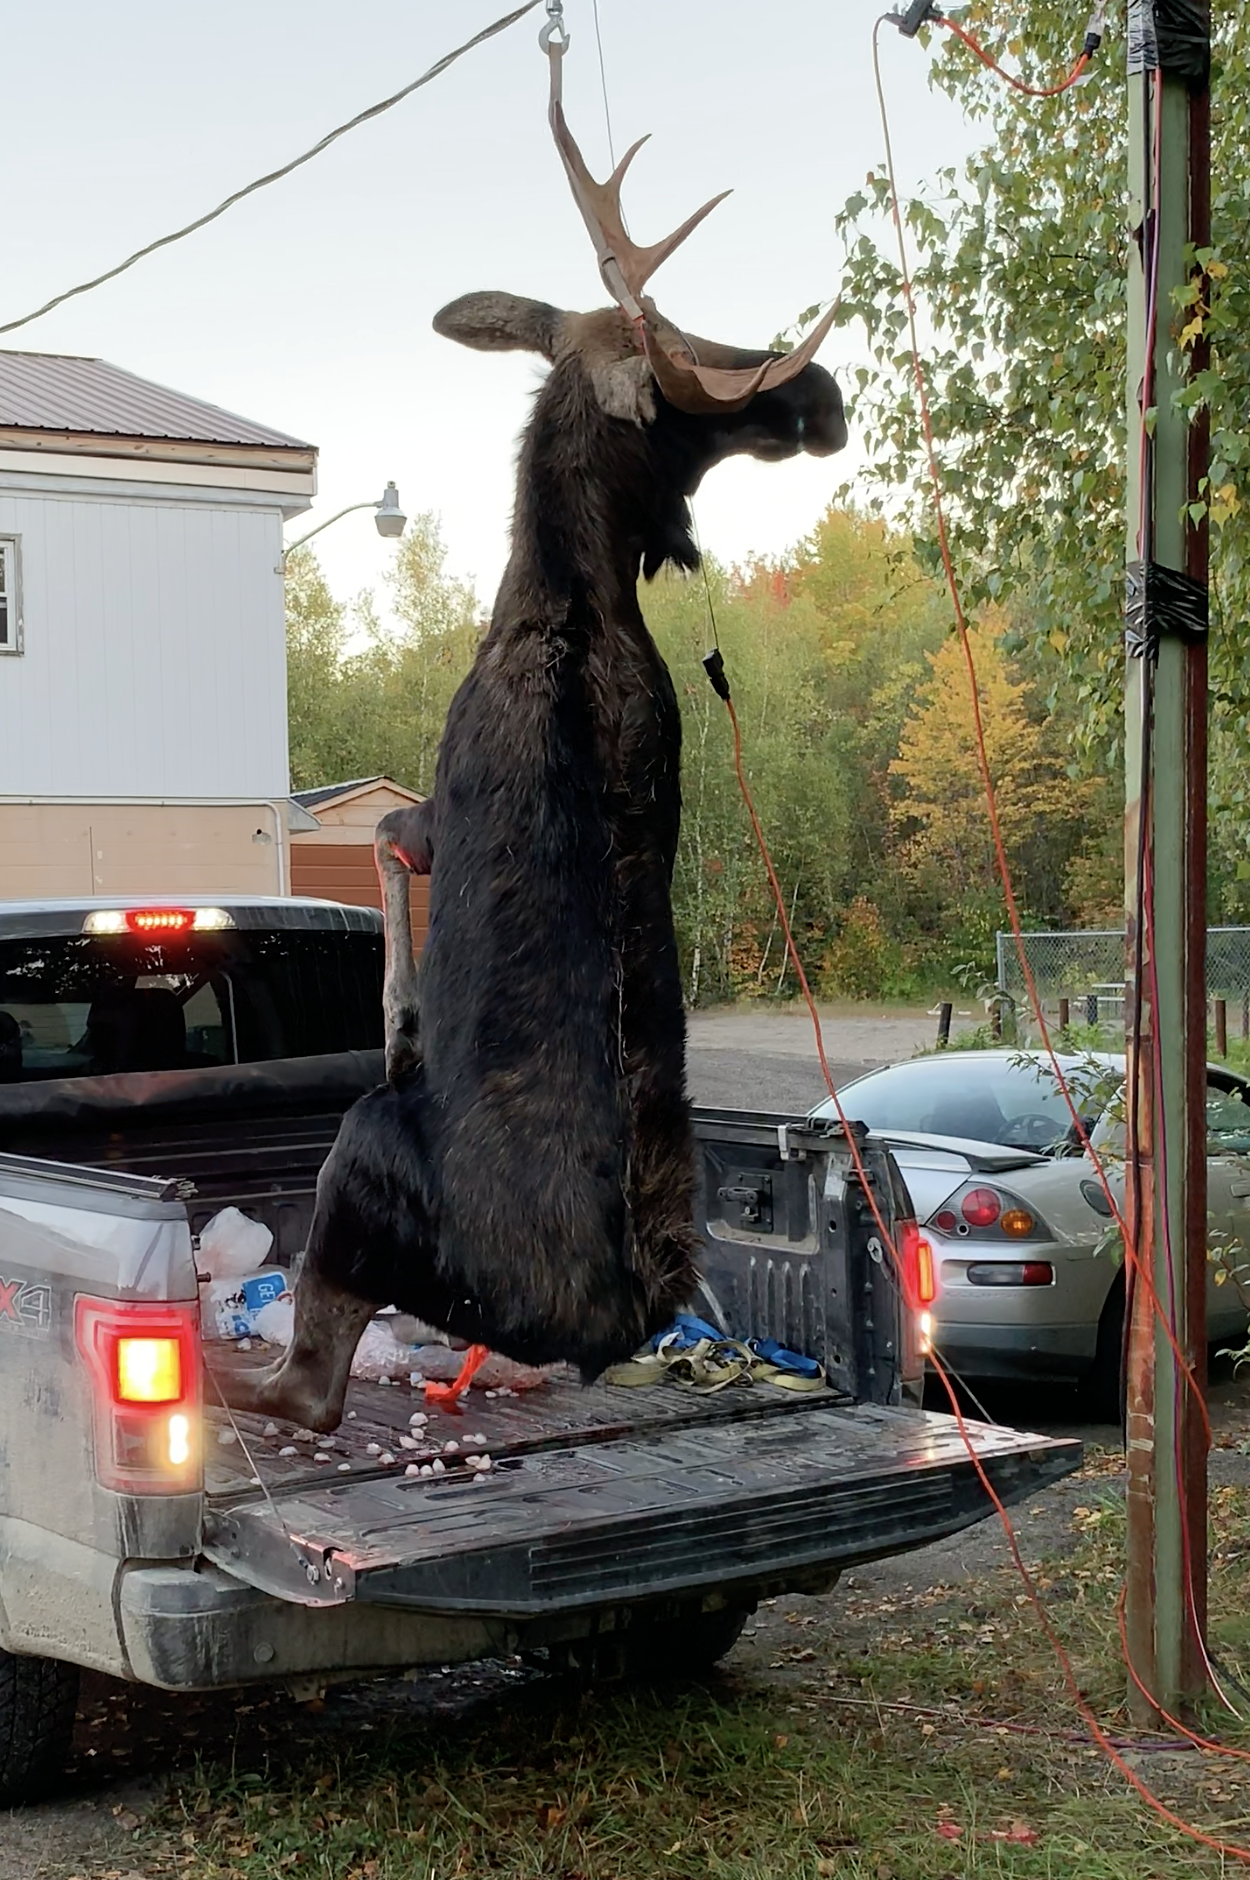
Don’t Assume Moose Are By Themselves During the Rut
When hunting Maine moose during the rut, a big mistake is to assume moose are by themselves. One of the hunts I went on we shot a small moose towards the end of the hunt, and we were happy with that small bull because we had hunted hard. But we didn’t think about the possibility of another bull being nearby. Sure enough, a 50″ bull popped out after the shot at 40 yards.
Even more commonly you may be driving around and see a cow and think “it’s just a cow I don’t need to get out of the truck” but this is a mistake. During the rut, a bull might be in the brushes off to the side just out of sight. It is good practice to get out of the truck, load your gun, and start glassing around the cow for a bull.
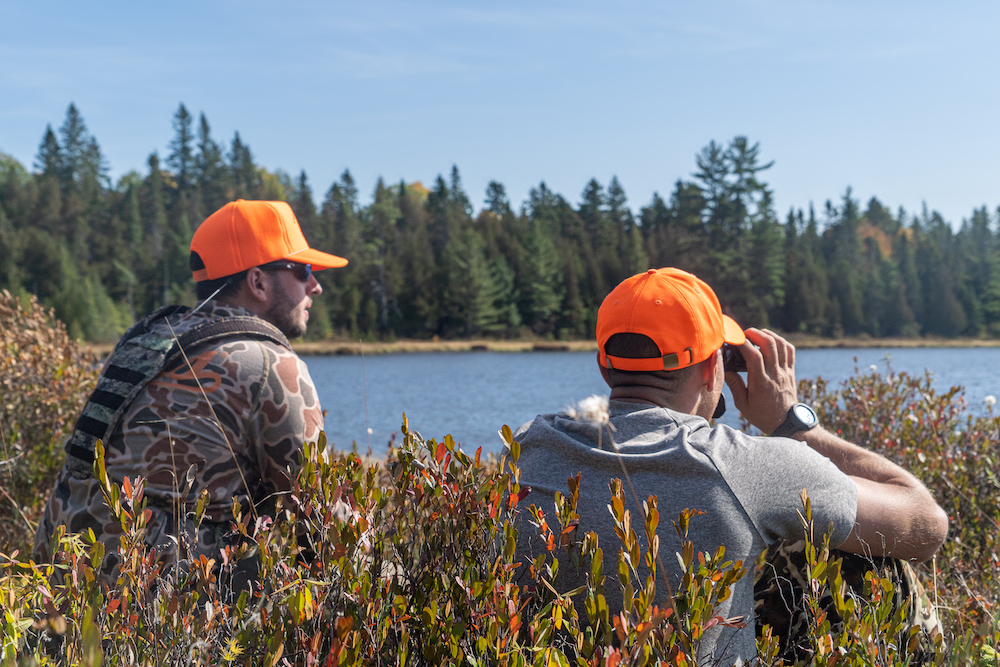
Have Others Scouting While You’re Hunting
Having other friends or family with you to help you scout while you’re hunting is an excellent way to get a bull on the ground. The more eyes you have the better chances someone will be able to find a spot where a big bull could be hanging out.
Keep Hunting Groups Small and Agile
With that being said, it is important for the shooter not to be with a lot of people because as you increase in the number of people, there is more time being wasted. Instead, break up into teams of 2 to 3 and rotate who gets to go with the hunter. The others should be scouting to help the shooter find a bull.
Good quality walky-talkies are great pieces of gear to have when moose hunting in Maine so information of moose sightings can be relayed quickly by others in the party.
If enough people are in a party, split up to help the shooter find a bull.
Hunt All Weather Conditions
When you’ve only got one week to hunt, you’ve got to make the most of it. Fortunately, moose are moving in just about all weather conditions except warm ones. That means windy and rainy days are good days to be hunting and they are great days to be hunting from the truck.
Maine Bull Moose During The Rut In The Pouring rain
Don’t Give Up
With essentially a once-in-a-lifetime tag it is important not to give up. It’s easy to get discouraged. You want to look back and say you gave it all you had. Hunt all day and hunt hard, it will pay off. Just put the odds in your favor as much as possible.
Conclusion
I’ve been fortunate to go on a few moose hunts over the last few years and have learned a thing or two about how to hunt Maine moose during the rut.
Eating your Maine Moose tag is no fun. I hope you’ve been able to take away some information from this post and learned from my experiences over the last couple of years hunting the Maine moose rut in September in the North Maine Woods.
I’m working on an off-grid Subaru forester hunting rig conversion because I’m planning to maximize my time hunting and do more out-of-state hunting while staying flexible and agile in my approach.
After looking into every method I could find from trucks, RV’s, cargo trailers, pop-up campers, campers…etc, I finally decided to just keep the vehicle I had and convert it into a hunting rig to keep costs as low as possible and to keep things simple.
Sure, a Subaru Forester it’s going to be tight but I think I’ll be able to fit everything I’ll need to make it work. I’m willing to sacrifice comfort and off-road capabilities for more hunting.
It’s not going to be able to handle 100% of what I want it to do, but it will get me into around 70% of where I need to go safely. I can make up the rest with a little extra legwork. I am willing to make that sacrifice for now but may need to upgrade to a truck in the future.
This is my first post documenting the process and I still have a lot of work to do. That being said, it’s been coming together nicely over the last month or so.
This post contains Amazon and other affiliate links, which means I’ll receive a commission if you purchase through my link, at no extra cost to you. Of course, you are not obligated to use my links, but it does help fund these posts in hopes of bringing more value to you!
Storage Plan
Many people online convert their vehicles using wooden storage and drawers. I personally didn’t want to go this route if I didn’t have to. I didn’t want to take the time to build unless it was an absolute benefit. So far I’ve found that there isn’t a big enough benefit for me to invest the energy.
I’d rather buy plastic storage. I have some work to do to figure out what bins will be most efficient.
I may need to buy roof storage as well, but I’d like to be able to carry a canoe during hunting season, so we’ll see how crowded it is in my car when hunting season rolls around.
Sleeping In My Subaru Forester
I haven’t slept in my car yet because I’ve been getting everything together but I’m going to try to sleep in my car this weekend as a test run. I plan to write a post on how that goes.
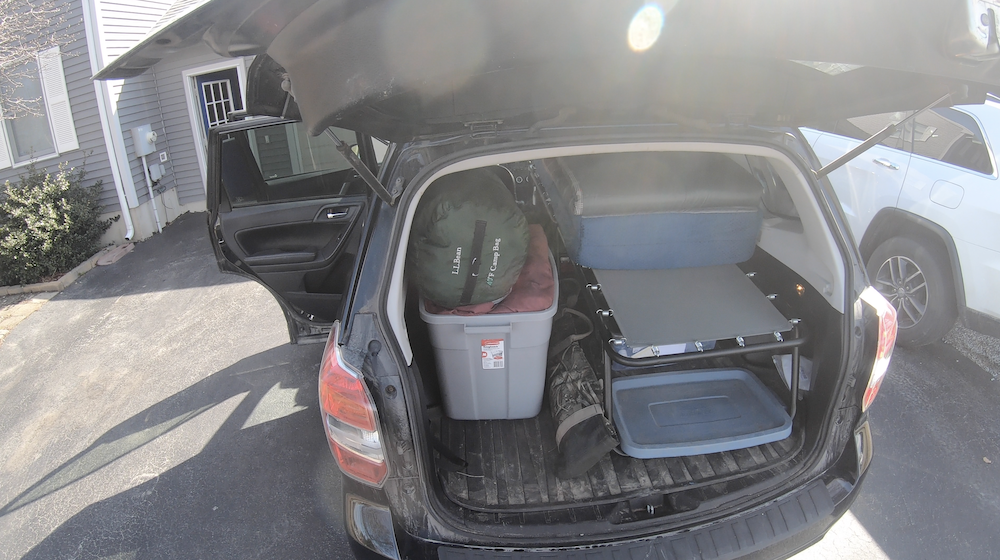
Cot
For sleeping, I am using a tall Coleman cot. It fits absolutely perfectly in my Forester. I’m 6’3”, which is quite tall for a Subaru Forester, but the way the cot is situated I don’t have to sleep diagonally at all. This helps maximize space a lot.
By taking the headrest off the passenger seat I am able to gain many inches of extra length because the height of the cot is about level with the passenger seat after this modification.
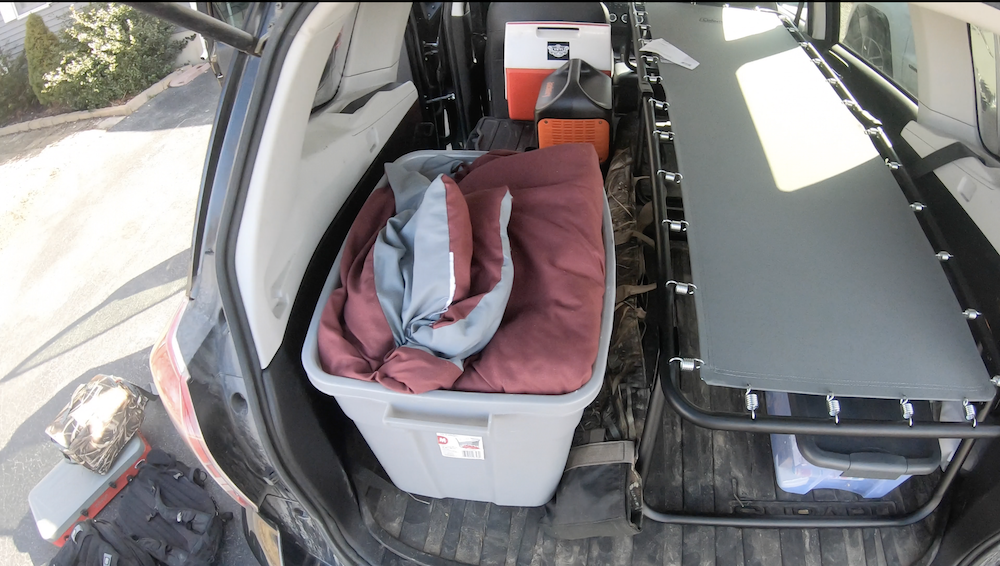
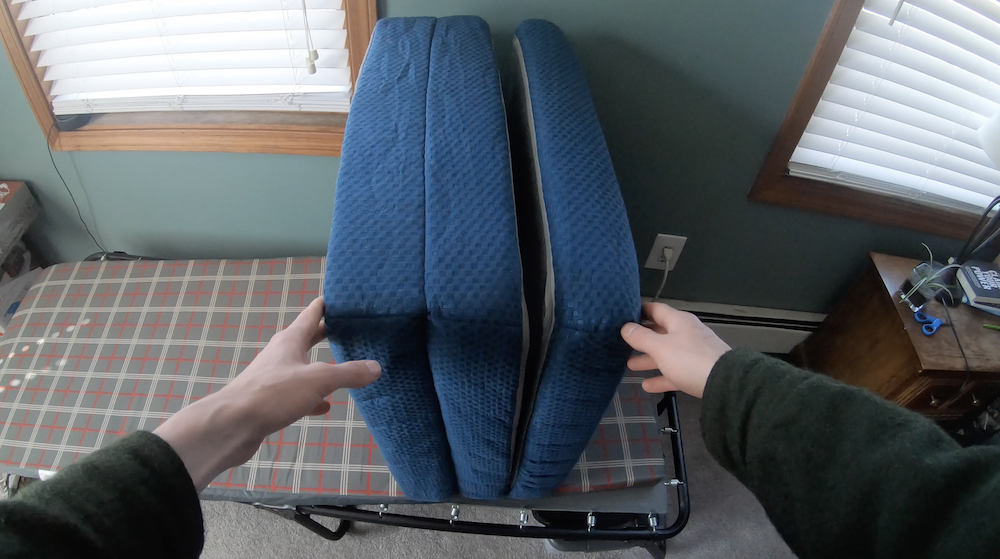
Mattress Pad
When I add my 4″ Tri-Fold Memory Foam Mattress pad the slight difference is not very noticeable. I’m able to rest the top of my head over the top. I will go more into this in future posts and videos. I’ve got a tri-fold mattress for easier storage when not in use. I may buy another mattress, I’m not sure that I’m going to stick with this memory foam model.
Tri-fold memory foam mattress pad
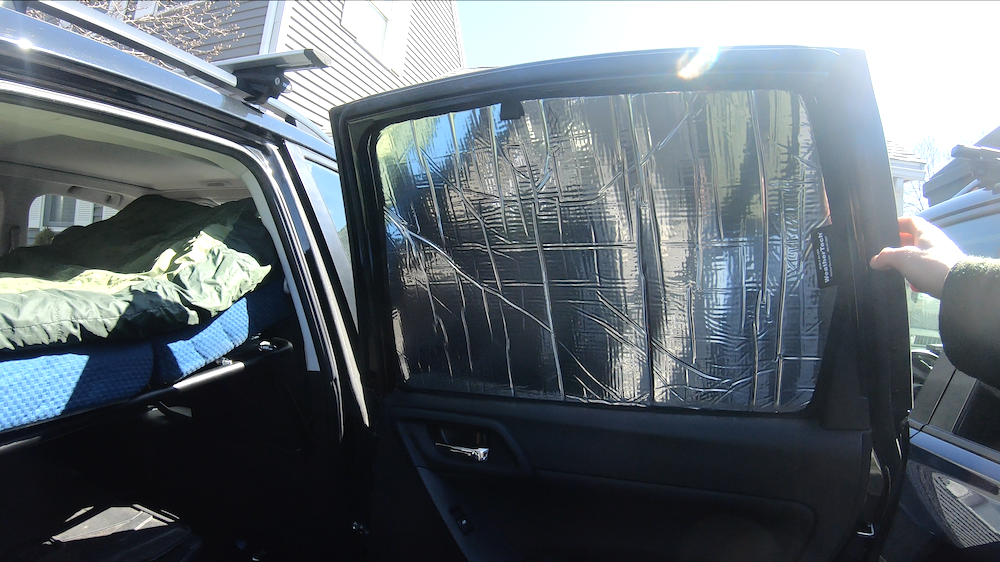
Privacy
One of my first purchases was pop-in window shades for my car. It keeps people from looking into your car when you’re sleeping or just in general. They are the WeatherTech Windshield Sunshade for Subaru Forester.
Window Covers For Subaru Forester Camping
They are very simple to use and provide thermal regulation in both hot and cold weather depending on if you face the reflective side in or out.
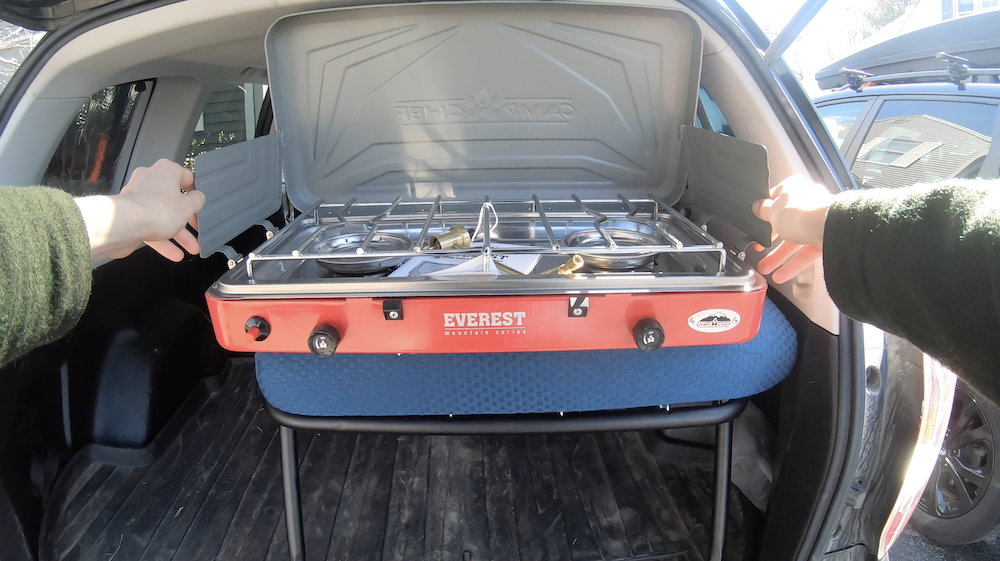
Cooking When Hunting
For cooking, I bought the Camp Chef Everest with 20,000 BTU burners because of the amazing reviews it has. I have yet to try it but am looking forward to it.
I’m also looking into a JetBoil, I’ve heard these are great for minimalist camping.
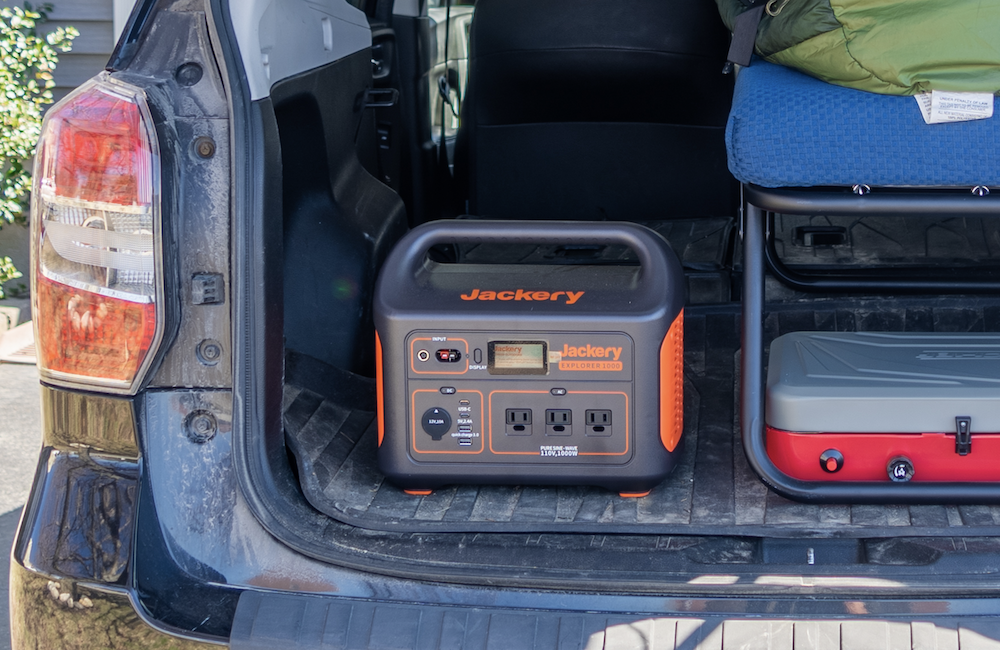
Off-Grid Electricity
Because I film and blog, my Subaru Forester hunting rig conversion needed to have as much power as possible. When I’m out there in the woods I don’t want to run out of power. I bought the Jackery 1000W portable power station. It’s basically a giant battery. This power station is supposedly able to handle a LOT of power. In addition, to the battery, I bought two Jackery solar panels to keep the battery charged when I don’t have a way to charge it.
Jackery Off-Grid Power Subaru Forester
It also can be charged while my car is running. These features will be very helpful for keeping my cameras, laptop, drones…etc charged for week-long hunts or longer.
The Jackery 1000 is currently the biggest battery made by Jackery and I had to buy the largest because its the only model with USB-C plugs for my camera gear. Otherwise, a smaller model battery may have been plenty but I’d rather have too much power than not enough.
Tires
I bought BF Goodrich tires because heavy-duty 8-ply tires are important. Flat tires are stressful and time-consuming. Every time I’ve gone on moose hunts in northern Maine I’ve had a slow leak because of small metal staples or nails that a more rugged tire would be able to defend against. I also don’t want to deal with this traveling out of state.
On top of that, I needed some tires that could handle more off-road terrain. My all-seasons just weren’t cutting it in the snow. I was always scared I was going to get stuck. Although I have tire chains, I’d rather have a nice set of tires.
Other Thoughts
Lift Kit
I’ve briefly looked into this. A 2″ lift is pretty expensive. It would be helpful, but at that point, I might as well save the money for a truck if I need a lift that bad. So, I think I’m going to make do with it at stock height. I think it will be good enough, but not ideal.
Canvas Tent
I haven’t looked into this too much yet, but maybe something I consider for extra room or to just get out of my car once in a while. A tent would be especially nice in the winter because I could use a wood stove.
Conclusion
I’ve still got several small details to wrap up. For example, cookware, fine-tuning storage, ergonomics…etc. But for the most part, the big stuff is taken care of. I’m going to start practicing living in it soon, maybe this weekend especially as the temperatures warm up so that I can figure out the things that aren’t as obvious.
Let me know if you’re interested in more of my Subaru Forester hunting rig conversion posts. I hope you guys enjoy reading these short simple journal posts. I’m looking to do these at least once a week to document scouting, hunting, hunting prep, ideas, SUV-Living/Conversions…etc.
During my two decades of turkey hunting in Maine I’ve discovered a handful of Maine turkey hunting tips that work. I’ve learned most of these tips through trial and error.
These are my best Maine turkey hunting tips. I wish I had these tips when I started. If you follow these tips I have no doubt you’ll increase your spring turkey hunting success in Maine.
This post contains Amazon and other affiliate links, which means I’ll receive a commission if you purchase through my link, at no extra cost to you. Of course, you are not obligated to use my links, but it does help fund these posts in hopes of bringing more value to you!
Table of Contents
Tip #1. Northern vs Southern Maine Turkey Hunting Tips
Turkeys can be found from southern Maine to the northern parts of Maine. Understanding the turkey densities in different parts of Maine is critical for designing the hunt you want.
Northern Maine Turkey Hunting
When I talk about northern Maine I am referring to the parts of Maine located north of the visible development on aerial imagery. In this region of Maine turkey numbers are much lower.
You will want to find pockets of turkeys that are residing closer to the limited development and farm country. These areas provide enough food for northern Maine turkeys.
Turkey hunting can be harder in the north because there are less birds, but if you can find pockets of birds in the north, you will likely have them all to yourself.
With minimal hunting pressure, these birds will decoy and come into calls better than southern Maine turkeys which get more hunting pressure, especially later in the season.
Southern Maine Turkey Hunting
Although hunting pressure is higher in southern Maine, there are still great opportunities for turkey hunters.
Southern Maine winters are much easier on turkeys and they find plenty of food. For this reason, there are a lot more turkeys in southern Maine. The trade-off is that there is also more hunting pressure.
The first week is usually really good as birds aren’t pressured much. After the first week you can expect birds to be more weary and finding those less pressured pockets of southern Maine will make for more enjoyable hunts after the first week.
Tip #2. Turkey Hunting Pressure in Maine
Compared to other states Maine has fairly low hunting pressure, however, that does not mean there aren’t areas of high turkey hunting pressure. Knowing the hunting pressure of certain areas of Maine is a big part of having a successful turkey hunt in Maine.
You can often get an idea of how heavily turkeys will be hunted by how easily visible they are from a road, and how busy the road is. Other hunters are taking notes too. Don’t discount these areas, but do your best to find turkeys away from high human traffic areas. It’s always best to find them in areas with very minimal to no traffic.
Competing for Turkeys
You don’t want to be competing with other people for the same turkeys if you can help it. In my opinion, it takes away from the fun of having a 1 on 1 battle with a group of turkeys. Other hunters can be discouraging because turkeys may go to them instead of you. Especially if they have more knowledge than you and are better at calling.
That said, don’t give up if a hunter shoots a turkey near you. Although turkeys may not be talking much after the shot, there could easily be other turkeys roaming around and may come into your decoys within an hour, you just never know. This is especially true during the first week of the season when they’re not wise to the hunting pressure yet.
Turkey Hunting Pressure & Calling
Additionally, knowing the hunting pressure will allow you to adjust how much calling you should do. If the turkeys you are hunting are not pressured at all, you can get away with a little more calling even if it is a little bit unnatural compared to real hens.
The effects of hunting pressure get worse as the season continues, this means turkeys will often stop gobbling altogether except for when they’re in their roosts. This means you should mimic this behavior when you’re calling. This will be more realistic to the turkeys.
Often that means the best tactic is to never call. It sounds counter-intuitive but pressured birds will often go to the hunter that does not call over with a hunter that is calling.
Tip #3. Travel To Less Pressured Areas of Maine
If the season progresses and you still don’t have your turkey, start scouting new areas. Specifically, areas that might be overlooked or that don’t have much hunting pressure. These can be great late-season honey holes. Sometimes you just have to give up on the turkeys you’ve been hunting to find easier turkeys to hunt.
You can head north, but there are plenty of opportunities to find overlooked honey holes in southern Maine.
Tip #4. Take The First Week Off From Work
If you’re serious about bagging a Maine turkey there is no better way than to spend most of your time hunting during the first week. Hunting pressure will be in full effect before long and you’ll want to take advantage of non-pressured birds for as long as possible.
I’ve found that after the first week, birds become smart to hunters and are harder to kill. If you spend most of your time hunting when turkeys are less call-shy and timid, you’ll have better luck. Plus it will be more fun because turkeys will be more apt to be gobbling their heads off.
Tip #5. Maine Turkey Hunting Gear
The Maine turkey hunting season starts around May 1st, and ends in the first week of June. In Maine, May mornings are cold especially early in the season. The afternoons get quite warm though, so you’ll want to have the right clothes and be prepared to shed layers.
I’ve written a more in-depth article for Best Turkey Hunting Gear For Beginners which you may find helpful. This article is applicable to Maine turkey hunting because it is the exact gear that I use when hunting turkeys in Maine.
Tip #6. Plan For Maine Insects/Bugs
Ticks and mosquitos can be a real problem when hunting turkeys in Maine. Ticks are at full-force in May. For this reason, I prefer to use a ground blind.
I also use Rynoskin to deal with ticks and mosquitos. It is a chemical-free baselayer that keeps ticks from getting to your skin and helps reduce the number of bites from mosquitos.
If this sounds like something you’d be interested in, you can check out my review. There is a certain way to use it to its full potential which I go over in that post.
Tip #7. Scouting for Turkeys in Maine
I can’t express how important scouting is for turkey hunting success in Maine, and frankly, it’s not that hard to do since turkey gobbles are easily heard and turkeys are quite visible. Especially in fields just before hunting season, before hunting pressure starts.
Scouting for turkeys is often an overlooked aspect of turkey hunting, you will be ahead of the game if you do.
Pre-Season Turkey Scouting in Maine
Pre-season scouting helps tremendously for early success. You’ll want to put a tag on a turkey as soon as possible because as the season progresses turkeys become warier and will be harder to see, call, hear, and find.
Scouting Maine Turkey Roosting Areas
To find roosts, it is best to drive around areas where turkeys are known to hang out and listen 30-min before daylight while they gobble before getting out of the trees.
This can also be done in the evening right at sunset but in my experience, it is not as effective because turkeys don’t gobble for as long so it can be hard to check multiple places in the same scouting session.
Another tip is to drive around early morning and about an hour/hour-half before sunset and find the turkeys that are making their way back to their roosts.
If you see turkeys in fields at these times you can be their roosts will not be far away. Mark these locations on your GPS and come back to find where exactly they are roosting.
Tip #8. Hunt Multiple Locations for Turkeys
My favorite tactic is to find a handful of roosts before the season starts so that you can hunt multiple areas during the first week of turkey hunting. Having multiple areas in your back pocket is very helpful.
Many times you’ll find out that one spot you were planning to hunt gets too much hunting pressure. These areas can be frustrating to hunt and makes hunting harder. By having different places to hunt you can stay in better hunting situations.
Tip #9. Hunt Turkeys Near Roosts
After you’ve located a few roosting areas, watch where these birds naturally want to travel in the mornings when they get down out of the roost. When you hunt, position yourself between the roosting turkeys and where they naturally want to go to intercept them.
Take advantage of their natural patterns. Turkeys will often use the same travel corridors when getting down out of their trees because they will likely be heading to the same morning food source each day.
Just make sure you don’t get too close to their roost because they may fly out of range when getting out of the trees in the morning. I like to be about 75 yards from the roost in the direction of travel.
Tip #10. Hunt Turkeys All Day In Maine
In Maine, you can hunt turkeys all day long. This wasn’t always the case though, quitting time was at noon which is common in other states. Now that you can hunt turkeys all day, this makes Maine fairly unique and a great place to turkey hunt.
Hunting all day is an excellent way to put the odds in your favor. You might think there are no turkeys are around or that they have moved on after the morning excitement, but if you’re in an area where turkeys frequent chances are you will see some action.
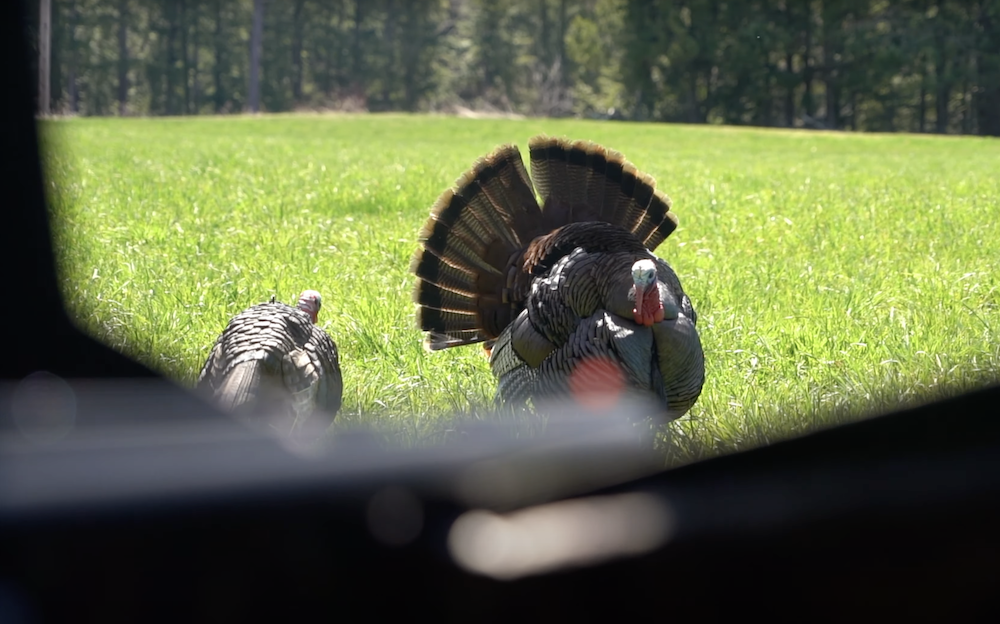
Keep your eyes peeled, they can come into the decoys silent. Oftentimes though, once a gobbler gets within a 30-yard ‘bubble’ they can’t help themselves and will gobble, often startling the **** out of you. These situations really get the heart pumping as they are least expected but if you stick it out will happen more often than you think.
Tip #11. Bring Comfortable Gear
I started seeing more success turkey hunting success when I bought a camo pop-up blind and comfortable lawn chair. This enabled me to move around a lot and not be seen because the blind was enclosed. It also gave me the comfort of staying in the bling for hours longer than just sitting against a tree with a cushion.
It also helps keep you warmer and dryer on windy or rainy days, not to mention keep the ticks and mosquitos away which is worth every penny in my opinion. Bring a good book, or binge-listen to podcasts or audiobooks, whatever it takes to stay longer. If you’re patient in an area where turkeys frequent, you will eventually have success.
Blinds Are Effective Pieces Of Turkey Hunting Gear
The pop-up blind I use is the Ameristep Care Taker Ground Blind which offers enough room for two hunters. It has adjustable shooting windows with removable mesh screening. It’s very easy to put up and to take down. It’s completely blacked out on the inside, so hunters stay out of sight. My favorite aspect of this blind is how easy it is to travel with because it comes in a carrying case similar to that of a lawn chair. Also, it’s very easy to set up because it pops up in sections similar to an umbrella. I’ve linked to it above if you’re interested.
All turkey hunters will appreciate a fully adjustable and swiveling blind chair. The legs of this chair adjust which allows for a perfectly leveled sit. This is key for maximum comfort. Additionally, the chair swivels 360º so that you can shoot out of any window of a blind easily at the approaching turkeys. A comfortable chair is key for success because when you’re comfortable you can last longer in the blind.
Tip #12. Be Patient
Patience is key to turkey hunting success. Morning in the turkey woods is often exciting, the turkeys are often gobbling and the anticipation of success is high. But if the gobblers don’t do what you were hoping then hope can die quickly.
But don’t give up, be patient. Birds are usually still nearby you just have to wait for them to make their rounds. A good time to be hunting is when they’re done with their breakfast and are looking to get a little frisky. The toms will be out looking for hens.
Don’t Lose Hope If They’re Not Gobbling
Morning in the Maine turkey woods is often exciting, but sometimes they just won’t gobble. Or they will stop gobbling altogether once they leave their roost. These birds may be over-hunted and are weary, or the weather may not be right for them to be gobbling.
You may think there isn’t a turkey for miles, but don’t lose hope. Just because you don’t hear them gobbling doesn’t mean they haven’t seen your decoys and are coming in. Give them time and your patience may be rewarded.
Tip #13. Turkey Hunting Weather in Maine
The Maine turkey hunting season starts around May 1st, and ends in the first week of June. In Maine, May mornings are cold especially early in the season. The afternoons get quite warm though, so you’ll want to have the right clothes and be prepared to shed layers.
Sunny Days are Best
Sunny days are the best days to be turkey hunting. Especially, if the few days prior were not good. This will often have birds out running around and gobbling their heads off.
Turkey Hunting in the Rain
Turkeys are on the move in the rain and you can have great luck on rainy days. However, you will likely not hear any gobbling and you should not call much yourself. Your best bet is to set a decoy out in a highly visible spot and just wait. Also, there is nothing more beautiful than a dry turkey, but a wet turkey is uglyr’n hell.
Turkey Hunting in the Wind
Turkeys are on the move on windy days too. Again, you will hear less gobbling and you should not call much yourself. Your best bet is to set a decoy out in a highly visible spot and just wait. your decoys will look more realistic with the wind adding some life to them.
Tip #14. Don’t Call Too Much
Beginners often call way too much because they love getting gobblers to call back to them, who doesn’t! I highly suggest resisting this urge, there is a fine line here, don’t overdo it.
When you call too much, it will start to seem unnatural and the gobbler may lose interest. Pay attention to how often and how loud real hen turkeys call and try to mimic that. You’ll notice they’re often not all that loud and that they don’t call very much.
Tip #15. Play Hard To Get
Once I have a gobbler fired up and talking back to me after every call I make. He will often stay out of range because he is trying to get the hen (my decoy) to come to him. To counter this, I will stop calling as often and pretend to lose interest.
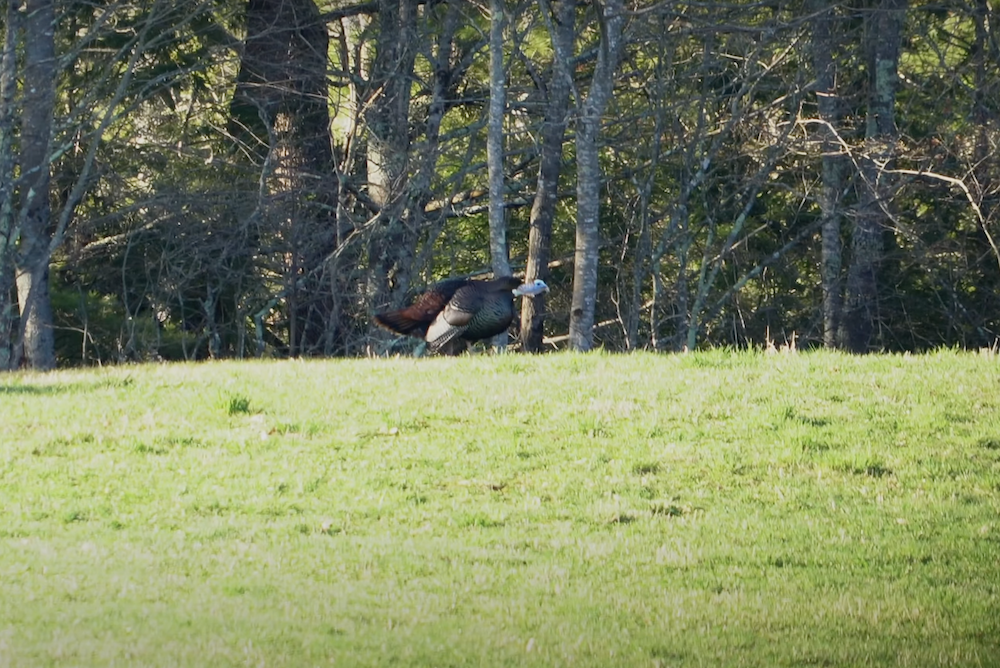
This Maine gobbler kept gobbling but would stay out of range. I had to play hard to get in order to get him in the decoys.
I do this by making the gobbler call 2-3 times before I respond with some light yelps. Often, toms will get frustrated that you’re losing interest and will often make their way to your decoys. Playing hard to get pays off big-time. This process can take hours so don’t overdo the calling.
Tip #16. Let The Gobbler Go
There are a couple of tips you can implement if you find yourself struggling to pull a gobbler in that sounds fired up and interested. First, you should implement “Don’t Overcall” then “Play Hard To Get”. The next step is to just let them go. If a gobbler just won’t come in don’t try to force it by calling more. This will just make things worse and he will figure out that your decoys aren’t the real deal.
Very often, especially for mature birds, just let them go. Toms get mad when they can’t convince you to come to them. They will keep you in the back of their minds while they go about their business. Often, after they’ve had some breakfast they will come back to see if you’re still around. They often come in silent, but they will be more apt to come right in because they are impatient and tired of waiting. Be ready!
Tip #17. Blind Call Sparingly
Blind calling is when you call even when you don’t think there are any turkeys around. This can be an effective tactic because it can bring birds in that are in earshot. If you’ve been calling at a fairly normal volume, it is not a bad idea to throw in an unnaturally loud call to see if you get a shock gobble once in a rare while.
However, I’ve had the best luck calling at a natural volume even if I feel like turkeys are not around. I will give a short calling sequence every 20 minutes just in case something has moved into earshot. You’d be surprised how many turkeys are actually around, but just aren’t calling back.
Tip #18. Turkey Decoy Placement
Different decoy combinations are used in different situations to get the gobblers to do what you want. Turkeys are territorial and lustful, you can use decoys to play on these weaknesses. Try to visualize and anticipate how and in what direction gobblers will approach decoys.
Toms will often hang back from hen decoys 15-20 yards as they get a read on the situation. But they will have no problem approaching another tom or jake decoy. I often place my hens off to the side of my blind and the male decoys close to where I want to shoot but only about 10 yards away. This makes the gobblers cross in front of me so I often create shots 20 yards and under.
Tip #19. Maine Turkey Decoy Setups
1 Hen
Unless you plan to be highly mobile (running and gunning), you’ll almost always want at least one decoy with you. Even then, I will often still bring one decoy. This should always be a hen decoy because when you call you’re mimicking a hen. So to not have a hen decoy in your decoy setups will look unrealistic to turkeys. Also, gobblers are looking for hens at this time of year, so there is almost no reason for not having a hen decoy.
I like this setup when hunting pressure is high, I feel like a single decoy seems more legit to real turkeys because other hunters are often using more than one decoy.
A hen is used as an attractor for toms and jakes. They can be used alone or with other male decoys. When placed with male decoys, a jealously and territorial trigger button will be pushed within male birds making them want to come into the decoys.
A tom turkey in strut when placed next to a hen decoy is used to get another dominant tom fired up and aggressive so that he will want to attack the decoy, thus bringing the bird into shooting range. Jakes will often be scared of a tom decoy so keep that in mind. Less aggressive toms may also shy away. For this reason, I rarely use this setup.
1 Jake + 1 Hen
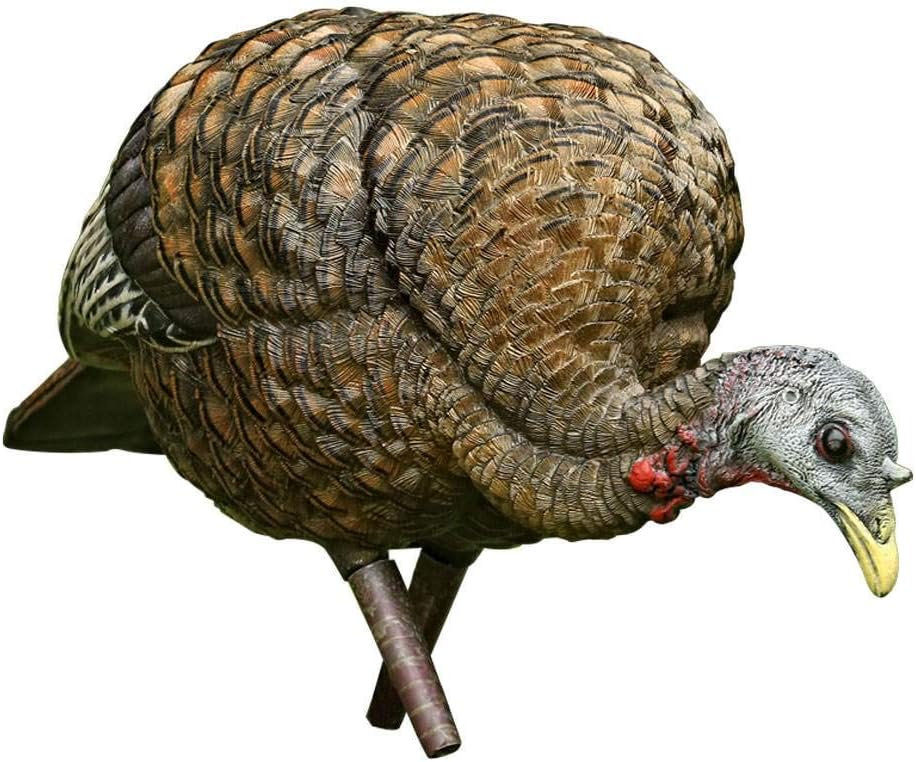
A jake turkey decoy that is semi-puffed up or even better – in full-strut – with hen decoys will make a tom want to put the jake in its place by letting him know who’s boss. This will make the tom angry want to come in and take the jake out of the picture so he can have the hen (your decoy) to himself. Additionally, other jakes will feel comfortable coming to join. This jake decoy can bring in any age male turkey. I use this setup a lot.
A semi-puffed jake decoy with a hen decoy will make toms angry and is a decoy layout I use when turkey hunting in Maine.
Two hen decoys are good for larger groups of gobblers because a bigger group of male turkeys will feel more comfortable coming to a party of two. Two hen decoys are very non-threatening so you can attract any male turkey. However, although not threatening, a single male turkey may be intimidated and feel outnumbered, especially jake.
Tip #20. Practice Your Turkey Calling
Calling is an important part of turkey hunting. Especially when it is more effective at the beginning of the hunting season when turkeys are not as badly pressured by hunters. I suggest listening to real hens calling on YouTube, taking mental notes, and practicing your turkey calling my mimic these turkeys. I like slate calls myself. Just remember that knowing when not to call is just, if not more important, than knowing how to call well.
Tip #21. Be Mobile
Although there is a lot to be said for being patient. Sometimes you’ve just gotta take the game to the turkeys. A good strategy is by walking around and calling periodically until you hear a gobble, then try to get close to the gobbler and set up a single decoy and try to call him in.
A gobbler will often want you to go to him which is a tricky situation, sometimes it pays off by walking in the opposite direction and calling or calling quieter. This will make you sound further away and will make the tom angry and will start coming to you.
Final Thoughts On Maine Turkey Hunting Tips
These are the best Maine turkey hunting tips that I’ve learned through years of trial and error. I hope you’ve found some value in these tips. I have no doubt you’ll increase your Maine turkey hunting success significantly by following these tips.
I bought 14 popular binoculars for hunting at different prices to determine the best binoculars for the money and conducted field tests to judge and compare each binocular. In this article, I cover everything from entry-level to high-end hunting binoculars and everything in between, sorted by price.
Table of Contents
How Hunting Binoculars Were Chosen For This Review
I bought 14 highly recommended binoculars from multiple sources across the web, at different price points, to test and review the best value binoculars for hunting.
After researching hundreds of binoculars using multiple online sources and cross-referencing them, I decided to buy hunting binoculars where these multiple sources overlapped in recommendations.
To keep these binoculars on a level playing field, I purchased 8×42 binoculars in most cases. But this review does cover some other sizes such as 9×45, 10×42, and 10X50 for further comparisons.
How These Hunting Binoculars Were Scored
I tested these binoculars over 3 weeks, using them in common hunting scenarios to see how they compared.
Testing Binoculars in Low-Light Situations
Testing Binocular Color on Mallards
Testing Binoculars While Shed Antler Hunting
They were scored using 10 categories that are essential for hunting applications:
Build Quality
Bulk & Weight
Usability
Field of View
Brightness
Low-Light Performance
Clarity/Color
Chromatic Aberration
Price
Warranty
This post contains Amazon and other affiliate links, which means I’ll receive a commission if you purchase through my link, at no extra cost to you. Of course, you are not obligated to use my links, but it does help fund these posts in hopes of bringing more value to you!
This Hunting Binocular Review’s Credibility
No Affiliation
I’m not affiliated with any of these binocular companies. I bought all of these binoculars with my own money, except for the Vortex Vipers which I borrowed from a friend.
Some of the hunting binoculars tested in this review to determine the best value binoculars for hunting for the money
My Credentials
As a wildlife biologist, Maine hunting guide, and avid outdoorsman I spend a lot of time in the outdoors and with outdoor gear that will make my life easier. For these reasons, I choose my hunting gear very carefully. I’m very picky about choosing my gear because I want it to do the job at hand as efficiently as possible without becoming a burden. Choosing the right binoculars is no different.
I’ve owned a few binoculars and had opportunities to try different types of binoculars through friends, family, and other outdoor professionals over the years. I also do photography and videography using interchangeable lens cameras. The concepts of how these lenses work with cameras are basically the same as how binoculars work with the human eye.
This, combined with extensive research on the ins and outs of how binoculars work, and how to choose binoculars to get peak performance for specific hunting styles is something I believe I’m very qualified to do.
Watch The YouTube Video:
Field-Tested Hunting Binoculars Under 350$
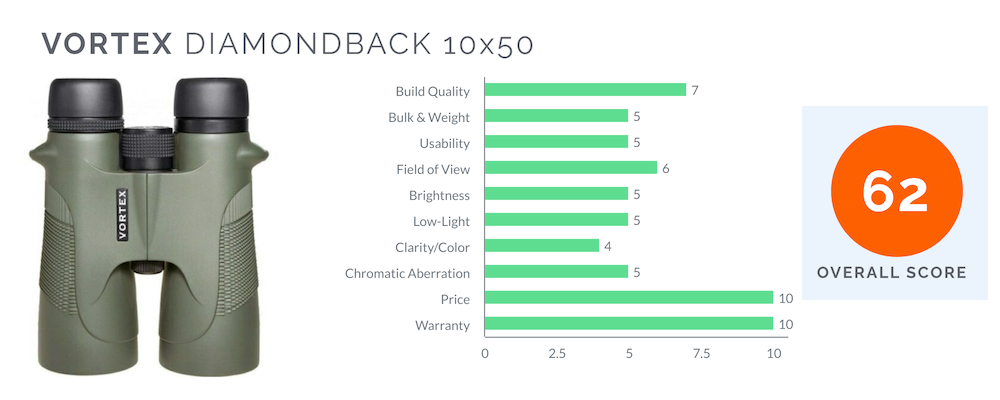
1. Vortex Diamondback (Old Version)
These are the binoculars that I’ve been using for the past 5-6 years now. For the price (on sale for 150$) these binoculars worked great and were some of the better binoculars on the market at the time for this price. However, after using other binoculars I found that my Diamondbacks were not nearly as clear as the newer binoculars that were around the same price.
The reason I included these older model binoculars in this review is to point out how much technology has changed in the last few years. Manufacturing has been able to produce much higher-quality glass, allowing for better binoculars to be a more reasonable price.
The difference between these Diamondbacks and the other binoculars in this review is night and day. If you have older binoculars, I would highly suggest an upgrade.
Edge-to-edge clarity just isn’t there either. It feels like you have tunnel vision when looking through these binos, but at least the center is in focus. Below are my field notes for each category:
Build Quality
Durable binoculars, they have lasted over 5 years with no issues.
Bulk & Weight
Fairly heavy and bulky binoculars for a 10X50.
Usability
Focus knob is hard to move, one solid click-in eyecup setting.
Field of View
315ft/1000 yards – not bad for 10X, but has tunnel vision (edge-to-edge clarity lacking)
Brightness
Not very bright compared to the other binoculars in this review
Low-Light
Expected more out of 50mm, orange-yellow tinted in lower light, things become ‘fuzzy”.
Clarity/Color
Edge-to-edge clarity is poor.
Chromatic Aberration
Aberration is noticeable and present but not terrible.
Price
Inexpensive, not made anymore
Warranty
One of the best there is for warranties – Lifetime Warranty
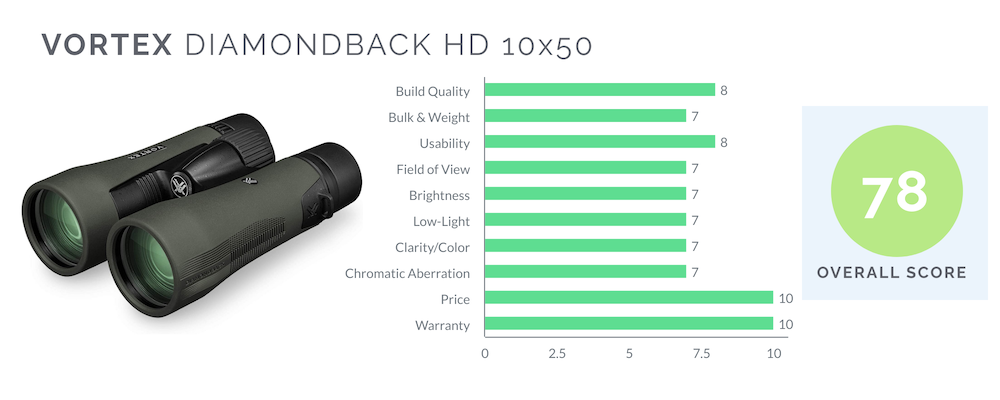
2. Vortex Diamondback HD
You might be wondering if there is a big difference between the older model Diamondbacks and the newer Diamondback HD’s. I had the same question, so I bought the HD’s to compare how glass quality has increased over the past few years.
There was a huge difference. The Diamondback HD’s were better in every way and were much more competitive and comparable to the other binoculars in this review. Below are the field notes I took during my review:
Build Quality
Durable, feels very well made
Bulk & Weight
Average for 10×50, slightly front-heavy
Usability
Eyecups work well, focus knob works well with one finger
Field of View
315 FOV, average for 10x
Brightness
Brightness is about average compared to other binos
Low-Light
Not bad for 10×50, about average
Clarity/Color
Pretty good, also about average
Chromatic Aberration
Some, but not bad for the price
Price
One of the most affordable tested
Warranty
One of the best there is for warranties – Lifetime Warranty
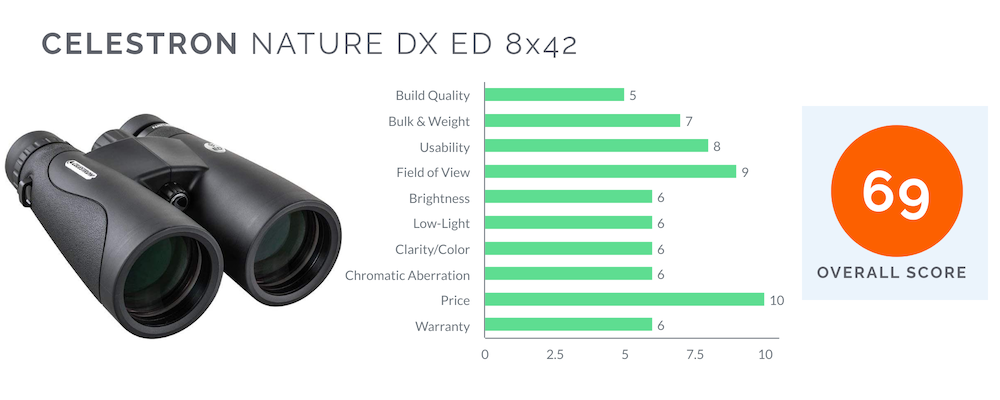
The Celestron Nature DX ED 8×42 was the most affordable binocular in this test. For its price, it does well. It does a good job in situations where there is plenty of light. But once the sun starts to set you start to notice where this binocular is lacking. That being said, it does not do a horrible job, it just is obvious when comparing these binoculars to the other binoculars that it does a below-average job in brightness, low light, and clarity.
A big reason to get good hunting binoculars is to be able to see when animals are most active, during low light. But if the type of hunting you do doesn’t require you to see low-light situations, then these binoculars are not bad for their price. But if you spend 50$ more you can get a substantially better pair. Below are the field notes I took while reviewing these binoculars:
Build Quality
Eyecups are finicky, they don’t stay in place well.
Bulk & Weight
Average compared to other binoculars
Usability
Does a good job focusing on objects quickly
Field of View
Excellent, 393 FOV, very wide
Brightness
Orange-yellow tint, especially in low-light
Low-Light
Slightly below average when compared to other binoculars
Clarity/Color
Slightly below average when compared to other binoculars
Chromatic Aberration
Slightly below average when compared to other binoculars
UPDATE: I did a longer-term review of these binoculars. I did this review after owning the binoculars for about a year and through one hunting season.
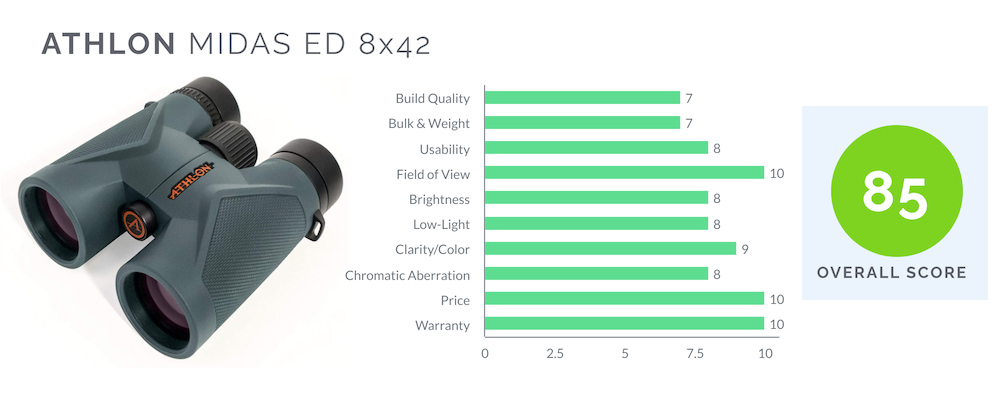
The Athlon Midas ED binoculars were amazing and outperformed even the most expensive binoculars. For the price, I could not tell the difference between the hyped direct-to-consumer Maven C1’s in the picture quality. They also did the same, and even better in most cases, in low light situations than the 350-500$ tier binoculars.
The image from these binoculars is incredibly clear, crisp, and bright. The adjustable diopter is very precise, and the focus knob is easy to turn with one finger, which I appreciate for finding focus fast and when I have cold hands. The wide field of view is very convenient and helpful in many hunting situations.
These binoculars are light and convenient and come in a great carrying case, have great lens caps that stay attached to the objective lenses, and the twist-up eyecups have the perfect settings for me. Fantastic pair of binoculars and they are one of the most inexpensive binoculars in this test. Below are my field notes I took while reviewing these binoculars:
Build Quality
Average, feels sturdy in hand.
Bulk & Weight
Slightly better than average, lower-profile
Usability
1 finger focus knob adjustment, everything works well
Field of View
426 FOV, tied with best there is in this review
Brightness
Excellent, bright white, amazing for the price
Low-Light
Excellent better thana and comparable to more expensive
Clarity/Color
Edge to edge is very well done for wide FOV
Chromatic Aberration
Slightly better than average, not very noticeable
Price
Inexpensive, one of the more affordable options, especially for what you get
Warranty
Athlon offers a very good lifetime warranty.
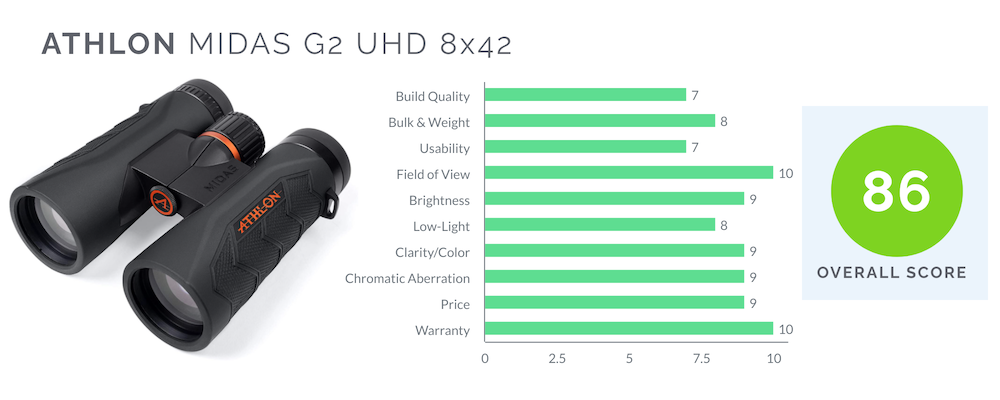
5. Athlon Midas G2 UHD
I tested both the Midas ED (predecessor, above) and this Midas G2 UHD. I gave these two binoculars a very similar score. The ED’s were a little bit more comfortable while these G2 UHD’s had an ever so slight advantage in clarity and low-light performance.
These binoculars were also amazing for the price, just like Midas ED’s. When compared to the hyped direct-to-consumer Maven C1’s I could not tell the difference in the picture quality. These binoculars also outperformed the binoculars in the 350-500$ price range tested in this review.
The image from these binoculars is incredibly clear, crisp, and bright. The wide field of view is very convenient and helpful in many hunting situations. I wish the twist eyecups were more comfortable like its predecessor (above), but they still work well.
Overall, these binoculars are truly incredible, they’re light and convenient and come in a great carrying case, have great lens caps that stay attached to the objective lenses. They are inexpensive compared to most of the binoculars in this review. Below are my field notes I took while reviewing these binoculars:
Build Quality
average
Bulk & Weight
slightly better than average
Usability
average
Field of View
426, tied with best
Brightness
excellent, bright white
Low-Light
great, comparable to more expensive
Clarity/Color
edge to edge is very well done for how wide
Chromatic Aberration
very little
Price
inexpensive
Warranty
lifetime
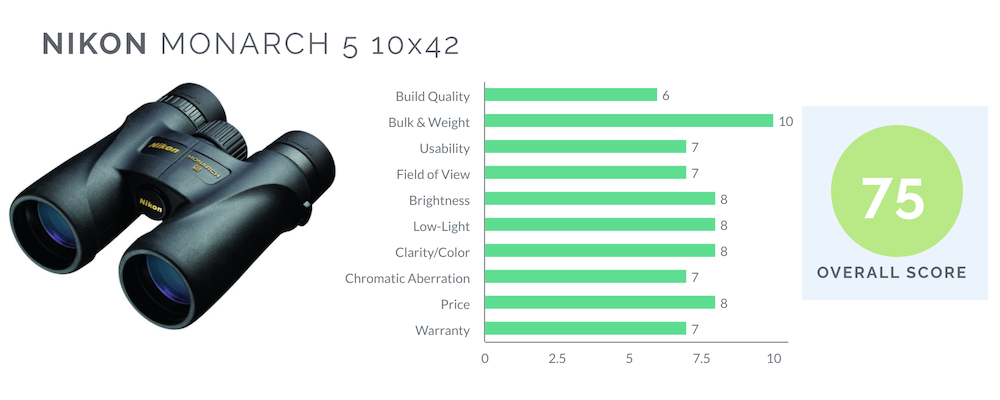
6. Nikon Monarch 5
This review examined the 10×42 model of these binoculars. Overall I was impressed with these binoculars as they were 10×42’s competing with mostly 8×42’s in this review.
I was impressed with the brightness and low-light capabilities of these binoculars, especially for being 10×42’s, which normally don’t do as well in this category compared to 8×42’s. But these were able to keep up with and do better than some of the more expensive 8×42 binoculars.
The Monarch 5’s didn’t slouch in any department except slightly in build quality. The build quality, in my opinion, was not great because of the rubber that gets marked up very easily. Although the rubber coating of the binoculars is great for grip and deadens noise when bumped, the rubber is ‘pencil eraser-like’. My first impressions indicated that residue would likely remain on this rubber coating. This doesn’t affect performance but I’d like to keep my hunting binoculars clean and looking as nice as possible for years to come.
These binoculars were also very lightweight. This may be fine in an 8×42 pair, but for these 10×42’s I wouldn’t mind having a little bit more weight to stabilize my viewing experience. It can be difficult when looking for small details, and small details are often the most important for hunters. For example, being able to see antler tines, turkey beards, or identifying waterfowl at a distance.
I think I would have enjoyed the Nikon’s higher if I had tested an 8×42 pair. This is because it would have ranked better in field of view (330 ft instead of 288 ft at 1000 yards), they wouldn’t have appeared to be as shaky, and low-light may have been even better than it already is. Below are my field notes from reviewing these binoculars:
The Celestron Trailseeker ED 8×42’s were basically the same as the Celestron Nature DX ED 8×42 (above). They have a slight advantage because the eyecups are definitely better. There was no improvement in low-light performance with the increased price of the binoculars over the Nature DX.
These binoculars also do a good job in situations where there is plenty of light. But once the sun starts to set you’ll notice where this binocular is lacking. That being said, it does not do a horrible job, it just is obvious when comparing these binoculars to the other binoculars that it does a below-average job in brightness, low light, and clarity.
A big reason to get good hunting binoculars is to be able to see when animals are most active, during low-light. But if the type of hunting you do doesn’t require you to see low-light situations, then these binoculars are not bad for their price.
What I found during this review is that you can get binoculars that perform much better in low-light for less money. Below are my field notes I took while testing:
Build Quality
Average
Bulk & Weight
Average
Usability
No hiccups
Field of View
426 ft / 1000 yards – Excellent
Brightness
Not great, in low-light – orange tint
Low-Light
Below average
Clarity/Color
Nothing to brag about
Chromatic Aberration
Some, not super noticeable
Price
Starting to get expensive for what you get when compared to other binoculars
The Maven C1’s are the most expensive binoculars in the under 350$ price range. These binoculars do very well when compared to the other binoculars. Their daytime clarity was amazing and performed excellently in low-light. They were one of my favorites in the under 350$ category and even outperformed more expensive binoculars.
BUT, these binoculars have one big hiccup for me and that is the metal focusing knob. The focusing knob is so noisy and makes a metallic noise even when running your finger over the dial. If you were to ever hit that knob on another piece of metal by accident when hunting it would make quite a racket. Stealthiness is very important to me as a hunter, and this brought the Usability rank down a lot. I couldn’t bring these on most of the hunts that I do for this reason. This is unfortunate because they have amazing glass for the price. The knob needs a rubberized coating or replacement in my opinion.
Even though I liked these binoculars a lot, the Athlon Midas really gave them a run for their money. Although I think that the Maven has a very slight advantage in glass quality from my field observations, it is likely not enough for me personally to justify the extra price of the Mavens. I also really enjoy the wide field of view that the Athlon Midas offers. Below are my field review notes:
Build Quality
Slightly better than average
Bulk & Weight
Slightly better than average
Usability
Metal focus knob – very noisy
Field of View
341 ft/1000 yards, not the best, not the worst
Brightness
Excellent, bright white
Low-Light
90% pass-through, it was noticeable, very good
Clarity/Color
Very crisp glass
Chromatic Aberration
Some, slightly better than average
Price
Most expensive in price range, but still great value for the price
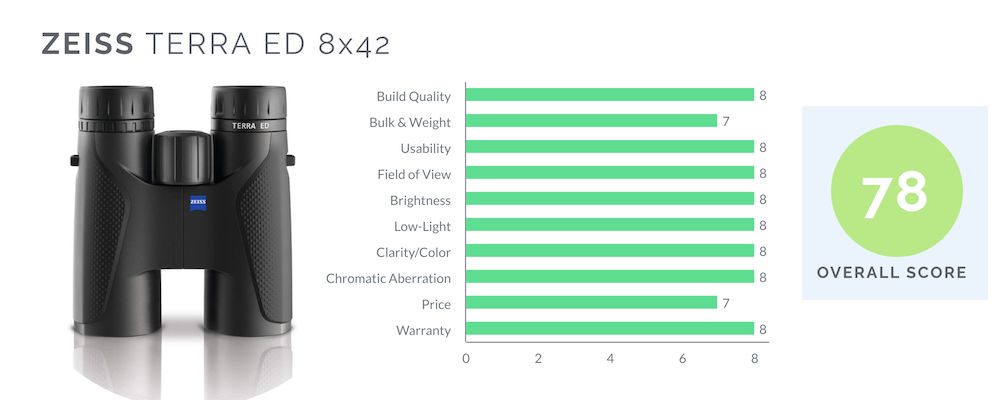
The Zeiss Terra EDs are all-around solid binoculars. They ranked slightly above average in most categories. The eyecups were a little sticky but not so bad it would prohibit me from buying. I liked that the focus knob was more easily moved with one finger than most other binoculars. They are very bright, and crisp, and do well in low-light. I was not a fan of the lens caps, they are different than other binoculars and got in the way often.
Overall these binoculars were very good, but I was just as impressed, if not more impressed, with some of the lower-priced binoculars such as the Midas’s and Maven C1. I would be more inclined to buy this binocular over the Maven C1 because of Maven’s metal adjustment knob. The Mavens did appear to have better optics though. So, if the metal knob is not an issue for you then the Mavens would be a better choice. Below are my field review notes:
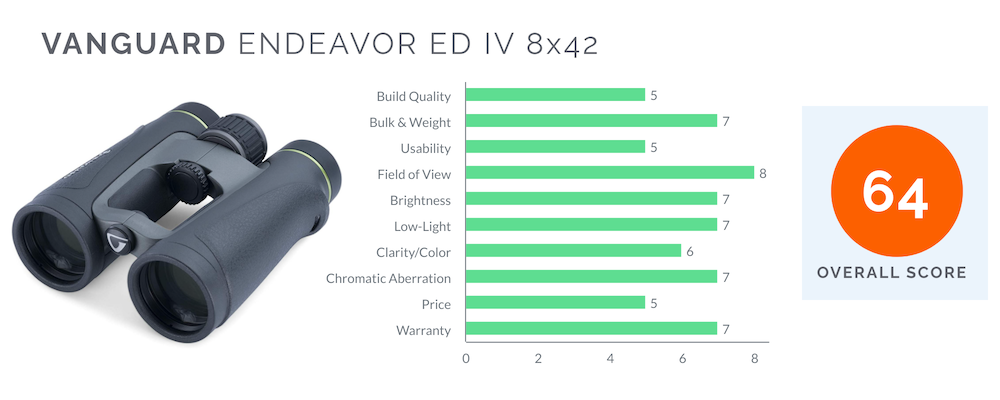
I did not have a good experience with the Vanguard Endeavor ED IVs. I may have received a faulty pair, I’m not sure but they did not perform well. The eyecups and focus knob were terribly sticky, especially when cold. If the weight of your finger was not placed on the center of the focus knob, it would be even harder to twist. For this reason, I primarily had to use fingers from both hands to be able to move the dial to focus. This is annoying, especially in hunting situations when you often need to get focused quickly.
It was difficult to get a clear picture, even after using the diopter to adjust both eyes. The brightness and low-light capabilities left some to be desired. It had an orange tint to the glass in low lighting, similar to that of the cheapest binoculars in this review.
For the price, I believe there are many better binocular options to choose from for hunting applications. Below are my field review notes:
Build Quality
Below average, sticky dial and eyecup
Bulk & Weight
Average
Usability
Everything was sticky, knob didn’t work well with 1 finger
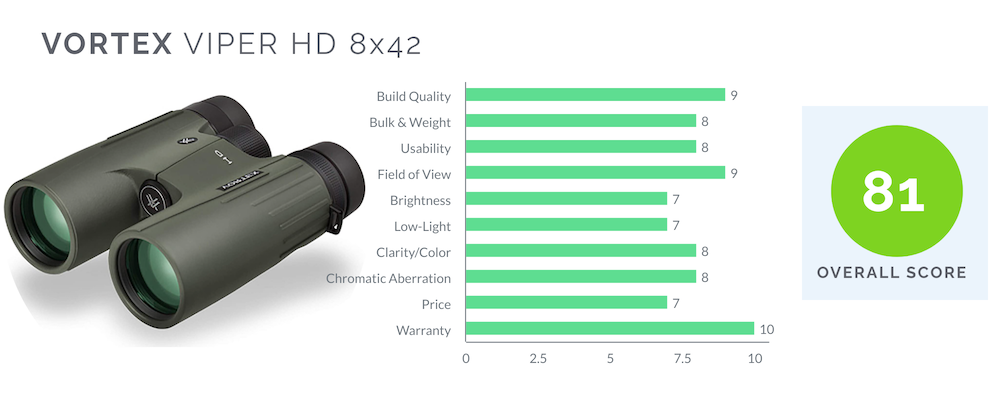
The Vortex Vipers were one of my favorite binoculars in the review. These were my favorite binoculars in the mid-tier price range (350-500$). They were above average in most areas but were not as bright nor did they have the same and low-light capabilities that the Zeiss Terra ED, Maven C1, and Midas binoculars had. That being said, the Vipers were still competitive in these areas.
These are great binoculars but are beginning to be on the more expensive side. For the price, these aren’t a bad purchase, but I found that some of the cheaper binoculars did equal to, if not better, when compared to the Vipers. My field review notes are below:
The Maven B2s binoculars were awesome, I really liked them. They were clearly better than all of the other binoculars tested so far in terms of glass quality.
However, these Mavens were also big and long which added a lot of bulk. They were 9×45’s so I did expect some increase in size but I did not expect them to be as big as they were. If you plan to hunt mobile, these binoculars should be carefully considered. For this reason, they did not score well in the bulk/weight category.
Like the Maven C1s, they had a metal focus knob that made a lot of noise. This is very unfortunate because hunters have more important things to focus on than making sure their binoculars don’t make noise. For this reason, they did not score well in the usability portion of this review.
Despite not ranking well in these categories, the B2s still scored well for how clear their glass was. Below are my field notes from testing:
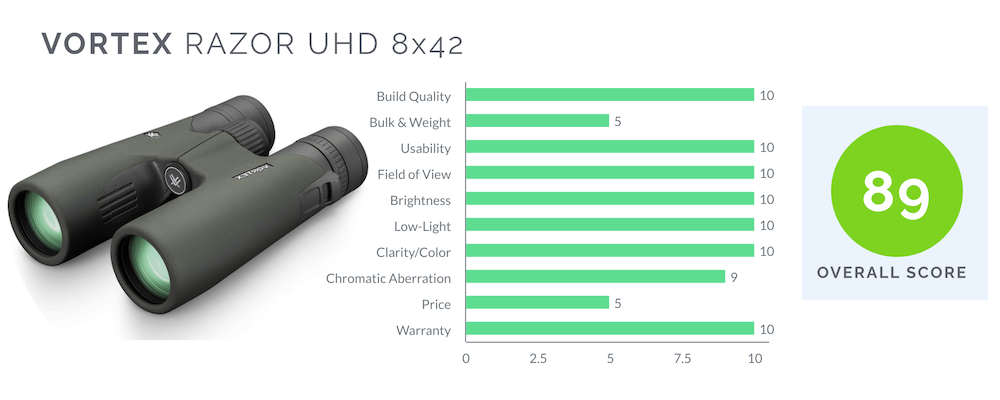
The Vortex Razor UHD binoculars were fantastic, I liked them a lot. They were better than all of the other binoculars in terms of glass quality, even slightly better than the Maven B2s.
However, like the Mavens, these binoculars were also big, well, I should say long but sleek, which added bulk. These binoculars were only 8×42’s and they were about the same size as the 9×45 Maven B2s. I did not expect them to be as big as they were. If you plan to hunt mobile, these binoculars should also be carefully considered. For this reason, they did not score well in the bulk/weight category.
These binoculars score very well in every other category except price, as they are very expensive. Below are my notes from field testing:
Build Quality
Excellent, perhaps my favorite
Bulk & Weight
Huge for 8×42 when hunting
Usability
As good as it gets?
Field of View
420 ft @ 1000 yards, 2nd best, excellent
Brightness
Very bright, it’s noticeable, especially in low-light
Low-Light
Excellent low-light binoculars
Clarity/Color
Very clear
Chromatic Aberration
Very minimal
Price
Expensive
Warranty
Vortex has one of the best warranties for binoculars
Every credible article that I researched when determining which binoculars to buy for this review pointed to these binoculars as being the best of the best. I knew I had to buy these binoculars so that I would have something to hold all other binoculars to during the review.
These binoculars did not disappoint, everything that is mentioned about them in other reviews about them being exceptional binoculars I also found to be true. They were, without a doubt, the best binoculars I tested. They scored just about perfect in every category, except for price because they are by far the most expensive binoculars.
The diopter was the easiest to set, it was a very easy experience to perfectly dial each eye. The focus was unmatched by the way it was able to push in and out of the thick cover, and it was amazing clarity and low-light.
They were a little heavy and bulky when compared to most of the other 8×42 binoculars, but it made them feel very well made and durable as well as cutting down on hand jitters. They were much less cumbersome than the Maven B2s and Vortex Razor UHDs.
I particularly enjoyed how I did not need to be perfectly on-axis when looking into the binoculars. I could move my eyes side-to-side without the annoying ‘blackout’ effect you see from the lower-quality binoculars. This meant eye strain was at a minimum when using the Swarovski EL’s. Below are the field notes I took while conducting my review:
Build Quality
Very well made
Bulk & Weight
For 8.5×42, slightly big and heavy
Usability
Excellent
Field of View
399 ft @ 1000 yards, excellent for 8.5x
Brightness
Very bright
Low-Light
Superior low-light capabilities
Clarity/Color
A very clear and crisp glass
Chromatic Aberration
Minimal to none
Price
The most expensive binoculars tested
Warranty
Average
The Final Results
It was clear after conducting this review that both the Athlon Midas G2 UHD and the Athlon Midas EDs are the best value binoculars for the money. You can’t go wrong with either one for the price. When compared to the Swarovski’s, there was a difference, but for hunting applications, there wasn’t a 10x difference in price. For the price difference, the Midas’s had, in my opinion, 80% of what the 1000$+ binoculars had to offer.
Best High-End Hunting Binoculars For Hunting
The Swarovski’s and Vortex Razor UHD’s both tied for first place. These two were built differently, so you’ll need to consider your personal style of hunting when choosing them.
For me, the Swarovski EL’s were the best high-end binoculars for mobile hunters because they were the smallest of the tested binoculars in the 1000$+ category while also have slightly more zoom and maintaining a very wide field of view.
The Vortex Razor UHDs are built differently than the Swarovski’s but were also very nice binoculars. If you don’t mind a little more bulk for the type of hunting you do, these binoculars are just about every bit as nice.
Are Expensive Hunting Binoculars Worth The Money?
There is a point of diminishing return when buying hunting binoculars. You can obtain 80% of the quality by spending 10x less money.
For example, the Athlon Midas binoculars cost +/- 250$, whereas the Swarovski EL’s cost +/- 2500$. So for 10x less money, you can still have at least 80% of what those expensive binoculars offer.
For me, if 250$ binoculars are even 70% comparable to 2500$ binoculars, that’s good enough for me.
I put my hunting binoculars to the test in all types of weather and through rough habitat and I don’t need to be worried about losing, dropping, scratching, or forgetting expensive binoculars.
For the reasons mentioned in this article, I believe the Midas binoculars are the best value binoculars for hunting because they offer, in my opinion, 80% of the value when compared to the most expensive binoculars that cost 5x-10x more money.
I hope you’ve found this review of the best hunting binoculars helpful, if you have, feel free to share it using the social media buttons below.
If you have questions or comments feel free to leave them in the comments section below or message me on Facebook or Instagram.
Learn exactly what you need for turkey hunting gear as a beginner so you can get out in the woods and start having success. Over 15 years of trial and error with turkey hunting gear has enabled me to dial in what works. In this post, I share what I believe is the best turkey hunting gear for beginners based on my experience.
You don’t need much gear to get started turkey hunting. A shotgun and some camo will get you started. However, the gear in this post will help increase your odds of success and make you more comfortable in the process.
Table of Contents
The Turkey Hunting Essentials
Turkey Hunting Shotgun
You’re definitely going to need a shotgun. For beginners, I would recommend anything between a 20 ga to a 12 ga shotgun. Pump-action shotguns will generally be the lowest price. Personally, I use a Benelli Supernova pump shotgun which is a little bit more expensive than the Nova but, in my opinion, it is worth the money. I’ve been using mine for over 10 years, you can check out the review of my Benelli SuperNova here if you’re interested.
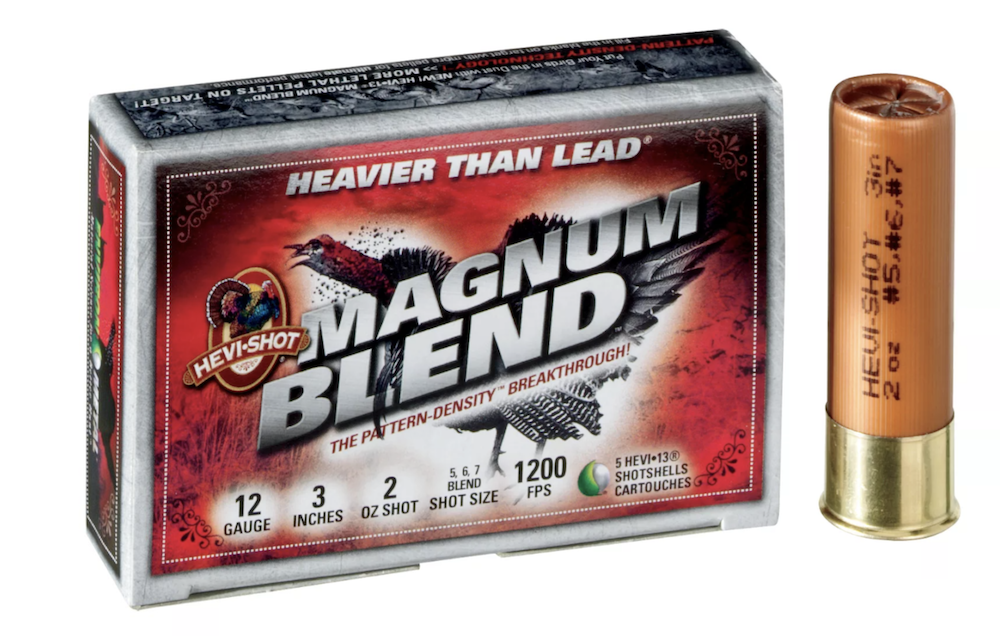
Turkey Hunting Ammo
I suggest getting #6 shells of the heaviest ammo you can find, ideally lead or tungsten. This means you will get a lot of BBs on target with good knockdown energy. Many small heavy BBs are what you’re looking for, it doesn’t matter that they travel at a slower velocity. A slower velocity is better for keeping your pattern tighter at longer distances too. Remember, you’re shooting at the head and neck of the turkey, it doesn’t take much to be lethal so the more BBs you have the better odds one of those BBs will hit lethally. 2-3/4 and 3-inch shells will work just fine but you will have to let turkeys get closer than if you’re using 3.5-inch shells.
Steel #4 would not be ideal because those are lightweight large-diameter bullets, which means fewer BBs per shell with less knockdown power.
Hunting License
A hunting license is a requirement for hunting turkeys. This doesn’t really count as gear but…don’t forget your hunting license! You can thank me later.
Turkey Hunting Clothes
Turkeys have incredible eyesight, so buying camo clothes would be worth your while. I would recommend head-to-toe camo, especially if you won’t have a ground blind.
Camo Ball-Cap
Ball caps are essential pieces of gear, they provide camouflage, warmth, and protection from the sun, insects, and branches. If you’re hunting in a ground.
Camo Neck Buff/Gaiter Facemask
Buffs are versatile and can be worn in many different ways. I use mine as a facemask and for protection from the sun and insects. Additionally, turkeys have incredible eyesight, so having a facemask will help you from being detected.
Touchscreen Camo Gloves
Beginners often overlook the importance of gloves because they feel like they don’t need them. However, your hands are the most noticeable part of your body because of their excessive movement. Concealing your hands will go a long way to remain undetected.
Touchscreen gloves are awesome for turkey hunting because I’m often use my Phone GPS to navigate and take waypoints. I’m also using my phone when the hunting is slow. Having gloves that are touchscreen enabled will keep my gloves on my hands so I’m not moving them as much when taking them on and off to use my phone, thus keeping turkeys from spotting the extra movement.
Camo Moisture-Wicking Long-sleeve
I always wear a lightweight moisture-wicking baselayer because in spring temps can get pretty warm in the afternoon. Being able to wick sweat during the hotter periods of the day will help you stay comfortable and remain in the woods longer.
Camo Polyester Fleece Hoodie
The early mornings can be pretty chilly, I always wear at least a hoodie, and sometimes even a bigger jacket. As the day progresses I can take off what I don’t need. But I’m usually quite comfortable with Rynoskin Total, a long-sleeve shirt, and a hoodie all day. This camo pattern mimics the bark of a tree. It is suggested to break-up your outline when turkey hunting by putting your back against a tree.
Lightweight and Quiet Camo Pants
Lightweight and quiet pants are essential for turkey hunting. You don’t want to be weighed down and make a bunch of clothing noise when turkey hunting. I like these pants because they address all of these concerns and they have some green color in them. I like the green because, in May, vegetation is just started to become green.
These pants will work for hunting out of a hunting blind as well because turkeys won’t be able to see past your waist, so it is okay that they aren’t black like the inside of a hunting blind.
Rubber Turkey Hunting Boots
I am a huge fan of knee-high rubber boots. I wear them all season long. My favorites for turkey hunting are the Lacrosse Grange boots and the GumLeaf Field Wellys. They’re lightweight and comfortable and are great for the mucky spring turkey season. If you want to know more about why I like these boots so much you can check out my YouTube video, both boots are included in the review:
Black Turkey Hunting Clothes For Ground Blind Use
If you’re hunting from a ground blind, I would suggest black clothing to blend into the inside of the ground blind better. You don’t need to wear black from head to toe, just a shirt, facemask, gloves, and a hat.
Turkey Hunting Decoys for Beginners
Although decoy prices range, I suggest buying a good pair that will last and look great over the long term. My dad and I used a decoy called “wrinkled crap” for a few years. It came out of the box deformed, and every year it would become more distorted from packing it away for the season and from the plastic heating and cooling after hunts.
Avoid buying ‘wrinkled crap’ decoys so you don’t end up trying to make it look halfway decent by sticking a bunch of sticks in it in the dark while turkeys are getting out of their roost all around you. I’ve linked some of the better decoys worth the money below.
Different decoy setups are used in different situations to get the gobblers to do what you want. Turkeys are territorial and lustful, you can use decoys to play on these weaknesses. Try to visualize and anticipate what direction gobblers will approach decoys.
Toms will often hang back from hen decoys 15-20 yards as they get a read on the situation. But they will have less of a problem approaching another male decoy. I often place my hens off to the side of my blind and the male decoys close to where I want to shoot but only about 10 yards away. This makes the gobblers cross in front of me so I often create shots 20 yards and under. My favorite setup is one jake and one hen decoy.
Turkey Hunting Decoy Setups
Tom Turkey Hunting Decoy
A tom turkey in strut when placed next to a hen decoy is used to get another dominant tom fired up and aggressive so that he will want to attack the decoy, thus bringing the bird into shooting range. Jakes and less dominant toms will often be scared of a tom decoy so keep that in mind.
Jake Turkey Hunting Decoy
A jake turkey that is semi-puffed up with a hen decoy will make a tom want to put the jake in its place by letting him know who’s boss. This will make the tom want to come in and kick the jake away from the hens so he can have them to himself. Additionally, other jakes will feel comfortable coming to join this jake. Jake decoys can bring in any age male turkey.
Hen Turkey Hunting Decoy
A hen is used as an attractor for toms and jakes. They can be used alone or with other male decoys. When placed with male decoys, a jealously and territorial trigger button will be pushed within male birds making them want to come into the decoys. Often just one or two hen decoys with no male decoys will work well too but won’t trigger as aggressive of an approach. Males will often come in slower but more calmly.
Best Turkey Hunting Calls For Beginners
You don’t need to buy all of these different types of calls. I would suggest just buying one and getting good with it.
Turkey Hunting Slate Call
I prefer the slate call and use it more than any other call. I feel like I get a very realistic result from them. The slate call is great for soft to medium volumes. Often there is no need to call loud because they will sound unrealistic to turkeys anyway. The downside to this call is it can be tough once turkeys get close because you need to use both hands to use it. I will often use my voice if I need to use my hands.
Turkey Hunting Mouth Call
A mouth call can be beneficial for those who aren’t hunting from a blind. Using a slate call in these situations can get you seen by turkeys because of the movement. A mouth call is the most discrete call.
A mouth call is the most versatile because you can have your hands on your gun and call at the same time. It can produce quiet and loud volumes. I recommend beginners to get mouth calls to practice with but to also have another call at the ready while you’re learning because it can take time to learn.
Turkey Hunting Box Call
A box call is a great tool for locating gobblers that are far away in the distance because the box calls are generally able to produce the loudest yelps of any type of call besides an electronic call. It also can call quietly, but it does not seem to sound as realistic to me when making quiet calls compared to the slate. The clucking and purring is pretty okay, but the slate does better for these quieter calls.
Versatile Turkey Hunting Box Call For Beginners
This is another style of box call and is one that I would recommend for beginners. It is not just a box call, but it also has a built-in second call for purring, clucking, and cutting (see wooden rod). This is a very versatile call and is easy to learn, this is my most highly recommended call for beginner turkey hunters.
Electronic Game Caller With Programmable Turkey Calls
An electronic game call, where legal, can be an awesome piece of turkey hunting gear for a beginner because it takes all of the guesswork out of calling turkeys. These calls come with a function that lets you download new sounds, and download custom sounds so that they can be used for any type of hunting. Pro Tip: You can also strategically place these calls to trick turkeys into shooting range by placing the calls 20 yards or so behind you, drawing turkeys in closer.
Best Turkey Hunting Gear For Beginners (Recommended Gear)
Pop-Up Blind For Turkey Hunting
For whatever reason, turkeys are just not phased by ground blinds. It’s always best practice to conceal them into the environment as much as possible but from what I’ve experienced, you don’t need much. You can also get away with a lot of movement within a blind that you otherwise could not. Although heavy, it’s worth its weight in gold. I’m almost always hunting out of a ground blind.
I highly recommend a ground blind for beginners because it will increase your success by concealing movement, be more comfortable, and keep bugs away. In my experience, new hunters move around way too much without a ground blind. They don’t know that they are moving around too much because they don’t have much experience. A blind will allow new hunters to move around, allowing for a more enjoyable hunt, and without blowing their opportunity at shooting a turkey.
The blind below is the Ameristep Care Taker Ground Blind (100$) which offers enough room for two hunters. It has adjustable shooting windows with removable mesh screening. It’s very easy to put up and to take down. It’s completely blacked-out on the inside, so hunters stay out of sight.
My favorite aspect of this blind is how easy it is to travel with because it comes in a carrying case similar to that of a lawn chair. Also, it’s very easy to set up because it pops-up in sections similar to an umbrella.
Lawn chairs are the most affordable and comfortable chairs for ground blinds that I’ve been able to find. They’re so comfortable that when I start to get bored after the morning excitement, I’ll often doze off in hopes to be woken up by a gobble (this has happened many times). This is my recommended chair of choice for beginner turkey hunters.
Another benefit is how easily lawn chairs can be transported. They fold up and can be put into a small bag that you can carry over your shoulder. This is something to consider when you’re carrying a lot of gear to your spot. The downside is they aren’t as maneuverable as some other ground blind chairs, but most are more expensive than lawn chairs.
Adjustable, Swiveling Ground Blind Chair
All turkey hunters will appreciate a fully adjustable and swiveling blind chair. The legs of this chair adjust which allows for a perfectly leveled sit. This is key for maximum comfort. Additionally, the chair swivels 360º so that you can shoot out of any window of a blind easily at the approaching turkeys. A comfortable chair is key for success because when you’re comfortable you can last longer in the blind.
Rynoskin Total Clothing: Chemical-Free Insect Protection
Ticks and insects are at full-force during spring turkey seasons. I’m a big advocate of Rynoskin Total, I wear it religiously to protect me from mostly ticks but also to help with minimizing mosquito bites and bites from other insects. Because of how bad ticks and other bugs are in Spring, I honestly don’t go turkey hunting or in the woods unless I’m wearing the stuff.
I don’t like spraying myself with harmful chemicals. Rynoskin Total is a chemical-free breathable baselayer that helps prevent bugs from penetrating the tight mesh. But make sure you read my full review before you buy it because I developed a regimen that I follow to help maximize the effectiveness of the gear. You can check the price on Amazon.
Original Rynoskin (camo) & Rynosking Total (Black and Green)
Binoculars For Turkey Hunting
I did a YouTube video on the 14 best value binoculars for hunters. I bought these binoculars and field-tested and compared them all. To sum the video up, I found that the Athlon Midas binoculars were the best for the money. They would make excellent turkey hunting binoculars.
Some of the hunting binoculars tested in my YouTube review
Binocular Harness
A binocular harness wraps around the torso and keeps the binoculars at chest level so hunters can be hands-free when hunting. When turkey hunters need their binoculars, they will be able to get to them quickly and effortlessly. Binoculars are only needed periodically, but quick access can make a difference between identifying a gobbler in time to get a shot off or not before he disappears. Being able to store binoculars in an easily accessible place makes the process seamless when they are needed.
Rangefinder
Rangefinders are very versatile and can be used for much more than just turkey hunting. However, they are one of the best pieces of gear a turkey hunter can own whether a beginner or not. It can be very hard to judge the distance of a turkey, especially in a big field with no depth perception. A rangefinder is a staple in my turkey hunting arsenal.
This Vortex rangefinder below has excellent reviews. Vortex is a leading manufacturer of high-quality glass (binoculars, spotting scopes, rangefinders) and has unbeatable lifetime warranties. I also created an article on the best rangefinders so you can check that out if you want help narrowing down options.
Turkey Locator Call – Crow Call
When turkeys just don’t seem to be cooperating and you can’t get one to gobble, a crow call can sometimes get a turkey to ‘shock-gobble’. This can be a game-changer for a particular hunt. This isn’t an item that a lot of turkey hunters would think of because it isn’t used often but it’s one of those items that can pay off when it’s needed and is nice to have when hunting. As a beginner turkey hunter, this wouldn’t be my first purchase but it’s a good tool to keep in mind.
Choke Tubes
Choke tubs are an important tool when turkey hunting to maximize a shotgun’s range. When turkey hunting it is best to use a full or extra full choke, I normally use a full choke. This keeps your pellet pattern tight for long-range shots.
However, when your shotgun is shooting very tight patterns you need to make sure it is accurate at close range because it’s much easier to miss a target a close range if your pattern is very tight. A lot of turkey hunters use sights (red dots, scopes) on their shotguns to sight in their shotgun so their pattern is centered at close and long range.
Turkey hunting choke tubes are screwed into shotgun barrels to increase shot-pattern density for longer and more lethal shots on turkeys.
Seat Cushion
If you’re not going to be hunting from a blind you’re going to want something comfy to sit on or you’ll be moving around way too much. I suggest something with padding for your butt and your back otherwise you’ll get sore faster. Some turkey hunting vests have this as a built-in feature.
Turkey Hunting Vest
The turkey hunting vest may be the most important peice of gear other than your shotgun, lciense, and ammo. You’ll be carrying a lot of gear. For example; shells, calls, sandwiches, water, bug spray, turkey decoy attachments, and other odds and ends. It’s very helpful for getting from Point A to Point B while keeping your hands as free as possible. I always wear my vest or at least bring it with me so that I know I have everything I need when I’m out hunting. Having a lot of pockets is key, I also like having a lot of inside pockets. Try to get one that has back and seat cushions built-in so you don’t have to make a separate purchase.
Sitka Tool Belt
The Sitka Tool Belt is a helpful waist pack for turkey hunters especially if they prefer not to to wear a turkey vest. I did a hands-on review of the Sitka Tool Belt and the biggest takeaway is how well laid out it is for organization and accessibility. I would recommend the green camo version for spring turkey hunting because it will blend in better.
Sitka has also come out with the Turkey Tool Belt, designed specifically for turkey hunting. It has dedicated pockets specifically for turkey hunting gear. If it’s anything like the regular Sitka Tool Belt it will be a well-thought-out product but I have not got my hands on that model.
Final Thoughts
The best turkey hunting gear for beginners will be different depending on the individual, based on how you want to hunt turkeys (stalking, hunting from a blind, still hunting…etc). But to get out there and have a successful turkey hunt, you don’t need much. In fact, the less you have often challenges you to think critically and develop your turkey hunting and woodsmanship skills. That being said, spending a little money on gear can make for a more relaxed and comfortable hunt, so it is all about how you want to design your hunt.
These are my best tips for beginners after 20+ years of turkey hunting trial and error. I’ve made many mistakes turkey hunting over the years which I’ve learned from. These tips will help you avoid the newbie mistakes I made while learning to turkey hunt so you can improve your success this hunting season. These are the turkey hunting tips I wish I had when I started.
This post contains Amazon and other affiliate links, which means I’ll receive a commission if you purchase through my link, at no extra cost to you. Of course, you are not obligated to use my links, but it does help fund these posts in hopes of bringing more value to you!
Table of Contents
Tip 1. Gear Up – Turkey Hunting Gear for Beginners
First things first. If you’re going to turkey hunt you’re going to need some essential gear. But don’t be discouraged, you don’t need much to get started. I’ve written a more in-depth article on turkey hunting gear for beginners if you want more detailed information.
The Necessities:
Hunting License
Shotgun & Ammo
Camouflage Clothing
Other Recommended Gear:
Turkey Decoys
Turkey Call
Pop-Up Hunting Blind (not necessary, but highly recommended)
Tip 2. Pattern Your Shotgun
Choke-Tubes
The first step in patterning your shotgun is determining whether you have interchangeable choke-tubes. Having a shotgun with interchangeable choke tubes is a big benefit for turkey hunters because you can use a full-choke to keep your shot-pattern dense. This allows you to make longer shots. If you don’t have a full choke don’t worry, you can still use your shotgun to hunt turkeys, you just need to make sure the turkeys are closer when you take a shot.
Choke Tubes For Turkey Hunting
Turkey Hunting Ammo
I would buy a few different boxes of turkey ammo to test out during the patterning process. Not all ammo will shoot the same out of your gun, you’ll want to use the ammo that shoots more accurately by having most of the pellets hit where you’re aiming. I would use shotgun shell size #4 or #6. But for sure #6 when using Heavi-Shot because it’s plenty lethal at further distances but you’ll get more pellets to fill in the gaps of your shotgun pattern.
How Far Can You Shoot A Turkey?
The bigger the ammo, the further you can shoot. Below are the maximum distances I recommend shooting a turkey with different-sized turkey ammo using Hevi-Shot (tungsten ammo).
12 GA 3.5″ Shells – 50 Yards
12-GA 3″ Shells – 45 Yards
12-GA 2.75″ Shells – 35 Yards
20-GA 3″ Shells – 35 Yards
20-GA 2.75″ Shells – 30 Yards
These are very heavy bullets, making them excellent for knockdown power and penetration on turkeys at long distances.
If you’re going to be shooting turkeys at these maximum ranges it is suggested to use good ammo. I recommend Hevi-Shot because it is even heavier than lead, and will put a turkey down at these distances more effectively. I would specifically recommend Hevi-Shot Magnum Blend for shots at these maximum range applications. They are expensive, but you should only need one to get get the job done so they should last many seasons. If you can’t afford it, regular lead ammo will work but make sure turkeys are 5 yards closer than the recommendations above.
Turkey Targets
Buy a few targetsand set them out at the maximum range you plan to shoot based on the yardages above. Shoot at these targets to see which ammo patterns best for your shotgun. You’ll want to choose the ammo that has the most pellets in a small area. You may notice that the majority of your shot is hitting slightly off-center. This is important information letting you know you may need to compensate for this by aiming slightly off-target. You can also purchase a red-dot sight or scope for your shotgun. This will allow you to move your point of aim to where your pellets are hitting.
Tip 3. Let Them Get Closer Than You’d Think
If a turkey is coming in, don’t jump the gun (no pun intended) and shoot right when the turkey enters what you think is the edge of gun range. This greatly increases the odds of wounding or missing a turkey.
Turkey Hunting Tips For Beginners – Let Them Get Closer Than You’d Think
Let the turkey come in close for a quick ethical kill. A good rule of thumb is if they’re still coming in, let them keep coming until it is unquestionable. It is an even better idea to have a rangefinder on you to confirm distances. If you don’t have one, you can read my article on the Best Rangefinders For Hunting.
Although rangefinders aren’t absolutely necessary, I highly suggest them for beginner turkey hunters. It can be very hard to judge the distance of a turkey, especially in a big field with no depth perception.
Additionally, with the excitement, it’s easy to pull the trigger too soon. A rangefinder is a staple in my turkey hunting arsenal.
Leupold RX-1400i TBR/W – Best Hunting Rangefinder For The Money
I can’t express how important scouting is for turkey hunting success, and frankly, it’s not that hard to do since turkey gobbles are easily heard and turkeys are quite visible. Especially in fields just before hunting season before hunting pressure starts. Scouting for turkeys is often an overlooked aspect of turkey hunting, you will be ahead of the game if you do some scouting.
Pre-Season Turkey Scouting
Pre-season scouting is essential for early success. You’ll want to put a tag on a turkey as soon as possible because as the season progresses turkeys become warier and will be harder to see, call, hear, and find.
Scouting for Turkey Roosting Areas
In order to find roosts, it is best to drive around areas where turkeys are known to hang out and listen 30-min before daylight while they gobble before getting out of the trees. This can also be done in the evening right at sunset but in my experience, it is not as effective because turkeys don’t gobble for as long so it can be hard to check multiple places in the same scouting session.
Another tip is to drive around early morning and about an hour/hour-half before sunset and find the turkeys that are making their way back to their roosts. If you see turkeys in fields at these times you can be their roosts will not be far away. Mark these locations on your GPS and come back to find where exactly they are roosting.
Tip 5. Hunt Multiple Spots for Turkeys
My favorite tactic is to find a handful of roosts before the season starts so that you can hunt multiple areas during the first week of turkey hunting. Having multiple areas in your back pocket is very helpful. Many times you’ll find out that one spot you were planning to hunt gets too much hunting pressure. These areas can be frustrating to hunt and makes hunting harder. By having different places to hunt you are able to stay in better hunting situations, increasing turkey hunting success.
Tip 6. Hunt Turkeys Close To The Roost – But Not Too Close
After you’ve located a few roosting areas, watch where these birds naturally want to travel in the mornings when they get down out of the roost. When you hunt, position yourself between the roosting turkeys and where they naturally want to go to intercept them.
Take advantage of their natural patterns. Turkeys will often use the same travel corridors when getting down out of their trees because they will likely be heading to the same morning food source each day. Just make sure you don’t get too close to their roost because they may fly out of range when getting out of the trees in the morning. I like to be about 75 yards from the roost in the direction of travel.
Tip 7. Hunt All Day
Hunting all day is an excellent way to put the odds in your favor. You May think there are no turkeys are around or that they have moved on after the morning excitement, but if you’re in an area that turkeys frequent chances are you will see some action.
Keep your eyes peeled, they can come into the decoys silent. Oftentimes though, once a gobbler gets within a 20-yard ‘bubble’ they can’t help themselves and will gobble, often startling you. These situations really get the heart pumping as they are least expected but if you stick it out will happen more often than you think.
Tip 8. Don’t Lose Hope If They’re Not Gobbling
Morning in the turkey woods is often exciting, but sometimes they just won’t gobble. Or they will stop gobbling altogether once they leave their roost. These birds may be over-hunted and are weary, or the weather may not be right for them to be gobbling. You may think there isn’t a turkey for miles, but don’t lose hope. Just because you don’t hear them gobbling doesn’t mean they haven’t seen your decoys and are coming in. Give them time and your patience may be rewarded.
Tip 9. Be Patient
I’ve eluded to this in many of the other tips but patience is key to turkey hunting success. Morning in the turkey woods is often exciting, the turkeys are often gobbling and the anticipation of success is high. But if the gobblers don’t do what you were hoping then hope can die quickly. But don’t give up, be patient birds are usually still nearby you just have to wait for them to make their rounds. A good time to be hunting is when they’re done with their breakfast and are looking to get a little frisky. The toms will be out looking for hens at this time.
Tip 10. Bring Comfortable Gear
I started seeing more success turkey hunting success when I started bringing a camo pop-up blind and comfortable lawn chair. This enabled me to move around a lot and not be seen because the blind was enclosed. It also gave me the comfort of staying in the bling for hours longer than just sitting against a tree with a cushion. It also helps keep you warmer and dryer on windy or rainy days, not to mention keep the mosquitos away which is worth every penny in my opinion. Bring a good book, or binge-listen to podcasts or audiobooks, whatever it takes to stay longer. If you’re patient in an area where turkeys frequent, you will eventually have success.
All beginner turkey hunters will appreciate a fully adjustable and swiveling blind chair which is probably the superior option for hunting in a blind. That said, I prefer a regular lawn chair when using a shotgun. If you’re turkey hunting with a bow though, make sure you get a chair without arms because it will get in the way of pulling your bow back.
The pop-up blind I use is the Ameristep Care Taker Ground Blind which offers enough room for two hunters. It has adjustable shooting windows with removable mesh screening. It’s very easy to put up and to take down. It’s completely blacked out on the inside, so hunters stay out of sight. My favorite aspect of this blind is how easy it is to travel with because it comes in a carrying case similar to that of a lawn chair. Also, it’s very easy to set up because it pops up in sections similar to an umbrella. I’ve linked it below if you’re interested.
Blinds Are Effective Pieces Of Turkey Hunting Gear Especially For Beginners
Tip 11. Dealing with Insects
I use Rynoskin to deal with ticks and mosquitos during turkey season. It is a chemical-free baselayer that keeps ticks from getting to your skin and helps reduce the number of bites from mosquitos. If this sounds like something you’d be interested in, you can check out my Rynoskin review. There is a certain way to use it to its full potential which I go over in that post.
Since turkeys have a poor sense of smell you can also bring bug spray or a Thermacell to keep the mosquitos away. Keeping bugs at bay is important for turkey hunting because turkeys have very good eyesight, so swatting at mosquitoes is something turkeys will see from a long distance.
Tip 12. Turkey Hunting Weather
Sunny Days are Best
Sunny days are the best days to be turkey hunting especially if the couple days prior were rainy and windy. The suppressed gobbling activity on poor weather days gets gobblers antsy and ready to gobble on nice days.
Turkey Hunting in the Rain
Turkeys are on the move in the rain and you can have great luck on rainy days. However, you will likely not hear any gobbling and you should not call much yourself. Your best bet is to set a decoy out in a highly visible spot and just wait.
Tip 13. Take The First Week Off From Work
If you’re serious about bagging a turkey as a beginner there is no better way than to spend most of your time hunting during the first week. Hunting pressure will be in full effect before long and you’ll want to take advantage of non-pressured birds for as long as possible.
I’ve found that after the first week, birds become smart to hunters and are harder to kill. If you spend most of your time hunting when turkeys are less call-shy and timid, you’ll have better luck. Plus it will be more fun because turkeys will be more apt to be gobbling their heads off.
Tip 14. Travel To Less Pressured Areas
If the season progresses and you still don’t have your turkey, start scouting new areas. Specifically, areas that might be overlooked or that don’t have much hunting pressure. These can be great late-season honey holes. Sometimes you just have to give up on the turkeys you’ve been hunting to find easier turkeys to hunt.
Tip 15. Don’t Call Too Much
Beginners often call way too much because they love getting gobblers to call back to them, who doesn’t?! I highly suggest resisting this urge, there is a fine line here, so don’t overdo it. When you call too much, it will start to seem unnatural and the gobbler may lose interest. Pay attention to how often and how loud real hen turkeys call and try to mimic that. You’ll notice they’re not all that loud and that they don’t call very much.
Tip 16. Play Hard To Get
Once I have a gobbler fired up and talking back to me after every call I make. He will often stay out of range because he is trying to get the hen (my decoy) to come to him. To counter this, I will stop calling as often and pretend to lose interest.
Turkey Hunting Tips For Beginners- This Tom kept gobbling but would stay out of range. I had to play hard to get to get him in the decoys.
I do this by making the gobbler call 2-3 times before I respond with some light yelps. Often, he will get frustrated that you’re losing interest and will often make their way to your decoys. Playing hard to get pays off big time. This process can take hours so don’t overdo the calling.
Tip 17. Let The Gobbler Go
There are a couple of tips you can implement if you find yourself struggling to pull a gobbler in that sounds fired up and interested. First, you should implement “Don’t Overcall” and then “Play Hard To Get”. The next step is to just let them go. If a gobbler just won’t come in don’t try to force it by calling more. This will just make things worse and he will figure out that your decoys aren’t the real deal.
Very often, especially for mature birds, just let them go. Toms get mad when they can’t convince you to come to them. They will keep you in the back of their minds while they go about their business. Often, after they’ve had some breakfast they will come back to see if you’re still around. They often come in silent, but they will be more apt to come right in because they are impatient and tired of waiting. Be ready!
Tip 18. Blind Call Sparingly
Blind calling is when you call in hopes of locating a bird by getting them to gobble back. These are birds in the vicinity that you did not know were there. This can be an effective tactic because it can bring birds in that are in earshot. If you’ve been calling at a fairly normal volume, it is not a bad idea to throw in an unnaturally loud call to see if you get a shock gobble once in a rare while.
However, I’ve had the best luck calling at a natural volume even if I feel like turkeys are not around. I will give a short calling sequence every 20 minutes just in case something has moved into earshot. You’d be surprised how many turkeys are around, but just aren’t calling, especially later in the day when the morning action subsides.
Tip 19. Turkey Hunting Pressure
Knowing the hunting pressure is a big part of having a successful turkey hunt for beginners. You can often get an idea of how heavily turkeys will be hunted by how easily visible they are from a road, and how busy the road is. Other hunters are taking notes too. Don’t discount these areas, but do your best to find turkeys away from high human traffic areas. It’s always best to find them in areas with very minimal traffic, like an isolated field that is out of sight from a well-traveled road.
Competing for Turkeys
You don’t want to be competing with other people for the same turkeys if you can help it. In my opinion, it takes away from the fun of having a 1 on 1 battle with a group of turkeys. Other hunters can be discouraging because turkeys may go to them instead of you. Especially if they have more knowledge than you and are better at calling.
That said, don’t give up if a hunter shoots a turkey near you. Although turkeys may not be talking much after the shot, there could easily be other turkeys roaming around and may come into your decoys within an hour, you just never know. This is especially true during the first week of the season when they’re not wise to the hunting pressure yet.
Calling
Additionally, knowing the hunting pressure will allow you to adjust how much calling you should do. If the turkeys you are hunting are not pressured at all, you can get away with a little more calling even if it is a little bit unnatural compared to real hens.
The effects of hunting pressure get worse as the season continues, this means turkeys will often stop gobbling altogether except for when they’re in their roosts. This means you should mimic this behavior when you’re calling. This will be more realistic to the turkeys. Often that means the best tactic is to never call. Sounds counter-intuitive but pressured birds will often go to the hunter that does not call over with a hunter that is calling.
Tip 20. Turkey Decoy Placement for Beginners
Different decoy combinations are used in different situations to get the gobblers to do what you want. Turkeys are territorial and lustful, you can use decoys to play on these weaknesses. Try to visualize and anticipate how and in what direction gobblers will approach decoys.
Toms will often hang back from hen decoys 15-20 yards as they get a read on the situation. But they will have no problem approaching another tom or jake decoy. I often place my hens off to the side of my blind and the male decoys close to where I want to shoot but only about 10 yards away. This makes the gobblers cross in front of me so I often create shots 20 yards and under.
Tip 21. Turkey Decoy Combinations for Beginners
Here is a more in-depth article about turkey decoy setups:
Unless you plan to be highly mobile (running and gunning), you’ll almost always want at least one decoy with you. This should always be a hen decoy because when you call you’re mimicking a hen. So to not have a hen decoy in your decoy setup will look unrealistic to turkeys. Also, gobblers are looking for hens at this time of year, so there is almost no reason for not having a hen decoy.
I like this setup when hunting pressure is high, I feel like a single decoy seems more legit to real turkeys because other hunters are often using more than one decoy.
A hen is used as an attractor for toms and jakes. They can be used alone or with other male decoys. When placed with male decoys, a jealously and territorial trigger button will be pushed within male birds making them want to come into the decoys.
A tom turkey in strut when placed next to a hen decoy is used to get another dominant tom fired up and aggressive so that he will want to attack the decoy, thus bringing the bird into shooting range. Jakes will often be scared of a tom decoy so keep that in mind. Less aggressive toms may also shy away. For this reason, I rarely use this setup.
1 Jake + 1 Hen
A jake turkey decoy that is semi-puffed up with hen decoys will make a tom want to put the jake in its place by letting him know who’s boss. This is because Tom turkeys don’t want jakes to puff up to display for hens. This will make the tom angry and want to come in and take the jake out of the picture so he can have the hen (your decoy) to himself. Additionally, other jakes will feel comfortable coming to join. This jake decoy can bring in any age male turkey. I use this setup a lot.
Semi-Puffed Jake Turkey Decoy
2 Hens
Two hen decoys are good for larger groups of gobblers because a bigger group of male turkeys will feel more comfortable coming to a party of two. Two hen decoys are very non-threatening so you can attract any male turkey. However, although not threatening, a single male turkey may be intimidated and feel outnumbered, especially jakes.
Tip 22. Practice Your Calling
Calling is an important part of turkey hunting. Especially when it is more effective at the beginning of the hunting season when turkeys are not as badly pressured by hunters. I suggest listening to real hens calling on YouTube, taking mental notes, and practicing your turkey calling my mimic these turkeys. I like slate calls myself.
Just remember that knowing when not to call is just, if not more important, than knowing how to call well.
Tip 23. Be Mobile
Although there is a lot to be said for being patient. Sometimes you’ve just gotta take the game to the turkeys. A good strategy is to walk around and call periodically until you hear a gobble, then try to get close to the gobbler and set up a single decoy and try to call him in. A gobbler will often want you to go to him which is a tricky situation, Sometimes it pays off by walking in the opposite direction and calling or calling quieter. This will make you sound further away and will make the tom angry and will start coming to you.
Conclusion
After years of hunting turkeys, I’ve learned a lot through trial and error. I wish I had these tips when I started hunting. If you follow these tips I have no doubt you’ll increase your springtime turkey hunting success. What turkey hunting tips do you think should be added? Let me know in the comments below.
There are a few reasons why beavers build dams. Beaver dams are an essential survival strategy for beavers because it allows them to create their own habitat instead of relying on the environment to provide it for them as most animals do. This article will dive further into beavers dams, why beavers build them, and beaver dam misconceptions.
Table of Contents
Why Do Beavers Build Dams?
What is a Beaver Dam?
In order to understand why beavers build dams, you must know what a beaver dam is. A beaver dam is a restriction in an outlet of a waterbody by beavers in order to create flooding.
Why Do Beavers Build Dams?
Since beavers are considered semi-aquatic; they are well adapted to life in the water – complete with webbed swimming feet and a broad paddle-like tail. On land, they move quite slowly and are extremely vulnerable to predators.
By strategically placing a dam at the outlet of a waterbody, the beavers restrict water flow and effectively flood the immediate area, creating a pond within which they can construct a lodge and move about the area much more easily. In the simplest terms, beavers build dams to help fulfill their most basic needs of survival; food, water, shelter, breeding, and rearing.
How Do Beavers Build Dams?
Typically, a family of beavers will construct and maintain a single dam within their territory. Dams are a mixture of cut trees, branches, and mud used to fuse everything together. Since beavers are primarily nocturnal, much of dam building occurs at night. Using their incredibly strong and sharp teeth, beavers work quickly to chip away at the layers of a tree or lop off branches.
Ideally, the tree or large branches will fall into the water, which allows the beaver to float the wood through the water. Once the larger pieces are in place, the beaver will use anything available in the area: mud, twigs, small rocks or stones, grasses, shrubs, plant roots, and more to plug-in any open areas and create a more waterproof dam. Beavers also maintain the dam regularly and are signaled that the dam needs repair by the sound of running water.
A beaver chewing trees to be used to make a beaver dam or beaver lodge
How Big Are Beaver Dams?
On average, dams reach about five-feet high and vary in length from just a few feet to a few hundred. Beaver dams vary in size and placement depending on the environment and size of outflow they are trying to plug. The largest beaver dam in recorded history was in Alberta, Canada, reaching over a half-mile long at 2,790 feet.
Beaver Lodges Vs Beaver Dams
What Does a Beaver Lodge Look Like?
If you’ve ever looked out over a pond or marsh, your eye may have caught that characteristic pile of sticks protruding out of the wetland. This is more than just a messy pile of sticks and logs that the local wildlife has pushed out of the way. This is a beaver lodge.
Beaver Lodge Covered in Snow
Why Do Beavers Build Lodges?
A beaver lodge is many things: a home, nursery, a hideout, a kitchen and dining room, and most of all – a necessary element of survival.
Where Do Beavers Live?
The habitat of the beaver is flexible: because they can, in fact, create the necessary habitat conditions needed for their survival. However, they need one key factor available in their environment – and that’s water. Beavers can move into and occupy ponds or lakes, rivers and streams, marshy areas, and any wetland. Within these areas they have flooded beavers will create and live in lodges mode from logs, sticks, and mud.
The North American beaver (Castor canadensis) is one of two beaver species in existence today, occurring throughout the U.S. and Canada. The species has been successfully introduced into South America and Europe, and historically occupied areas of Mexico.
Do Beavers Hibernate?
Beavers are not true hibernators, and instead, remain active throughout the winter months. During this season, beavers spend the majority of their time within the lodge, given that they’ve been successful at preparing for the cold weather by storing enough food (in the form of fresh branches) to last until the spring thaw.
What Do Beavers Eat?
Beavers are herbivores, meaning they eat only plants. They will utilize most parts of the tree, from bark, buds, stems, and leaves. Their favorite trees are aspen, willow, birch, alder, cherry, and maple. Beavers will also forage other plants in the area like grasses, ferns, mushrooms, and roots of wetland plants. Beavers don’t eat fish or other wetland wildlife.
Beaver Food Caches
Beaver food caches are usually a pile of sticks located near the lodge. These are important supply stocks for the beaver family, particularly in the winter when caches are stashed close to the lodge for easy access when ice forms.
Beaver Food Cache
Are Beavers Dangerous?
Beavers prefer to be secretive, staying within the safety of their pond. It’s a good practice to always respect wildlife by giving them their space and keeping a safe distance. But in general, beavers are not a threat.
Beavers may seem scary because they are very territorial creatures. They will slap their hefty leathery tail on the surface of the water and made a loud KA-THUNK as if someone dropped a large rock into the water. They do this to scare off intruders. If your paddling in an area at sunset or nighttime when beavers are on the move, this can be very startling. They will also commonly fight each other to defend their territories by biting with their teeth. It is not uncommon for beavers to have battle scars and bite marks. Beavers will mark their territory by placing castor gland scent on small mud piles within their territories.
However, beavers will opt to flee from a human rather than stand and fight. It is possible sick or disoriented beavers, especially those that feel threatened, may try to defend themselves from people and other animals.
Beaver Diseases & Rabies
Never drink water from a pond or beaver impoundment. The water could be contaminated with giardia bacteria from beaver feces and can produce an ailment in humans known as “beaver fever.” Beavers are susceptible to bacterial Tularemia, transmitted by ticks or biting flies.
Beavers can be infected with rabies, which is sometimes contracted from territorial scuffles with another mammal in the area (like a rabies-infected raccoon). Even when beavers do contract the disease, they rarely pass it on to other animals. Rabies attacks the brain and nervous system and will end in death for the beaver.
Interesting Beaver Facts
How Long Do Beavers live?
In the wild, the average life span of a beaver is about ten years, and up to fifteen years in some cases. In captivity, beavers have been recorded living up to 24 years. During this time, a well-fed beaver can reach a size of 60 pounds and over three-feet in length.
Baby beavers, called kits, will stay with their parents for the first two years of life. This means they may be living with the previous year’s offspring for one season, forming a large beaver colony.
How Long Can A Beaver Stay Underwater?
A beaver can stay underwater for up to 15 minutes before needing to come to the surface for air.
Beaver Eyelid Adaptations
Beavers are equipped with transparent eyelids so they can see while swimming, similar in function to goggles.
Conclusion
Beavers are fascinating animals that are efficient engineers, creating dams with a very specific purpose. Their ability to build dams and create impoundments provides excellent habitat for other plants and animals. I hope you’ve found this post helpful, if you have feel free to share this on social media using the social media buttons.
This OnX Hunt App Review covers, Layout & Ease of Use, Parcel Information Layer, Federal, State, and Public Land Parcel Layers, Aerial, Hybrid, Topo Maps, Measure Tools, Tracking and Track Library, Offline Maps, OnX Maps Web Application, OnX GPS Chips, and Subscription Pricing.
I believe these topics are the most important to discuss when deciding if the OnX Hunt App is right for you.
OnX Hunt App Review
Key Features Discussed:
Layout & Ease of Use
Parcel Information Layer
Federal, State, and Public Land Parcel Layers
Aerial, Hybrid, Topo Maps
Measure Tools
Tracking and Track Library
Offline Maps
OnX Maps Web Application
GPS Chips
Subscription Pricing
OnX Hunt App Layout & Ease of Use
OnX is laid out very simply and it took no time at all to figure out how to use it and is one of my top GPS hunting apps. I have found many GPS apps on the market can be quite confusing to use at first. OnX is one of the simplest to learn, while still being feature-rich.
When you open the app you will have a dashboard below the map. In this dashboard, there are 5 main tabs to choose from which makes things clean and simple. These tabs are “Map Layers” “Off-Grid” “My Content” “Map Tools” and “Tracker” as shown in the photo below. Everything you need can be found within these 5 tabs.
OnX Hunt App Home screen Layout – Clean and Easy to Use.
OnX Hunt App Parcel Information Layer
The paid versions of OnX give you the option to toggle off property parcel information so you can see where you are in relation to property lines. I can’t say enough good things about OnX with its helpfulness in finding out the owners of parcels. OnX has made it so easy to determine what house owns a certain property just by looking at the parcel information. It saves hours of headaches trying to find out who owns what parcel of land and talking to a bunch of different landowners.
In Maine, you can access anyone’s land as long as it is not posted. Often, I end up scouting a property first before I ask permission so I can figure out if the property is even worth hunting in the future. If the property is worth hunting, I will make a point to still ask for permission and OnX makes this a breeze.
OnX Hunt Private Parcel Layer
OnX Hunt App Federal, State, and Public Land Parcel Layers
There is a lot to like about OnX but arguably my favorite aspect of OnX is that you can toggle on/off Federal, State, and Public land parcel layers. This is super handy because you can quickly scan the state you are hunting and find places that are likely to be open to the public. I use this feature all of the time to find new places to scout and hunt.
When possible, I prefer to hunt on public land so that I don’t have to ask for permission. It’s always nice to have a handful of public land areas in your portfolio of places to hunt when hunting season approaches. OnX makes it very easy to find these overlooked public land areas because it highlights these parcels so they stand out from the private land parcels. In the photo below you can see these highlighted areas.
Government Lands – Federal, State, and Public Land Parcel Layer
OnX Hunt App Aerial, Hybrid, Topo Maps
OnX also has an excellent quick toggle button on the bottom right hand of the home screen that allows you to switch from aerial, hybrid, and topo maps very easily. Although the topo maps aren’t super detailed, they are quite good and usually give me detailed enough information for 90% of what I’m using it for.
OnX Hunt Map Quick Toggle Button
OnX Hunt App Measure Tools
Measure tools are a must-have for me when scouting and hunting. I like to be able to measure distances and areas to estimate how long an area will take to scout or to determine how many miles I have back to my vehicle at the end of the day so that I can estimate what time I need to leave the woods to get back to the car around dark. This app has the option to measure both lines and areas.
OnX Hunt App Tracking
You can record the path you’re walking by clicking the “Tracker” Tab. Here you will find a big green button that says “Start” when you want to stop tracking there is a big red button that says “Stop” making it straightforward to use.
OnX Hunt Tracking
OnX Hunt App Review of Offline Maps
Another dynamite feature of the paid version of OnX is the option to download offline imagery. This allows you to always have a map in the background of your app, even if you don’t have phone service. I use this feature a lot when I am tracking bucks in the snow in remote areas of Maine, where service is rare.
This offline map feature gives me more time to hunt at the end of the day because I can find my way out to the nearest logging road easily. This feature also makes me much more confident when I’m in the big woods. It’s easy to get lost in remote areas, but OnX helps me feel comfortable going anywhere. This way I spend a lot less time thinking about getting lost or figuring out how to get back to my car at the end of the day, keeping me in the woods longer.
To do this, it does require a yearly subscription. Downloading offline maps is very simple in OnX. First, you navigate to the “Off-Grid” tab, then you choose the option “save a new map”. Next, you select the area you want to download, and then OnX will download it for you. After downloading is complete, you can use this offline map anytime, even without service.
PRO TIP: I like to keep my phone in airplane mode when using it offline. Since I don’t need service to load the maps anymore this allows my battery to last so much longer.
OnX Maps Web Application
The OnX Maps Web Application is one of my favorite features. With this feature, you can use your computer browsers to open the OnX phone app. This allows you to have a much bigger screen. Additionally, you can import and export KML files from Google Earth onto the website application. This information is then seamlessly transferred to your phone application. I believe this website application could replace Google Earth in the future altogether if it keeps improving. For me, this alone is worth the subscription price.
onX Website Application
OnX Hunt App GPS SD Chips
Another awesome feature OnX provides is an SD chip that can be used in many Garmin GPS’s. I personally haven’t used this feature but I feel like it is worth mentioning in this post. The OnX website lists the Garmin GPS’s that will work with the SD chip. I really like that this SD chip can be updated so that the information on the chip doesn’t go out-of-date. In addition to buying the chip, OnX gives you a free year membership for the OnX App. This is nice because you’ll have a backup if either your phone or GPS stops working for whatever reason.
OnX Hunt App Considerations
The location icon in OnX is a circle. Because it is a circle, to determine the direction you’re facing in relation to the map you need to double click the ‘find location’ crosshair icon just below the map type quick toggle button. However, when you do this the entire map adjusts and throws off the north orientation. This is probably the worst feature of this app that needs to be fixed. In my opinion, this is unacceptable and I even use other GPS Apps just to have an arrow that points in the direction that I’m looking at while maintaining my north orientation.
There needs to be an option to keep a north orientation and have a triangular location icon that points in the direction I’m facing instead of the whole map moving. A setting to toggle this option would be great. The video below will help visualize what I am describing:
Subscription Pricing
Currently, OnX Hunt charges $29.99/year for Premium (a single state). Elite costs $99.99/year but gives you information for all 50 states. If you’re looking to get more information and/or to start your free trial you can head over to OnX Hunt App Website.
OnX Hunt App Final Thoughts
I hope you enjoyed this OnX Hunt App Review. If you have any questions or comments leave them in the comments section below or feel free to contact me on social media.
If you’re wondering what other GPS Hunting Apps are available you may like my post:
This JX3 Hybrid saddle review covers 13 categories; comfortability, mobility, maneuverability, safety, durability, versatility, cost-effectiveness, stealthiness, concealment, imperfect trees, tree-size, theft-prevention, and ability to hunt multiple stand locations. I believe these are the most important aspects to focus on when deciding on a tree saddle for hunting. This review will compare these categories to conventional tree saddles on the market.
My Experience Tree Saddle Hunting
Highly Mobile and Effective Pieces Of Equipment
Conventional tree saddles (tree saddles made entirely of fabric and rope) have worked great for me since 2016. This was when I made the switch from conventional tree stands (ladder, hang-on, and climbing). They’ve allowed me to hunt places most hunters would never dream to hunt because it’s too difficult to put up a conventional treestand.
Saddle hunting has increased my success dramatically. Conventional saddles have enabled me to get away from the hunting pressure and find more productive spots to hunt while still have the advantage of being in a tree.
Conventional Saddles (Fabric & Rope) Are Uncomfortable
However, there was one aspect that was lacking for me, long-lasting comfort. After spending some quality time in conventional saddles, I became disappointed with my comfort when on-stand for long periods of time. At the time it was worth being uncomfortable in order to get far back into my hunting spots and be able to climb a tree. But in recent years I was getting tired of being so uncomfortable and fidgety in the tree, so I started looking at other saddles on the market.
Conventional fabric saddles offer some adjustability but are uncomfortable over time.
After a few hours my body just couldn’t take the pinching at the hips, the cutting off of blood flow, and just couldn’t be fully relaxed in the saddles, thus I would fidget…a lot. I wasn’t about to have a missed opportunity at a big buck because I was fidgeting all the time. I knew I had to find another alternative.
Table of Contents
Comfortable Tree Saddle Research
I’ve really enjoyed hunting in tree saddles over the years and loved every other feature of them so I didn’t want to stop using them. So I did some research to see if there were any new saddles on the market that would be more comfortable.
New Saddles On The Market
Luckily, there are many more saddle-hunting options on the market than back in 2016 when I first made my switch to tree saddles, and technology had improved.
These new tree saddles consist of Tethrd Tree Saddles, newer versions of New Tribe Aero Hunter Saddles, Trophy Line Tree Saddle, and a few newer companies that offer similar features. However, after looking at reviews online they all had the same issues of causing discomfort over time. The fabric style designs aimed at keeping them as mobile as possible were the culprit for the discomfort.
I wanted a saddle that would be comfortable for the entire duration that I wanted to hunt. So I kept looking.
JX3 Hybrid Reclining Comfort. I had no issues sitting in the JX3 Hybrid tree saddle for 10 hours straight. It’s like a recliner in a tree.
JX3 Hybrid Tree Saddle Evolved From Guido’s Web Tree Saddle
Back in 2016, before buying a conventional saddle I was also eyeballing the Guido’s Web saddle which was a bigger but comfier looking saddle. At the time I decided it was too big because I wanted to hunt as mobile as possible. Now that I was looking for a tree saddle that could keep me mobile while keeping me comfortable, I was willing to give it another look.
A quick Google search for the Guido’s Web saddle revealed it had been bought out by JX3 Outdoors. JX3 updated and remodeled the Guido’s Web to what is now known as the JX3 Hybrid Saddle.
This saddle was said to be lighter, more versatile, and easier to use than the Guido’s Web. What are the odds? I couldn’t believe my luck. I had to give it a try.
JX3 Hybrid First Impressions
Customer Service
I contacted John, the owner of JX3 Outdoors, to see if he would like a review of his JX3 in exchange for a JX3 to experiment with…and here we are. John is a really nice guy, is quick to respond, and ships his products quickly.
Ease of Use & Set-up Instructions
Out of the box, the JX3 is all put together and ready to go and comes with an instructions manual. If you’re like me and prefer video instructions there is some good information on YouTube.
Field Testing The JX3 Hybrid Saddle
Works For Bowhunters and Firearm Hunters
I got my hands on the JX3 Hybrid Saddle at the beginning of November, just after the start of deer rifle season started here in Maine. I was able to put this saddle to the test in real hunting situations throughout the remainder of the hunting season. The saddle also works well for bowhunters. I practiced with my bow in the JX3 and it is just as easy to shoot out of as conventional saddles.
Putting The JX3 Hybrid To The Test
I’m normally hunting areas that most other hunters do not, in order to find mature bucks that aren’t pressured as hard. For this reason, I am often trying to be as sneaky as possible as I wade a mile or so into thick swamps in the dark. This is why I am drawn to saddle hunting in the first place.
So I was curious just how mobile this saddle was, how much of a beating it could endure, how quiet it was, and how it competes with other saddles.
JX3 Hybrid – Extended Legs and Easily Drawn Compound Bow
JX3 Hybrid Tree Saddle Review
I am excited to bring you this JX3 Hybrid saddle review because it doesn’t disappoint and was actually more than what I was expecting.
JX3 Hybrid Tree Saddle vs Conventional Treestands (Ladder, Climber, Hang-on Stands)
Since I have already covered these topics in-depth, this post will not compare conventional stands to the JX3 Hybrid. Instead, this post will focus specifically on the JX3 Hybrid Saddle and how it compares to other saddles.
JX3 Hybrid Tree Saddle vs. Conventional Tree Saddles
In this review, I discuss the 13 most important categories to consider when purchasing a tree saddle for hunting. These 13 categories are listed below. The differences between the JX3 Hybrid saddle and competitor saddles are subtle in most cases. There is one big exception; comfort. The chart below depicts the ranking I gave for each of these categories. My reasoning for the scores of each of these categories is described in the proceeding paragraphs.
The JX3 Hybrid is built differently than other saddles so there are some benefits and drawbacks to take into consideration to determine if the JX3 Hybrid is right for you.
Say goodbye to hip-pinching and numb legs & feet! Because of the metal frame, there is ZERO pinching at the hips or anywhere else like other saddles. Comfort is where the JX3 Hybrid really outshines conventional saddles.
Metal Frame
The JX3 Hybrid has a metal frame. This is unlike conventional saddles which are made entirely of fabric and rope. There are some major comfort benefits of the metal frame. One benefit of the metal frame is that even when you’re in awkward leaning trees the JX3 remains comfortable because the metal frame blocks the negative effects of gravity. In conventional tree saddles, gravity places more stress on your knees which makes them uncomfortable faster.
JX3 Hybrid Saddle Review | Metal Lip Against Tree
Metal Fork
Another benefit that the metal frame supports is the optional adjustable metal fork that can be attached to the frame which rests against the tree. With this fork, you separate yourself from the tree even further and gain more grip when maneuvering around the tree.
I don’t have much experience with the metal fork because I preferred to keep a closer profile to the tree for concealment, so I didn’t attach it often. Just using the metal lip worked better for me. When I did use the fork I did not find it all that much more helpful than the metal lip. It also seemed a little hazardous because it is fairly sharp and can scrape the back of your legs when maneuvering. The metal fork is adjustable. When I did experiment with it I found myself putting it as close to the seat as possible anyway. This helped keep it from scraping the back of my legs. I also found the screw to secure the fork would be somewhat in the way. With practice, this probably wouldn’t be an issue but it’s worth mentioning.
JX3 Hybrid Metal Fork Against Tree
Adjustable Backrest
The backrest is also adjustable, allowing for adjustments to be made easily in the field while being used. If you start getting tired of sitting in a certain way, you can make the adjustments so you recline comfortably again.
JX3 Hybrid Adjustable Backrest And Straps
Your body can fully relax in this saddle. If you want to take a nap for a while, it is easy to do so. You can’t nap well in other saddles because you can’t lean back in them for long periods. Additionally, when you lean forward your head and neck get kinked on the bridge strap. This is not the case with the JX3 Hybrid. Instead, it’s like being in a recliner in a tree. It’s truly incredibly comfortable and I can’t say enough good things about its comfort.
Tree Saddle Platform Comfort
In conventional saddles, I am always alternating my foot and knee placement a lot to maintain foot comfort (aka lots of fidgeting). Conventional saddles have a 45º-ish hammock-like angle that causes more resistance against gravity. This eventually causes foot and knee soreness.
The JX3 Hybrid takes a lot of pressure off your feet because of the 90º angle of the seat. This means the seat resists a lot of gravity. In the JX3 I only need to use my entire platform when I feel like it, instead of being forced to by discomfort. I really only need the top of my climbing sticks to rest my feet comfortably all day, the other steps of my platform are just for maneuvering.
Conventional Tree Saddles
Don’t get me wrong, conventional tree saddles can be fairly comfortable. Adjustable straps located on the back and leg portions of these saddles allow for some customized pressure point relief. You can also attach back-bands to recline into. I’ve done all of that, however, I’ve found that they are short-term solutions that end up not working well the longer you sit on-stand.
I’ve personally found that the unnatural body position and soreness from conventional saddles cause physical and mental fatigue. This is quite draining on consecutive hunts where you don’t have time to recover from the pinching of the conventional saddles. If you never plan to sit longer than 3-ish hours, you might be fine with a conventional saddle. After 3 hours you will probably only experience a little discomfort. In my opinion, they are at least better than non-mobile conventional treestands.
However, during the right time of year sitting all day is key to success for mature bucks. The ability to sit on-stand comfortably has made saddle hunting and stand hunting in general so much more enjoyable. For these reasons, I gave the JX3 Hybrid a 10 and conventional saddles a 6 out of 10.
JX3 Hybrid Comfort vs Conventional Tree Saddles
How Mobile Is The JX3 Hybrid Saddle?
How Much Does The JX3 Hybrid Saddle Weigh?
The JX3 Hybrid Saddle weighs about 13.8 lbs which is heavier than conventional saddles on the market. However, the JX3 Hybrid has backpack straps, the ability to store gear, and climbing sticks that can be attached to the frame. This made its mobility surprisingly good. It did not feel much heavier or cumbersome than conventional saddles.
JX3 Hybrid Saddle Weighs 13.8 lbs
How Much Do Conventional Tree Saddles Weigh?
Conventional saddles weigh anywhere from 1-7 lbs and can be worn like a piece of clothing. They are inarguably more light-weight which aids in their mobility. Additionally, it is fabric so it can easily be rolled up into a small bag and placed into a backpack. It can also be worn to the treestand which is what I prefer when hunting in conventional saddles. I drape the ropes over my shoulders when walking to my stand making transportation simple and noise-free.
JX3 Hybrid Backpack Straps and Ropes
I found the JX3 Hybrid almost as easy to carry as other tree saddles because of how it is carried. The JX3 Hybrid is designed to be carried like a backpack and comes with backpack straps. With the JX3 I was able to tuck all the ropes into the compartment saddle itself so I did not have to worry about the tree strap and linesman’s belt getting tangled. Another benefit of the JX3 Hybrid is it does not have a bridge rope. Instead, it has a built-in fabric bridge which was great because it was one less rope I had to deal with and get tangled up with.
Because of the backpack straps, the JX3 does not feel nearly as heavy as you would think. To be honest I can’t really tell the difference in weight because it packs so nice and close to the body. It also did not make much noise when walking through thick brush because it is tight to your body. My main concern was that the JX3 Hybrid wouldn’t be as mobile as I needed it to be, but I was pleasantly surprised when I found it to be a very mobile stand.
JX3 Hybrid Saddle & Climbing Sticks
One of my absolute favorite aspects of this saddle is that you can attach your climbing sticks to the back of the saddle frame.
That being said, you will have to figure out a way to attach them. The straps provided with the saddle aren’t great for strapping climbing vertically (which is key) to the frame. This is key because you don’t want your climbing sticks to get caught up in the brush. When you strap them vertically, walking through the brush is so much easier and quieter.
JX3 Hybrid with Climbing Sticks Attached
This is an important feature for me because when using a conventional saddle I would have to carry my sticks in one hand or over one shoulder (which would sometimes slip off) and my bow in the other which feels cumbersome. With the JX3 Hybrid, I didn’t have to worry about this because the sticks were on my back. This was worth the extra weight more often than not.
I gave the JX3 Hybrid a 9 out of 10 and conventional saddles a score of 10 out of 10 for mobility. They both work very well in their own ways, both have benefits and drawbacks.
JX3 Hybrid Mobility vs Conventional Tree Saddles
Can You Maneuver Effortlessly In The JX3 Hybrid Saddle?
A good tree saddle will let you shoot a full 360º around trees as well as directly underneath. A good saddle will also allow you to push off the tree to change your vertical height slightly to shoot just above or below a branch while still being able to shoot comfortably. By fully extending my legs from my platform it raises my elevation a few inches. Scrunching up close to the tree lowers my elevation. Both the JX3 Hybrid and conventional saddles do a great job with this. The JX3 backrest does not get in the way when extending your legs as it forms to the body.
JX3 Metal Lip Alleviates Strain When Maneuvering
You might be surprised that I gave the JX3 a better maneuverability score than conventional saddles given the JX3 Hybrid’s size. However, the JX3 Hybrid is a very maneuverable saddle, even more so than competitor saddles in my opinion. Because the JX3 has a metal lip on the front part of the seat frame, your knees are not needed as much for maneuvering. By rocking your body weight you can easily turn the saddle in the direction you want to go with very little effort. Since your knees are freer, you can use your legs for fine-tuning your movements and making your movements stealthier. This is one feature I appreciated when using this tree saddle.
JX3 Metal Fork Provides Grip When Maneuvering
The meal fork can be helpful for maneuverability because it digs into the tree allowing you to twist with minimal movement and no slippage because it digs into the tree. Personally, I did not use the fork much because it chews up the tree. I found the metal lip on the front works pretty much the same just with slightly less grip to prevent slippage when maneuvering.
Maneuvering With JX3 Hybrid On Platforms
There are many types of saddle hunting platforms on the market. Based on my experience they should all work just as well with the JX3. You won’t have to buy a new platform if you’re already a saddle hunter. I still use the same platform method as I always have. I have been able to maneuver with equal success in both the JX3 and conventional saddles.
JX3 Hybrid Maneuverability Using Lone Wolf Climbing Sticks with Ameristep Screw-In Step Platform
I found the JX3 slightly better for maneuvering in the tree. I liked that the metal lip could rock against the tree so that I could twist easier and with less strain. Because the JX3 reduces the amount of strain when maneuvering I gave it a score of 10 out of 10 and conventional saddles a 9 out of 10.
JX3 Hybrid Maneuverability vs Conventional Tree Saddles
Is the JX3 Hybrid Saddle Safe?
In my opinion tree saddles, in general, are just as safe if not safer than treestands, the JX3 is no exception.
When used properly you are harnessed to the tree throughout the entire climb. When ascending the tree you are harnessed in with the lineman’s belt. Once you get to the height at which you will be hunting you’ll need to also use the lineman’s belt to place the tree rope. The lineman’s belt allows for a quick, painless, and safe installation of the tree rope. Once the tree rope is secured to the tree you can attach yourself to it via carabiner. Once attached, the lineman’s belt can be removed. To descend the tree reverse the process.
If you encounter tree limbs that your lineman’s belt cannot get around you can use the tree strap as a second linesman’s belt. You can do this by re-attaching a second belt above the limb and removing the first belt from below the limb. Then you continue your way up the tree, thus being attached to the tree 100% of the time.
Tree Saddle Hunting | Climbing With Multiple Linesman’s Belts
Because both the JX3 Hybrid and other saddle companies both allow you to be strapped in 100% of the time, they both scored a 10 out of 10 in the safety category.
JX3 Hybrid Safety vs Conventional Tree Saddles
Is The JX3 Hybrid Saddle Durable?
I have not had enough time with the JX3 Hybrid to make this judgment. The seat fabric at first glance seems like it could stretch, wear out, or torn over time because it is thin. However, I contacted JX3 Outdoors to see if they have had any issues with the seat fabric. The response was that they had never had a return because of the fabric and provided the fabric specs:
“the fabric that is used is woven vinyl-coated polymer mesh which does not tear or split under pressure and offers exceptional abrasion resistance. in addition, it repels water and air-dries quickly and the pvc coating that covers the polyester core keeps water from soaking the yarn preventing any damage due to freeze and thaw.” – JX3 Outdoors
In addition, I was provided a video that demonstrates the durability of the fabric which made me feel much more confident in the seat’s durability over time.
If it can handle a screwdriver, it can handle sticks. Even after the fabric was eventually punctured, it did not compromise the integrity of the fabric much because other bands of the mesh appeared to be recruited to offset the punctured parts.
I gave both the JX3 Hybrid and conventional saddles a 10 out of 10 in the durability compartment because both are made of high-strength durable fabrics that will last a long time.
JX3 Hybrid Durability vs Conventional Tree Saddles
How Versatile Is The JX3 Hybrid Saddle?
Build-in Ground Chair
The Jx3 Hybrid is unique in that it doubles as a ground-chair. If a better setup presents itself from the ground, it can be used in that way. Additionally, this makes this saddle open to more types of hunting, like when mobile hunting for turkeys where a low profile seat is needed.
Built-in Bow Hanger
The JX3 also comes with built-in hooks on the sides of the saddle so that you can hang your bow from the saddle via the bowstring. I didn’t find myself using this feature because when a bow is in the hanger its is pointed down towards the ground. This means it takes extra movement to get it shot-ready.
It might just be a habit, but I prefer my bow to be upright so all I have to do is take it off a hook and it’s ready to shoot, resulting in minimal movement.
Packable Frame
Because of the strength of the high strength plastic and metal frame, the JX3 can be used to pack game out. There are a lot of straps for tightening making it a good option for packing game out. That being said, packing game out is not common where I live or practical where I hunt most of the time. It is also a Maine tradition to weigh the field-dressed deer, so quartering and packing out is not something I do much if any of.I do use the frame to pack my equipment to and from the treestand which I have found to be very helpful and comfortable. This is definitely a feature I miss when hunting out of conventional saddles.
Are the JX3 Hybrid Extras Worth It?
I don’t use all of the versatile features that the JX3 offers. That is not to say that these features don’t work, they are just impractical for me and my style of hunting most of the time. It is also important to note that I haven’t used this saddle for anything other than deer hunting. That said, there is no downside to having these features so, why not?
Because the JX3 Hybrid had more unique options it is clearly a more versatile saddle. For this reason, I gave the JX3 a 10 out of 10. Conventional saddles don’t have this much versatility, but they do the important things well. For example, being mobile with the ability to set up in trees in all shapes and sizes. I gave conventional saddles a score of 8 out of 10 in the versatility category when compared to the JX3.
JX3 Hybrid Versatility vs Conventional Tree Saddles
Is The JX3 Hybrid Saddle Cost-Effective?
Like all tree saddles, once you buy one you will not have to buy another treestand making it very cost-effective. It replaces the reason for buying multiple permanent ladder or hang-on stands, which adds up quickly. For example, one JX3 Hybrid = infinite treestands. Five hang-on or ladder stands = five treestands. Since all tree saddles have this ability, both were given a score of 10 out of 10.
How Much Does The JX3 Hybrid Cost?
The JX3 Hybrid costs about $395.00, you can check the price here. but as I mentioned it replaces the need for purchasing multiple conventional hang-on and ladder stands which adds up quickly. With the JX3 Hybrid, you can hunt anywhere at any time. Platform prices range because there are so many of them out there. The Ameristep Tree Steps that I use are around 2$-3$ apiece, and I rarely use more than 5. So for 15$, you can have an ideal platform.
JX3 Hybrid Cost-Effectiveness vs Conventional Tree Saddles
How Stealthy is the JX3 Hybrid Saddle?
The JX3 is less stealthy than competitor saddles. It’s a bit bulkier and has less fabric and more plastic and metal. That being said, for its size and materials, it is surprisingly quiet. Much of the metal and plastic is covered with fabric. I don’t have any problems with metal noise other than the carabiners, which I taped to prevent clanging (I do this on all other saddles too). Also, it’s carried tightly against your back so branches and whips have a hard time slapping the JX3 Hybrid when being carried.
Because the JX3 is a little larger and made with slightly noisier material I gave it an 8 out of 10 when compared to competitor saddles which received a 10 out of 10.
JX3 Hybrid Tree Saddle Review Comparison 2 | Stealthiness
JX3 Hybrid Concealment
Like conventional saddles, another great benefit of the JX3 Hybrid is that it enables me to use the tree to my advantage. For example, if an animal is coming from a certain direction, you can move so that the tree is between you and the animal to stay concealed. Another perk is that since you do not have to cut limbs down to get up a tree as touched on in the ‘Imperfect Trees’ section above. This allows you to leave natural cover to blend in better and stay more concealed.
The JX3 is a bit larger than conventional saddles and because of the frame of the seat, you can’t hunker down as close to the tree trunk as you can with other saddles. I don’t see this having any negative effects because it’s only a foot or so difference. For this reason, I have the JX3 a 9 out of 10 and conventional saddles a 10 out of 10.
JX3 Hybrid Concealment vs Conventional Tree Saddles
Can The JX3 Hybrid Saddle Be Set-up In Imperfect Trees?
Both the Jx3 Hybrid and competitor saddles are able to climb ugly trees that are full of branches without cutting the limbs and never detaching yourself from the tree. The benefit of this is; during run and gun setups you can put yourself in the best spot possible, even if the tree isn’t perfect. You can also hunt trees that are leaning. With a higher selection of trees available I have been able to put myself in better positions making my hunts more successful.
I gave the JX3 an 8 out of 10 because the JX3 is a bit bulkier and it is only slightly more difficult to climb up limby trees, especially in the brush because parts of the saddle tends to get caught by twigs so set up takes slightly longer. Conventional saddles scored a 10 out of 10 for their ability to set up in imperfect trees quieter and easier.
JX3 Hybrid Imperfect Tree Setups vs Conventional Tree Saddles
Can The JX3 Hybrid Saddle Set-up In Different Sizes Of Trees?
I gave both the JX3 Hybrid and competitor saddles a 10 out of 10 for their ability to climb trees of any size that will support your weight. The size of the JX3 Hybrid does not affect its ability to climb both small and large trees. I have found this to be important in swamps where vegetation is stunted.
The ability to hunt smaller trees gives me the ability to hunt where other hunters cannot. You can also hunt trees as large as the linesman and tree rope will reach which will allow you to climb trees over 30 inches in diameter. If you need to hunt larger trees you can purchase or create your own linesman’s ropes to meet your needs.
JX3 Hybrid Tree Size Flexibility vs Conventional Tree Saddles
Theft Prevention
Theft can be a problem on public lands, and even on private land! The peace of mind of being able to take tree saddles home at the end of the day is huge for me. There’s nothing worse than getting excited about going hunting only to find your stand missing or damaged. Additionally, not having a bulky ladder or hang-on stand permanently placed on a tree prevents treestand locations from being discovered by other hunters.
Since the JX3 Hybrid and conventional saddles are meant to bring in and out of the woods after every hunt, theft is not a problem. Thus, both were given a score of 10 out of 10 in this category.
JX3 Hybrid Theft Prevention vs Conventional Tree Saddles
Can You Hunt In Multiple Stands With The JX3 Hybrid Saddle?
Hunting in the same treestand repeatedly will quickly burn out your spots. The first couple sits are the most effective. This makes permanent ladder and hang-on stands easy to over-hunt and for big bucks to pattern your movements. To increase my success I like to spread out my hunting pressure within multiple high-odd locations and hunt them when conditions are right. This keeps my stands fresh.
Tree saddles are great for this because you are able to hunt anywhere you want on any given day because tree saddles come home with you after every hunt. Both the JX3 and competitor saddles are simple and easy to set-up so I can avoid hunting the same trees over and over. This keeps hunting spots fresh, making each hunt essentially the “first sit”. For this reason, both were given a score 10 out of 10.
JX3 Hybrid Multiple Stand Setups vs Conventional Tree Saddles
A place to solidly strap in climbing sticks vertically. Or an attachment that can be placed on the frame to do this. This would improve mobility and ease-of-use.
Backrest Slipping
One issue I had was that the backrest kept slipping off the metal-framed seat on one side. This only happens a few times over the course of a day. It was a little startling because it would happen suddenly, but did not affect overall comfort much.
Metal Fork
When maneuvering the optional metal fork that comes with the saddle can scrape the back of your legs or worse if not careful. I’ve found the metal lip is a better alternative anyway and does not damage trees as badly.
Longevity
After reading the instruction manual that came with the saddle I noticed that it is only recommended to use the saddle for 5 years before replacing the saddle. If the saddle is taken care of it will likely last longer, but for safety, the manual recommends replacing it every 5 years, which is not a very long time.
Strap Tightening
I would like to have straps that tighten easier. Due to the fastening buckle used the straps on the back of the saddle are difficult to tighten especially with cold hands. It would be great to have a buckle that could tighten and loosen very easily.
Is The JX3 Hybrid Saddle The Best Tree Saddle On The Market?
Like all tree saddles, they are a tool. One scenario may be better suited for a conventional saddle, another may be better suited for the JX3 Hybrid, and another for a conventional hang-on stand. It all depends on the specific hunt and your experience on how you will be best able to accomplish your goals for that specific hunt.
That being said, in my opinion, there are many more instances to use the JX3 than to not. What’s the point of carrying in a lightweight saddle if you’re not going to enjoy yourself and can’t focus on the hunt? The JX3 Hybrid can do whatever conventional saddles can do. Sure it might just take slightly longer or be slightly more cumbersome, but not enough to make a big enough difference to sacrifice comfort. What’s the point of using a conventional saddle that will get you in a tree 10% faster and quieter only to get up in the tree for a fraction of the comfort?
Is The JX3 Hybrid Saddle Right For You?
Comfort
The JX3 Hybrid and conventional saddles are neck and neck in most cases. The key takeaway is that the JX3 Hybrid offers much better comfort. And in my opinion, comfort should be a high-value determining factor when purchasing a tree saddle. Comfort is what allows you to sit on-stand longer, which increases hunting success, and results in hunting enjoyment.
All-Day Hunts
Based on my experience with the JX3 Hybrid it is the best mobile option currently on the market for all-day sits and is what I choose to use in those scenarios.
When It’s Not Necessary to Use The JX3 Hybrid
Quick Hunts
If you’re only sitting for a few hours and need the most stealthy and mobile piece of equipment possible, a small fabric saddle is often the way to go. I killed a nice buck waiting for the conditions to be just right to sit one time. The conditions ended up being perfect 30 minutes before sunset which meant I had 1 hour of huntable light. I also had to walk a half-mile or so and get into a swamp. An hour is barely enough time to get uncomfortable in a conventional saddle. I wanted the lightest and quickest method to get in and out. A conventional fabric saddle was the way to go. I ended up killing that buck 5 minutes before legal shooting light was over.
JX3 Hybrid Final Thoughts
I made the switch from lightweight conventional fabric saddles to the JX3 Hybrid Saddle made by JX3 Outdoors I haven’t looked back. What’s the point of using a lightweight conventional saddle if you’re so uncomfortable you can’t enjoy yourself and can’t focus on the hunt?
In my opinion, the JX3 Hybrid tree saddle is one of the best saddles currently on the market right now. I’m excited to put this saddle to the test even further in upcoming hunting seasons.
If you’re interested in the JX3 Hybrid, you can find it by heading over to the JX3 Outdoors Website.
JX3 Hybrid Return Policy
JX3 Outdoors offers a 30-day money-back guarantee. The customer is only responsible for return shipping. I think it is fantastic that you can test this saddle and make sure that it is exactly what you are looking for, and if it is not you can return it.
Conclusion
If you have questions or comments you can leave them in the comments section below. I’ve also conducted hands-on reviews of other top saddles. For example, the Aero Hunter, Tethrd ESS, Cruzr XC, and Dryad Drey.
Don’t forget to check out my other Saddle Hunting Posts if you haven’t already: