Understanding deer anatomy is crucial both before and after taking a shot. It provides essential guidance on precise shot placement and the right approach to blood trailing a deer for both good and sub-par shots. This knowledge is fundamental for ethical hunting, ensuring a humane and swift kill, and making well-informed decisions when pursuing a deer after a shot, whether it was a good or bad shot.
You may have come across this article seeking answers after successfully hitting a deer, eager to determine the effectiveness of your shot. You’ll find the answers you’re looking for in this article.
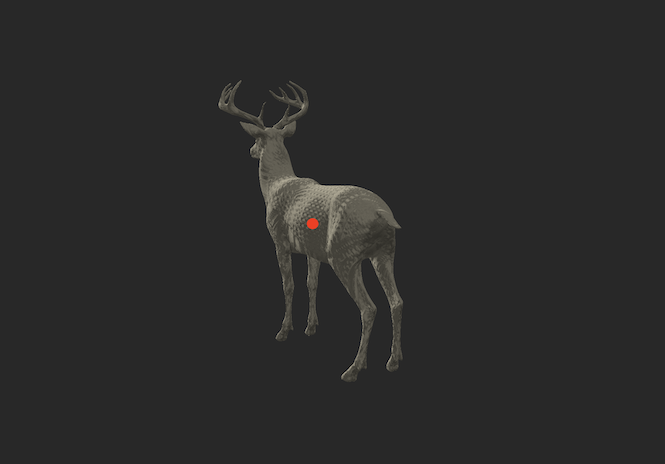
Deer Vitals |Learn Where To Shoot A Deer Using Deer Anatomy
Heart
The heart is a fairly small organ and is one of the best places to shoot a deer for a few reasons:
The heart is slightly encompassed by the lungs.
The majority of the lungs are found directly above the heart.
Compensates for string jumping deer.
Deer will expire quickly.
Distance plays a role in where you should shoot a deer with a bow. At further distances, the deer can react to the sound of your bowstring when it’s shot. They instinctually load their legs to run, which makes it look like they are ducking the arrow.
Since the heart is the lowest vital organ in a deer, if you aim for the heart and the deer tries to duck your arrow, you’ll still often hit the lungs which is also a great place to shoot a deer.
If the deer doesn’t duck the arrow then you’ll hit the heart. Deer that are shot in the heart will generally fall within 100 yards. A good rule of thumb is waiting 1 hour after a heart shot with a bow before taking up the blood trail.
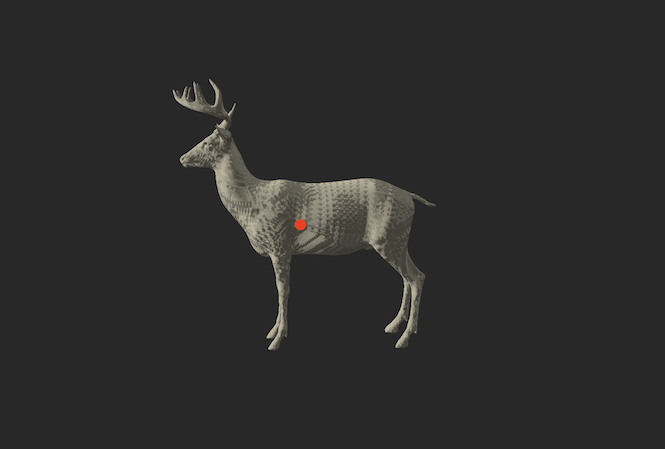
Lungs
The lungs are one of the quickest and most ethical places to shoot a deer for a few reasons:
They have a lot of capillaries and blood vessels.
Deer won’t be able to breathe after they’ve been shot.
Good blood trails.
The lungs are a large target.
As mentioned above, the lungs are another good spot to shoot a deer. Lungs have a lot of blood vessels and capillaries, the lungs need to have a lot of these because it helps animals assimilate oxygen. For this reason, a lot of bleeding will occur when the lungs are shot. Additionally, without the use of lungs, a deer cannot breathe for very long.
This combination leads deer to expire quickly and ethically. Deer usually don’t go more than 100 yards after a double-lung shot. A single lung shot is not as effective and the deer may run for a really long distance, and you may never find it.
When you’re aiming for the lungs always try to get both lungs. If you can only get a single lung because of the deer’s orientation, try to hit another vital organ in combination; such as the heart or liver.
A good rule of thumb is waiting for 1-hour after a double-lung shot with a bow before taking up the blood trail.
Liver
The liver is a decent place to shoot a deer with a bow, but it is never my goal to try to shoot the liver. I am always aiming for the heart and lungs. If the liver gets in the way then I consider that a bonus.
The liver is located behind the lungs and is sometimes hit by accident when aiming for the lungs. This can be a blessing when you think you’ve made a bad shot too far back toward the stomach.
Although it takes more time for the deer to expire than a heart or lung shot, it is still one of the quickest and most ethical places to shoot a deer.
When recovering a deer that has been shot in the liver a good rule of thumb is to wait 2-3 hours before taking up the blood trail.
Brain
The brain is another organ that when shot will drop a deer dead in its tracks. However, the brain is a very small target and if you end up missing the brain and wounding the deer in the head area it will likely be a slow and painful death for the deer.
For this reason, it is advised not to aim for the brain if there is potential for a better shot. Usually, there is if you wait for the deer to move to a better position.
If you’re very confident in your setup and have a very easy shot, the brain is one of the quickest and most ethical places to shoot a deer.
Spine
The spine is another organ that when hit will immediately drop a deer in its tracks. However, the spine is also a tough target to hit. If you end up missing the spine low you’ll often hit what is referred to as ‘no-mans land’ which is a spot between the spine and lungs that is just meat.
This will end up wounding the deer and most of the time these deer are not recoverable. For this reason, it is advised not to aim for the spine if there is potential for a better shot.
Almost always there is a better shot if you wait for the deer to move to a better position. If you’re very confident in your setup and have a good shot, the spine is one of the quickest and most ethical places to shoot a deer.
I would personally rather wait for a better shot at the lungs, heart, or liver.
High-Shoulder Scapula Shot
The high-shoulder or scapula shot is becoming a more popular place to shoot a deer because it will drop a deer dead in its tracks. This shot works well because the scapula bone is less thick than the shoulder joint.
This allows a bullet to break both shoulders easily. With both shoulders broken the deer is not able to run because it has lost the use of both of its front legs.
In addition, this shot is close to the lungs and the spine so if you don’t hit exactly where you want you’ll more than likely hit something else that is vital. The high shoulder scapula shot is a great place to shoot a deer for quick ethical kills.
Deer Anatomy| Where Not To Shoot A Deer
Shoulder Joint
A direct shot to the shoulder joint is not a good place to shoot a deer. The shoulder is a thick bone and bullets don’t always make it through the bone. This can wound a deer by breaking one leg and not hitting anything lethal or possibly puncturing only a single lung.
To get maximum penetration in order to hit the vitals, it is not recommended to shoot through the large bone of the shoulder joint.
Stomach & Intestines
Shooting a deer in the stomach and intestines should be avoided at all costs. A deer shot here will die but it will usually take 12 hours or so for the deer to expire. This a long and painful way to die for a deer, shooting a deer in the stomach is not an ethical shot. Sometimes accidents happen though and they can’t be avoided.
If you end up shooting a deer in the stomach the best thing you can do is to wait 12 hours and then pick up the track. It is almost guaranteed that the deer will lie down after getting shot in the stomach and will expire in its first bed if not disturbed.
If you start blood trailing too soon, the deer will run away from its bed and it will become exponentially harder to recover the deer. Normally, there will be no blood trail to follow when the deer is hit in the stomach.
Arteries & Veins
Just like all animals, deer have arteries and veins. And although it is deadly if you hit a deer in the main arteries or veins like the carotid or jugular, they are not very ethical shots to take because they are not easily visualized with the naked eye.
This makes them very hard to hit consistently. It is recommended to wait for a better shot. Consider it a bonus when arteries and veins are hit in addition to good shot placement.
Understanding deer anatomy is crucial for making proper shot placement and recovering deer effectively. If you have questions you can find links to where I can be reached below:
Maine has 3 species of ash trees; white ash, green ash, and black ash. In this post, you’ll learn how to identify and differentiate them.
How To Identify Ash Tree Species From Other Ash Trees
Once you’ve identified that a particular tree is an ash tree the next step is to identify which species of ash tree it is. Each species of ash has unique defining characteristics that separate them from other ash trees. Some characteristics are subtle and some are not so subtle. The characteristics used to identify ash trees are described below.
Characteristics For Identifying Ash Tree Species
Below I’ve listed some helpful characteristics that can be used to help identify ash trees to the species level:
Habitat
Height
Bark
Leaves
Buds
Twigs
Flowers
Fruit/Seeds
Roots
Native Distribution
1. Black Ash Trees (Fraxinus nigra)
Other Common Names
Black ash is also called brown ash, basket ash, and hoop ash
Key Identifying Characteristics
A key identifying feature of the black ash is the punky/spongy/flaky bark that other ash trees do not have. Age plays a role in how punky and flaky a black ash tree is. So just because it does not look very punky, don’t rule it out from being black ash, use some of the other identification features below as well.
Habitat
Black ash can easily be identified and distinguished from other ash species in a couple of ways. First, it is a wetland species and will almost always be found in wet areas. Black ash likes wetter soil than most ash trees so you will often find it where soils are saturated. It grows in cold regions in forested swamps.
Black ash tree habitat | Growing in wet soils
Height
Black ash trees will grow to about 60 ft tall but will have a fairly slender trunk. The trunk will rarely get more than 20 inches in diameter.
Bark
As mentioned above, an identifying feature of the black ash is the punky/spongy/flaky bark that other ash trees do not have. Age plays a role in how punky and flaky a black ash tree is. So just because it does not look very punky, don’t rule it out from being black ash, use some of these other identification features as well.
black ash tree bark
Leaves
The black ash tree typically has between 7-11 leaflets that make up a leaf. The leaf scar is only slightly notched which is more O-Shaped than the white or green ash.
White, Black, and Green Ash Leaf Scar Comparison. Photo From HereBlack ash tree leaves. Photo From Here
Roots
The roots of the black ash also have white dots/specks on them which other ash trees do not have. I’ve noticed that not all black ash will have obvious white dots, but if you do see them then you can confirm it’s a black ash tree. If you don’t see them use some of these other identifying features.
black ash tree roots and tree base (notice white dots)
Native Distribution
Black ash occurs in many northeastern U.S. states and in eastern Canada. The northernmost portion of black ash’s range extends from Newfoundland to southeastern Manitoba. Some populations have been observed in North Dakota which is the westernmost distribution. Black ash can be found in all of the Great Lake states the southern limit in northern Virginia.
Black Ash (Fraxinus nigra) Species Distribution Range Map
2. Green Ash Trees (Fraxinus pennsylvanica)
Green ash is the most common/widely distributed ash tree species in the United States and is also found commonly in Maine.
Other Common Names
Green ash is also called red ash, swamp ash, and water ash.
Habitat
Green ash can be found in wetlands, along the edges of wetlands, and in upland areas near wetlands in moist soil. Black ash also grows in wetlands but requires very wet soil.
Height
Green ash will grow to about 60 ft tall and will rarely exceed 24 inches in diameter, which is slightly larger than black ash.
Bark
Green ash bark has ridges and furrows. It is less fissured and furrowed than the white ash, but more fissured than the black ash. The ridges form a diamond-like shape. It is not punky/spongy and does not peel as black ash does.
Green Ash Tree Bark
Leaves
Green ash will have 5-9 leaflets that make up an entire leaf. It will most commonly have 7 leaflets. The leaves are 10 to 12 inches in length with individual leaflets 2 to 6 inches long. The leaflets are long-pointed at the tip with a tapering base. The top of the leaf scar is straight and is D-shaped, unlike white ash which has a deep U-Shape.
Fraxinus pennsylvanica (Green Ash) Leaves. Photo From HereWhite, Black, and Green Ash Leaf Scar Comparison. Photo From Here
Native Distribution
Green Ash Tree (Fraxinus pennsylvanica) Distribution Range Map
3. White Ash Trees (Fraxinus americana)
White ash is another species of ash that is commonly found in Maine and is widely distributed in the United States.
Other Common Names
White ash is also called purple ash, Biltmore ash, Biltmore white ash, cane ash, small-seed white ash.
Key Identifying Feature
The leaflets have a distinct, ¼ to 1/3-inch slender stalk that often has finely toothed edges, tapering to a pointed tip. The white ash also has a U-Shaped leaf scar notch which is different than the D-shape notch of the green ash, and the slightly notched black ash which is more O-Shaped.
White, Black, and Green Ash Leaf Scar Comparison. Photo From Here
Habitat
White ash trees prefer dry soils and will be found in dryer areas than black and green ash. White ash and green ash can be found close in proximity, however, white ash will be in the dryer soils and green ash will generally inhabit the wetter areas.
Height
This tree can grow to heights of about 120 ft and support a massive trunk to ~80 inches in diameter in optimal growing conditions.
Bark
The bark of the adult white ash is rough and has deep ridges and furrows that form a prominent diamond pattern. The bark looks similar to green ash but the ridges are even more prominent especially when mature as shown in the photo below.
White Ash Tree Bark
Leaves
White ash leaves are opposite and pinnately compound and are 8 to 12 inches long with 5 to 9 (usually 7) leaflets that are oval to elliptical. Leaflets are 2½ to 5 inches long and 1 to 2 inches wide. Leaflets attached by longer petioles. The base of each leaflet is well-defined. The leaflets have a distinct, ¼ to 1/3 inch slender stalk that often has finely toothed edges, tapering to a pointed tip. The top of the leaves are dark green and smooth, the bottoms are pale green with short hairs along the midvein and at the base of lateral veins.
The white ash also has a U-Shaped leaf scar notch which is different than the D-shape notch of the green ash, and the slightly notched black ash which is more O-Shaped.
Fraxinus americana (White Ash) Leaves. Photo From Here
Twigs and Buds
White ash twigs are stout with a gray-olive-green color and are hairless.
Flowers
Inconspicuous, meaning they’re not obvious. White ash has separate male and female plants of which their color is light green to purple, both sexes lacking petals. Female flowers occur in loose panicles, males occur in tighter clusters. The flowers appear after the leaves unfold.
Fruit
The fruits are winged samaras like all ash trees and develop in late May to June and mature in the fall. The samaras are one-winged, dry, flattened samara with a full, rounded, seed cavity, maturing in fall and dispersing over winter.
Native Distribution
In the distribution map below you can see that white ash is a widely distributed species and is one of the more common ash species found in the United States.
White Ash (Fraxinus americana) Distribution Range Map
Species Resembling Ash Trees (That Are Not Ash Trees)
By looking at the scientific names of these species you can tell right away that they are not actually true ash species. For example, Fraxinus is not shown in their scientific name, meaning they are not classified as true ash species, despite some of the names having ‘ash’ in them.
American Mountain Ash Tree (Sorbus americana)
Not to be confused with Texas ash (which is an ash tree) and is also called mountain ash.
European Mountain Ash (sorbus aucuparia)
Boxelder Tree (Acer negundo)
Shagbark Hickory Tree (Carya ovata)
Elm Tree (Ulmus species)
Black Walnut Tree (Juglans nigra)
Prickly Ash Tree (Zanthoxylum americanum)
Conclusion
Hopefully, you found this Maine ash tree identification guide helpful. If you have questions or comments leave them in the comments below and I will do my best to address them.
For more information on identifying ash trees, check out my other posts:
Ash tree leaves are unique and can be used to identify ash trees from other trees. In this post, you’ll learn what they look like so that you’ll be able to differentiate ashes from other trees.
Before you can identify which type of ash tree you are looking at, you first need to be able to identify ash from other common trees. For example, you need to distinguish ash trees from maples, oaks, birches…etc. So, how do you do this?
The answer is; all ash trees have the same or very similar over-arching characteristics. These characteristics include: branches, bud arrangement, leaves, bark, and seeds. These are the main features that can be used to identify ash trees. One of the best ways to identify an ash tree from other trees is by their leaves.
Ash Trees Have Opposite Leaves, Branches, and Buds
All ash trees (Fraxinus) have opposite leaves and branching (which is a good identifying feature because not many trees have this). Opposite branching/buds are when the branches, buds, and leaves are directly across from one another on the tree trunk or stem, as opposed to alternate branching which is staggered branches up the trunk or stem.
Alternate vs Opposite Leaf Arrangement. Photo From Here
Ash Trees Have Pinnately Compound Leaves
Another good identifying feature for ash trees (Fraxinus) is that they have pinnatelycompound leaves. This means one compound leaf is made up of many leaflets (mini-leaves) that form a larger leaf. There is a range of 5-11 leaflets that make up a leaf of an ash tree generally. This is a good identifying feature because boxelder (Acer negundo) is the only other tree that has compound leaves. So, if you see a tree with compound leaves there is a good chance it is an ash tree.
Pinnately Compound Leaves vs simple leaves. Photo From Here.
Parts Of Ash Tree Leaves
The photo below is a simple diagram of the parts of an ash tree leaf. This will be helpful to know when talking about ash tree leaves.
17 Species of Ash Tree Leaves | Examples With Pictures
1. Black Ash Leaves (Fraxinus nigra)
White, Black, and Green Ash Leaf Scar Comparison. Photo From HereBlack ash tree leaves. Photo From Here
The black ash tree typically has between 7-11 leaflets that make up a leaf. The leaf scar is only slightly notched which is more O-Shaped than the white or green ash.
2. Green Ash Leaves (Fraxinus pennsylvanica)
Green ash will have 5-9 leaflets that make up an entire leaf. It will most commonly have 7 leaflets. The leaves are 10 to 12 inches in length with individual leaflets 2 to 6 inches long. The leaflets are long-pointed at the tip with a tapering base. The top of the leaf scar is straight and is D-shaped, unlike white ash which has a deep U-Shape.
Fraxinus pennsylvanica (Green Ash) Leaves. Photo From Here
White, Black, and Green Ash Leaf Scar Comparison. Photo From Here
3. White Ash Leaves (Fraxinus americana)
White ash leaves are opposite and pinnately compound and are 8 to 12 inches long with 5 to 9 (usually 7) leaflets that are oval to elliptical. Leaflets are 2½ to 5 inches long and 1 to 2 inches wide. Leaflets attached by longer petioles. The base of each leaflet is well-defined. The leaflets have a distinct, ¼ to 1/3 inch slender stalk that often has finely toothed edges, tapering to a pointed tip. The top of the leaves are dark green and smooth, the bottoms are pale green with short hairs along the midvein and at the base of lateral veins.
The white ash also has a U-Shaped leaf scar notch which is different than the D-shape notch of the green ash, and the slightly notched black ash which is more O-Shaped.
Fraxinus americana (White Ash) Leaves. Photo From HereWhite, Black, and Green Ash Leaf Scar Comparison. Photo From Here
4. Blue Ash Leaves (Fraxinus quadrangulata)
The leaves are 8 to 12 inches long with 7 to 11 leaflets, 3 to 5 inches long, oval or lance-shaped, and with toothed margins.
The leaves of Pumpkin ash are a glossy green and can get up to 40 cm (15.7 in) long and are odd-pinnate with 5-9 leaflets that are hairy on the bottoms. The single leaves are oval but pointed at the tip. The leaf margin is serrated.
The pinnately compound leaves have 5 to 9 leaflets and are 7 to 12 inches long. Leaflets are 2 to 4 inches long and 2 inches across with a usually serrated margin but sometimes entire. The upperside is dark green and the underside is paler and smooth. The overall feel is thick and smooth.
Top and bottom of Carolina Ash Tree (Fraxinus caroliniana) leaves. Notice the lighter bottoms. Photo From Here.
7. European Ash Leaves (Fraxinus excelsior L.)
European ash leaves are opposite, 20–35 cm (7.9–13.8 in) long, pinnately compound, with 7–13 leaflets with coarsely serrated margins, elliptic to narrowly elliptic, 3–12 cm (1.2–4.7 in) long, and 0.8–3 cm (0.31–1.18 in) broad and sessile on the leaf rachis. There are no stipules.
These features distinguish ash from European mountain ash (Sorbus aucuparia) in which the leaves are alternate with paired stipules. The leaves are often among the last to open in spring, and the first to fall in autumn if an early frost strikes; they often fall dull green or develop a bright yellow autumn color.
8. Oregon Ash Leaves (Fraxinus latifolia)
Oregon Ash has pinnately compound leaves like all ashes. The leaves are 4 3⁄4–13 in long, with 5–9 leaflets attached oppositely in pairs on the rachis with one additional leaflet at the tip (common for ash trees). Each leaflet is oval-shaped and is about, 2 1⁄4 – 4 3⁄4 inches long and 1 1⁄8 –1 5⁄8 inches broad which is bigger than most other ashes. The leaves are noticeably lighter green than other species found in the same areas. The leaves will turn bright yellow and fall off early in autumn.
Oregon Ash Tree (Fraxinus latifolia) Leaves and fruit. Photo From Here.
9. Gregg’s Ash leaves (Fraxinus greggii)
Gregg’s ash has distinctive nearly evergreen leaves that are 1-3 in. They are long and are pinnately compound (like all ashes), lightly toothed, dark-green, and leathery which are found in threes, but up to seven small leaflets. The small size of these leaves is a unique characteristic of this ash tree making it a good identifier of this species.
Gregg’s Ash Tree (Fraxinus greggii): Evergreen Leaves. Photo From Here.
10. Arizona Ash Leaves (Fraxinus velutina)
The leaves are 4 to 10-inches long, pinnately compound with 3, 5, or 7 leaflets 1.5-3 inches or longer with serrated edges. The leaflets can be slightly different shapes and often have velvety hairs beneath which is the reason for one of the many common names “Velvet ash”. However, velvety hairs may not always be present. The foliage will turn yellow in the autumn.
Arizona ash (Fraxinus velutina) leaf. Commonly is tomentose (has small velvety hairs). Photo From Here.
11. Evergreen Ash Leaves (Fraxinus uhdei)
Evergreen ash tree leaflets are similar to other ash trees in that they are pinnately compound, odd in number, and are dark green. The leaves differ from other ash trees because they are partly evergreen as the same suggests. Although, some leaves will still fall off.
Mountain ash leaves are opposite with pinnately compound leaflets like all ashes and are 5″ to 8″ long. The leaves hold 5 to 7 oval to round leaflets. leaflets are long-stalked and 1″ to 3″ long. The leaf color is dark green on top and lighter green on the bottom.
Texas ash has “C-shaped” leaf scars where the bud sits within the cup of the “C”, very similar to white ash.
Mountain ash (Texas albicans) C-Shaped Leaf Scar. Photo From Here.
13. California Ash Leaves (Fraxinus dipetala)
Like all ashes, the leaves are pinnately compound. The leaves are between 2 – 7.5 inches long, light to dark green, with three to seven (rarely nine) leaflets that are usually between 0.4 – 2.75 inches long. The leaves are also thick and serrated along the margins.
The leaves are in opposite pairs or whorls of three, pinnate, and 6–10 inches long. Each leaf consists of 3 – 13 leaflets which are distinctively slender as the name suggests. The leaflets are about 1.2–3 inches long and 1–1.5 cm broad. The margins of the leaves are toothed (i.e. serrated). The leaves will turn a yellowish color in autumn.
Leaves opposite and pinnately compound, but uniquely often have whorls of 3 or 4 at ends of branches. There are usually 5-9 narrow leaflets with each consisting of about 4-6.5 cm long. They are dark green during the growing season and a vibrant red-purple color in the fall.
Raywood ash tree (Fraxinus angustifolia ‘Raywood’) red leaves and foliage. Photo From Here.
16. Manna Ash Leaves (Fraxinus ornus)
The leaves are in opposite pairs and pinnately compound. They are, 8–12 inches long and can have 5 to 9 leaflets which are oval shaped and 0.2–0.4 inches long and 0.8–2 in wide. The veins on the underside are usually hairy at the base. The margins of the leaflets are finely serrated with a wavy margin. The petioles are short but distinct, they are around 0.20–0.60 inches long. In the fall the leaves can range from yellowish to purplish. The leaf buds are grey, pinkish-brown, brown, with short grey hairs unlike those of the European Ash which are black.
17. Manchurian Ash Leaves (Fraxinus mandshurica)
Like all ashes, the leaves are pinnately compound and are about 10-15 inches long. The leaflets can number anywhere from 7-13 and are 5-20 cm long, and 2-5 cm wide and are obviously toothed and nearly stalkless. The leaves turn a beautiful yellow-chrome color in the fall.
Manchurian Ash Trees (Fraxinus mandshurica) leaves. Photo From Here.
How To Identify Ash Tree Species From Other Ash Trees
Once you’ve identified that a particular tree is an ash tree with the information above, the next step is to identify which species of ash tree it is. Using ash tree leaves to identify an ash tree to a particular species is more tricky because most ash trees have very similar leaves. For this reason, other characteristics should be used to further identify ash trees to an individual species.
Each species of ash has unique defining characteristics that separate them from other ash trees. Some characteristics are subtle and some are not so subtle. The list of characteristics used to identify ash trees to species is described below.
Characteristics For Identifying Ash Tree Species
Below I’ve listed some helpful characteristics that can be used to help identify ash trees to the species level:
You’ll want to know these saddle hunting pros and cons if you’re thinking about switching from conventional treestands to saddle hunting to determine if saddle hunting is right for you.
If you’re new to tree saddle hunting and are looking for tree saddle suggestions, you may find my tree saddle reviews helpful:
This post contains Amazon and other affiliate links, which means I’ll receive a commission if you purchase through my link, at no extra cost to you. Of course, you are not obligated to use my links, but it does help fund these posts in hopes of bringing more value to you!
Table of Contents
Saddle Hunting 101 | What Is Tree Saddle Hunting?
A tree saddle is basically a safety harness on steroids and it is worn while hunting and used instead of a conventional treestand like a climber or ladder stand. It features more padding and high adjustability to allow hunters of most shapes and sizes to sit comfortably for long hours while hunting.
Tree Saddle Hunting For Beginners | Parts of a Tree Saddle – Tree Saddle Diagram
Tree saddles are typically made with high-strength fabric and rope with carabiners which make up a tree rope that goes around your tree of choice, a bridge rope that attaches to this tree rope, a lineman’s belt, and of course the saddle itself (see picture below).
In a tree saddle, you are tied to a tree and you are semi-suspended facing toward the tree. To maneuver around the tree you must have some sort of platform which is usually not included with the purchase of tree saddles currently on the market.
Saddle Hunting Pros
1. Imperfect Tree Set-ups
Tree saddles allow you to get around trees that are full of branches without ever having to completely detach from the tree. This allows me to climb ugly trees that are full of branches during run and gun setups. This ensures you can be in the right spot, rather than having to settle for another tree further from where the action is. You can also hunt trees that are leaning. With a higher selection of trees available you can put yourself into better positions, making hunts more successful.
Tree Saddle Hunting | Climbing With Multiple Linesman’s Belts
2. Tree Size Adjustability
Tree saddles also you to climb trees of any size that will support your weight. I have found this to be important in swamps where vegetation is stunted. Being able to hunt smaller trees gives you the ability to hunt where other hunters cannot. You can also hunt trees as large as the linesman and tree rope will reach. I shot my 2017 buck in a white pine that was around 30” in diameter. If you need to hunt larger trees you can purchase your own ropes to meet your needs, but the standard ropes that come with the tree saddles are usually plenty.
3. Cost-Effective
Once you buy a tree saddle you will not have to buy another treestand, making it very cost-effective. It replaces the reason for buying multiple permanent stands like ladder or hang-on stands. Doing this will be costly over time. This is how I think about cost-effectiveness: One tree saddle = an infinite number of treestands. Five hang-on or ladder stands = five treestands.
4. Multiple Stands
I have personally noticed and most successful big buck killers agree that hunting the same treestand repeatedly will quickly burn out spots and that the first couple sits are the most effective. This makes permanent ladder and hang-on stands easy to over-hunt and for big bucks to pattern you. For this reason it is best to hunt permanent stands when conditions are perfect for that particular treestand. This will increase success of particular treestands by keeping them fresh until the timing is right. Hunting only when conditions are perfect, however, greatly reduces the time you are able to hunt.
If you’re like me you’re going to hunt every chance you get one way or another, so being restricted like this was not going to cut it for me. I needed a better option. To increase my success I needed to be able to spread out my hunting pressure within multiple high-odd locations and hunt them when conditions were right in order to keep my stands fresh.
With tree saddles, I am able to hunt any location because the saddle comes home with me after every hunt. It is simple and easy to set-up so I can avoid hunting the same trees over and over keeping them fresh, making each hunt essentially the “first sit”, keeping big bucks from patterning me.
5. Increased Maneuverability
My Ameristep Tree Step platform placed around the diameter of the tree enables me to shoot a full 360º around the tree as well as directly underneath. Big bucks often don’t come in where you expect. Other treestands don’t offer this type of maneuverability, being able to maneuver like this puts the hunter in control so he or she can take shots when they are presented. You can also change your vertical height slightly if you need to shoot just above or below a branch. This is done by fully extending my legs from my platform as it raises my elevation a few inches. Scrunching up close to the tree lowers my elevation.
Tree Saddle Hunting Offers Increased Maneuverability By Using Platforms
6. Stealthier
There is very little metal on tree saddles because everything else is rope and fabric. The carabiners are the largest pieces of metal. Some small strap adjusters are made of metal as well. Out of the box saddles are pretty quiet, much quieter than conventional treestands that are made entirely of metal. To make my saddles silent I usually add some tape to all of the metal pieces and that works well. I feel much more confident in my approach when setting up in bedding areas with a tree saddle rather than a metal stand.
When tree saddle hunting you can keep the tree between you and the animals you’re hunting so they can’t see you.
7. Better Portability
Tree saddles don’t weigh much, usually around 5 lbs or so, making them incredibly lightweight. Additionally, it is fabric so it can easily be rolled up into a small bag and placed into a backpack. It can also be worn to the treestand which is what I prefer, I drape the ropes over my shoulders when walking to my stand making transportation simple and noise-free.
This is how much my Aero Hunter Tree Saddle weighs in-bag, with a homemade back-band, and applied silencing applications.
8. Better Concealment
Another great benefit of saddles is they enable you to use the tree you’re in to block the view of approaching animals. If animals are coming from a certain direction I can move to the opposite side of the tree to stay hidden. Since you are facing the tree you can straddle yourself right up tight against the tree. Another perk is that since you do not have to cut limbs down to get to where you want to hunt on a tree you can leave some natural cover to blend in better.
9. Added Comfort
Tree saddles are comfortable compared to metal stands. Even when in awkward leaning trees the saddles remain fairly comfortable. Adjustable straps located on the back and leg portions of the saddle allow for customized pressure point relief. After a few hours I do start to squirm a little from the pressure of the saddle fabric, it can pinch circulation so I am regularly readjusting after being on stand for a few hours.
Here you can see buckles and prusik knots which can be adjusted to fit individuals nicely. The saddle forms well with my body for comfortable long sits on stand.
Some saddles come with back bands for reclining. The back band is fantastic for long sits in the tree as your back does tend to get tired over time without one. I have sat in the stand for around 12 hours a couple of times and I do start to ache, but I am able to extend my legs, stretch, maneuver, and change position to lessen the burden. Sitting anywhere for 12 hours would make anyone squirm. I have not been able to sit nearly this long in other conventional treestands.
JX3 Hybrid Tree Saddle Offers Reclining Comfort
10. Theft Prevention
Theft can be a problem on public lands, and even on private land! The peace of mind of bringing the tree saddle home at the end of the day is huge for me. There’s nothing worse than getting excited about going hunting only to find your stand missing. With the tree saddles, this is not a problem. Additionally, not having a bulky ladder or hang-on stand permanently placed on a tree prevents treestand locations from being discovered by other hunters.
11. Increased Safety
In my opinion, the tree saddles are just as safe, if not safer than traditional treestands.
When used properly you are harnessed to the tree throughout the entire climb. When ascending the tree you are harnessed in with the lineman’s belt. Once you get to the height at which you will be hunting you’ll need to also use the lineman’s belt to place the tree rope. The lineman’s belt allows for a quick, painless and safe installation of the tree rope. Once the tree rope is secure to the tree you can attach yourself to it via carbineer. Once attached, the lineman’s belt can be removed. To descend the tree reverse the process. It is quite simple.
If you encounter tree limbs that your lineman’s belt cannot get around you can set up the tree saddle as you would to hunt, as I just mentioned, then remove your lineman’s belt and re-attach the belt above the limb and carry on your way up the tree, thus being attached to the tree 100% of the time. A second lineman’s belt could also be added to climb branched trees even quicker.
I’ve often found myself getting lazy and not wearing, or forgetting to bring a safety harness when using a conventional ladder and hang on stands. Tree saddles leave you no option. To climb the tree fast and effectively you must be harnessed in at all times.
Saddle Hunting Cons
Before switching to tree saddle hunting, beginners should consider some aspects:
1. Video
I have never done any videotaping while hunting, but it is something I am considering. I am not sure how difficult videotaping would be, but I imagine the footage would be shaky while semi-suspended from the tree.
2. Weight
A person’s size may also affect their ability to stay in a tree saddle for long periods of time. I am a skinny dude 6’4 and 155lbs and it works great for me. Larger hunters may find it causes more strain at pressure points.
3. Practice
It takes a little bit of practice to use tree saddles effectively. For beginners, tree saddle hunting may seem awkward at first. It does take practice. For me, it felt a little awkward at first with the bridge rope getting in the way of pulling my bow back. Switching sides of the tree to shoot can be difficult too because you have to get a bow, with a knocked arrow, around the bridge.
Target practicing in different scenarios while in your tree saddle will help you figure out how to make shots count in the most awkward of situations. I highly recommend practicing like this.
4. Knee Pads
Personally, I don’t use knee pads when hunting with tree saddles, but many people do. The reason being is; as your knees press against the trunk of the tree for long periods they get sore, especially if the bark is ridged. Also, over time, I could see the bark wearing holes in the cloth of your pants at the knees. Knee pads would be a good solution for this. I alternate between straddling the tree trunk and using my knees to keep my knees from getting too sore.
5. Smell
Out of the box, the fabric and rope may have a chemical-like, factory-processed type smell. It is not a bad smell, but to a whitetail, it is strong and not natural. It took a while to get the smell out, I think it was from the dye of the saddle. I tried soaking everything in warm water and baking soda, I also let it soak in scent-killer laundry detergent which helps a little, but not much.
What I observed was the excess coloring of the fabric would come off in the water a little bit after every wash. This was evidenced by the dark tint of the water post-wash. I believe the smell is related to the coloring used because after each wash the smell reduced ever so slightly every time. Each time I washed the saddle less color would come off.
It took about a year for the scent to reduce to a point where I could not notice it. After washing a dozen times or so, letting it dry/air out outside for weeks, and practicing and hunting with it in the elements the scent has finally dissipated enough so that I don’t notice it anymore. I still wash and soak the system in scent-killer laundry detergent before each season, and sometimes during the season.
This experience will vary depending on which saddle you choose.
How to Climb & Setup In a Tree Saddle
Mobile Climbing Sticks
There are many ways to climb a tree using a tree saddle. One of the most common ways for saddle hunters is using a set of climbing sticks. They are lightweight, mobile, very easy to use, and only take a few minutes to get high up into a tree. In addition, there is a lot of custom saddle hunting gear out there that lets you customize your sticks to maximize their effectiveness.
Ameristep Screw-In Tree Steps
I also really like Ameristep screw-in steps (below). However, they can’t be used on public land or without permission on private land (in most states anyway). But I have a few trees in areas that are productive year-after-year as well as permission. On these properties, I prepare my trees ahead of hunting season using these screw-in steps. This way I don’t need to carry my Lone Wolf Sticks into the tree-stand during hunting season. This makes setting up even faster, quieter, and easier. On average it usually takes about 12 steps to make one treestand plus 4 more for the platform ring for a total of 16 steps.
Ameristep Screw-In Steps
Tree Saddle Hunting Platforms
Saddles are used in combination with platforms. Platforms are objects that are placed around the diameter of the tree at the height you want to stand. The purpose for the platforms is to give your feet something to rest and maneuver on while you’re in your saddle.
There are two types of platforms – ring of steps platforms and single-piece platforms. There are many versions of these platforms on the market. I suggest looking at all the options and deciding which might be best suited for your hunting style.
What Are The Best Tree Saddles?
In recent years there has been an increase in the number of tree saddles on the market. I haven’t been able to try all of them but I have tried many of the best. I’ve even done a handful of hands-on reviews: New Tribe Aero Hunter, JX3 Hybrid, Tethrd ESS, Cruzr XC, and Dryad Drey.
How Much Do Tree Saddles Cost?
Tree saddles are not inexpensive, but they make up for their money fast because you don’t need to keep buying them like other stands. Tree saddles range approximately from 200$-400$ with everything included. Platform prices range because there are so many of them out there. The Ameristep Tree Steps that I use are around 2-3$ apiece, and I rarely use more than 5 per tree. So for 15$, you can have more than an ideal platform.
Conclusion
In my experience, tree saddle hunting is the safest, most lightweight, and versatile option on the market as far as treestands are concerned. This makes tree saddle hunting an excellent option for all hunters. If you’re looking to take your hunting success to the next level saddle hunting is a great option to consider.
Ash tree species are easy to identify once you know what to look for. Learn how to identify ash trees and differentiate ash species by using this field guide. In this post you’ll learn how to:
Differentiate ash trees from other tree species (maples, oaks, beech…etc)
How to tell ash tree species apart (white ash, green ash, black ash…etc)
Learn trees that are commonly mistaken for ash trees but that are actually not ash trees (like American mountain ash trees despite the name).
Let’s jump in…
Table of Contents
How Many Species of Ash Trees Are There?
Within the ash tree genus (Fraxinus), there are about 45-65 species of trees (according to Wikipedia). I’m not going to cover ALL of these, I am going to cover the 17 most common ash trees that you are most likely to encounter or have questions about to save you time.
How To Identify An Ash Tree
Ash Tree Classification
First off, it helps to have a brief understanding of the taxonomic classification hierarchy of the ash species. You might not know it but you’re probably already quite familiar with this classification system.
For example, the botanical/scientific/ Latin names of plants are the genus and species levels of the classification system. Typically plants are identified using family, genus, and then species-level classifications. The higher classifications are unnecessary for basic identification purposes because the classifications become too broad (see photo below).
Ash Tree Taxonomic Classification
If the above information confused you at all, don’t worry! All you need to remember is that Fraxinus is an umbrella term that encompasses all ash tree species (white ash, green ash, black ash…etc).
How To Identify An Ash Tree From Other Common Trees
Before you can identify which type of ash tree you are looking at, you first need to be able to identify ash from other common trees. For example, you need to distinguish ash trees from maples, oaks, birches…etc. So, how do you do this?
The answer is all ash trees have the same or very similar over-arching characteristics. Characteristics such as branches, bud arrangement, leaves, bark, and seeds are main features that can be used to identify ash trees. These are discussed in the following paragraphs.
Ash Tree Branches & Buds
All ash trees (Fraxinus) have opposite branching (which is a good identifying feature because not many trees have this). Opposite branching/buds are when the branches and buds are directly across from one another from the tree trunk as opposed to alternate branching which is staggered branches up the trunk.
Alternate vs Opposite Leaf Arrangement. Photo From Here
Another good identifying feature for ash trees (Fraxinus) is that they have compound leaves. One compound leaf is made up of many leaflets (mini-leaves) that form a larger leaf. There is a range of 5-11 leaflets that make up a leaf of an ash tree. This is a good identifying feature because boxelder (Acer negundo) is the only other tree that has compound leaves. So, if you see a tree with compound leaves there is a good chance it is an ash tree.
Pinnately Compound Leaves vs simple leaves. Photo From Here.
Ash Tree Bark
The bark of ash trees is a great way to distinguish ash trees from other species of trees. Although not every ash shares the same bark characteristics, many of them do. It is also important to note that mature trees and young trees will have different looking bark. So keep this in mind when identifying ash trees. In many instances, mature ash trees will have diamond-shaped bark ridges or fissures. The younger trees have not developed the armor of older trees and will have thin smooth bark in most instances.
Ash Tree Bark – Many ash trees have bark that is furrowed/grooved and diamond-shaped. This is an example of a green ash tree.
Ash Tree Fruits
Ash tree fruits are seeds in the form of samaras. Seeds are only visible at certain times of the year and will fall off in late fall & early winter but are a great way to identify an ash tree. The seeds are found in clusters of oar-shaped pods called samaras. You may know these as “helicopters’.
How To Identify Ash Tree Species From Other Ash Trees
Once you’ve identified that a particular tree is an ash tree with the information above, the next step is to identify which species of ash tree it is. Each species of ash has unique defining characteristics that separate them from other ash trees. Some characteristics are subtle and some are not so subtle. The characteristics used to identify ash trees are described below.
Characteristics For Identifying Ash Tree Species
Below I’ve listed some helpful characteristics that can be used to help identify ash trees to the species level:
Habitat
Height
Bark
Leaves
Buds
Twigs
Flowers
Fruit/Seeds
Roots
Native Distribution
Identifying 17 Common Ash Tree Species
I have made a list of the 17 most common ash trees below. This will make it much easier and faster to identify a particular ash tree to the species level.
Ash trees have different distributions/regions they can be found in. For this reason, some of the ash trees listed may not be found in the area that you’re currently residing in. I have separated the ash trees by where they are distributed which will narrow down your search. This will make identifying ash trees much easier, let’s jump in:
Ash Trees Of The Eastern United States
1. How To Identify Black Ash Trees (Fraxinus nigra)
Other Common Names
Black ash is also called brown ash, basket ash, and hoop ash
Key Identifying Characteristics
A key identifying feature of the black ash is the punky/spongy/flaky bark that other ash trees do not have. Age plays a role in how punky and flaky a black ash tree is. So just because it does not look very punky, don’t rule it out from being black ash, use some of the other identification features below as well.
Habitat
Black ash can easily be identified and distinguished from other ash species in a couple of ways. First, it is a wetland species and will almost always be found in wet areas. Black ash likes wetter soil than most ash trees so you will often find it where soils are saturated. It grows in cold regions in forested swamps.
Black ash tree habitat | Growing in wet soils
Height
Black ash trees will grow to about 60 ft tall but will have a fairly slender trunk. The trunk will rarely get more than 20 inches in diameter.
Bark
As mentioned above, an identifying feature of the black ash is the punky/spongy/flaky bark that other ash trees do not have. Age plays a role in how punky and flaky a black ash tree is. So just because it does not look very punky, don’t rule it out from being black ash, use some of these other identification features as well.
black ash tree bark
Leaves
White, Black, and Green Ash Leaf Scar Comparison. Photo From HereBlack ash tree leaves. Photo From Here
The black ash tree typically has between 7-11 leaflets that make up a leaf. The leaf scar is only slightly notched which is more O-Shaped than the white or green ash.
Roots
The roots of the black ash also have white dots/specks on them which other ash trees do not have. I’ve noticed that not all black ash will have obvious white dots, but if you do see them then you can confirm it’s a black ash tree. If you don’t see them use some of these other identifying features.
black ash tree roots and tree base (notice white dots)
Native Distribution
Black ash occurs in many northeastern U.S. states and in eastern Canada. The northernmost portion of black ash’s range extends from Newfoundland to southeastern Manitoba. Some populations have been observed in North Dakota which is the westernmost distribution. Black ash can be found in all of the Great Lake states the southern limit in northern Virginia.
Black Ash (Fraxinus nigra) Species Distribution Range Map
2. How To Identify Green Ash Trees (Fraxinus pennsylvanica)
Green ash is the most common/widely distributed ash tree species in the United States.
Other Common Names
Green ash is also called red ash, swamp ash, and water ash.
Habitat
Green ash trees like moist soils but not as saturated as black ash trees. Green ash can be found in wetlands, along the edges of wetlands, and in upland areas near wetlands in moist soil.
Height
Green ash will grow to about 60 ft tall and will rarely exceed 24 inches in diameter, which is slightly larger than black ash.
Bark
Green ash bark has ridges and furrows. It is less fissured and furrowed than the white ash, but more fissured than the black ash. The ridges form a diamond-like shape. It is not punky/spongy and does not peel as black ash does.
Green Ash Tree Bark
Leaves
Green ash will have 5-9 leaflets that make up an entire leaf. It will most commonly have 7 leaflets. The leaves are 10 to 12 inches in length with individual leaflets 2 to 6 inches long. The leaflets are long-pointed at the tip with a tapering base. The top of the leaf scar is strait and is D-Shaped, unlike white ash which has a deep U-Shape.
Fraxinus pennsylvanica (Green Ash) Leaves. Photo From Here
White, Black, and Green Ash Leaf Scar Comparison. Photo From Here
Native Distribution
Green Ash Tree (Fraxinus pennsylvanica) Distribution Range Map
3. How To Identify White Ash Trees (Fraxinus americana)
White ash is another species of ash that is commonly found and widely distributed in the United States.
Other Common Names
White ash is also called purple ash, Biltmore ash, Biltmore white ash, cane ash, small-seed white ash.
Key Identifying Feature
The leaflets have a distinct, ¼ to 1/3-inch slender stalk that often has finely toothed edges, tapering to a pointed tip. The white ash also has a U-Shaped leaf scar notch which is different than the D-shape notch of the green ash, and the slightly notched black ash which is more O-Shaped.
White, Black, and Green Ash Leaf Scar Comparison. Photo From Here
Habitat
White ash trees prefer dry soils and will be found in dryer areas than black and green ash. White ash and green ash can be found close in proximity, however white ash will be in the dryer soils and green ash will generally inhabiting the wetter areas.
Height
This tree can grow to heights of about 120 ft and support a massive trunk to ~80 inches in diameter in optimal growing conditions.
Bark
The bark of the adult white ash is rough and has deep ridges and furrows that form a prominent diamond pattern. The bark looks similar to green ash but the ridges are even more prominent especially when mature as shown in the photo below.
White Ash Tree Bark
Leaves
White ash leaves are opposite and pinnately compound and are 8 to 12 inches long with 5 to 9 (usually 7) leaflets that are oval to elliptical. Leaflets are 2½ to 5 inches long and 1 to 2 inches wide. Leaflets attached by longer petioles. The base of each leaflet is well-defined. The leaflets have a distinct, ¼ to 1/3 inch slender stalk that often has finely toothed edges, tapering to a pointed tip. The top of the leaves are dark green and smooth, the bottoms are pale green with short hairs along the midvein and at the base of lateral veins.
The white ash also has a U-Shaped leaf scar notch which is different than the D-shape notch of the green ash, and the slightly notched black ash which is more O-Shaped.
Fraxinus americana (White Ash) Leaves. Photo From Here
Twigs and Buds
White ash twigs are stout with a gray-olive-green color and are hairless.
Flowers
Inconspicuous, meaning they’re not obvious. White ash has separate male and female plants of which their color is light green to purple, both sexes lacking petals. Female flowers occur in loose panicles, males occur in tighter clusters. The flowers appear after the leaves unfold.
Fruit
The fruits are winged samaras like all ash trees and develop in late May to June and mature in the fall. The samaras are one-winged, dry, flattened samara with a full, rounded, seed cavity, maturing in fall and dispersing over winter.
Native Distribution
In the distribution map below you can see that white ash is a widely distributed species and is one of the more common ash species found in the United States.
White Ash (Fraxinus americana) Distribution Range Map
4. How To Identify Blue Ash Trees (Fraxinus quadrangulata)
The blue ash tree got its common name from its inner bark that will turn blue when it is exposed to air. This color was extracted to make dye.
Other Common Names
Fraxinus quadrangulata is exclusively referred to as blue ash.
Key Identifying Feature
A key identifying feature of the blue ash is its distinctive 4-angled corky wings on the stem and twigs which makes the stem appear square.
Blue Ash tree stems and branches are 4-angled. Photo From Here
Habitat
Blue ash prefers to grow in dry upland soils, it is commonly found growing on limestone.
Height
Blue ash is a medium-sized deciduous tree and can reach heights of 75 feet with a trunk 35-inch diameter in ideal growing conditions.
Bark
Blue ash bark is rough and scaly, forming a plate-like structure. This is somewhat similar to black ash bark but not quite as punky in most cases. You’ll be able to tell which ash it is based on the habitat it is growing in (upland vs wetland).
Like all ash, the fruit is a winged samara. The blue ash samara is 1 to 2 inches long and hangs in clusters. Samaras fall from the tree over several weeks in autumn.
Flowers
Blue ash has bisexual flowers that bloom as leaves emerge. The tiny, purple, petal-less flowers hang in loose panicles.
As mentioned above the twigs typically have four corky ridges which is a defining feature of the blue ash. This gives twigs a square look, the name quadrangulata actually means four-angled.
Native Distribution
Blue ash is not as commonly found in the U.S. Its native distribution is confined to the midwest as shown in the distribution map below.
Blue Ash Tree (Fraxinus quadrangulata) Distribution Range Map
5. How To Identify Pumpkin Ash Trees (Fraxinus profunda)
Pumpkin ash could be confused with white ash because they share similar characteristics. However, white ash grows in uplands whereas pumpkin ash grows in wetlands.
Other Common Names
The other common names include red ash or swell-butt ash.
Key Identification Features
The term pumpkin ash comes from the pumpkin-shaped swollen trunk (buttressed) that can often be found at the base of the tree. The swelling of the trunk occurs most commonly in the wettest areas such as in standing water. The branches of pumpkin ash are gray-brown with distinct leaf scars, leaf scars are oval (not deeply notched). The leaves are compound like all ashes, with 7-9 stalked elliptic leaflets. The leaves and rachis are densely hairy. The fruit is a large winged samara (4-7 cm long and 7-10 mm broad) which is the largest of any ash species.
Pumpkin ash fruit is a large winged samara which is the largest of any ash species. Photo From Here.
Habitat
Similar to black ash, pumpkin ash has a natural habitat of consistently wet areas such as swamps, floodplains, river valleys, and other low areas.
Height
Pumpkin ash is a tall tree at maturity and can reach up to 125 ft tall and 6 ft in diameter but is typically 60-80 ft at maturity.
The bark is pretty characteristic of ash tree species but slightly less diamond-shaped perhaps. It’s rough, forming rectangular blocks, the irregular furrows deep and only vaguely diamond-patterned. Bark becomes more fissured with age, young trees do not have much if any fissuring.
Pumpkin Ash Tree (Fraxinus profunda) bark of young tree. Photo From Here.
Pumpkin Ash Tree (Fraxinus profunda) bark of mature tree. Photo From Here.
Twigs & Buds
The twigs are gray-brown, stout, fuzzy, with distinct leaf scars that are oval (not deeply notched). The buds are almost black.
Roots
Pumpkin ash is a deep-rooting tree with far-reaching shallow lateral roots with a formed taproot.
Leaves
The leaves of Pumpkin ash are a glossy green and can get up to 40 cm (15.7 in) long and are odd-pinnate with 5-9 leaflets that are hairy on the bottoms. The single leaves are oval but pointed at the tip. The leaf margin is serrated.
Fruit
Pumpkin Ash has the largest fruit of any Ash species. The paired samaras are about 8 cm (3.2 in) long. On female trees, samaras mature in August-October in drooping clusters.
Native Distribution
Since pumpkin ash likes swampy areas it is predominately found in the Atlantic Coastal Plain from southern Maryland and southeastern Virginia to northern Florida, and west to Louisiana. It does grow in the Mississippi and Ohio River Valleys from southern Illinois and Indiana, south through southeastern Missouri and northeastern Arkansas. Even though pumpkin ash trees can be found in all these areas, it is pretty discontinuous meaning its presence is patchy. The native distribution map is shown below.
6. How To Identify Carolina Ash Trees (Fraxinus caroliniana Mill.)
This ash tree could be confused with black ash (Fraxinus nigra) because they both grow in wetlands, they don’t always grow very large, and their bark is not always deeply furrowed (age-dependent). Although there is minimal overlap in their distribution range it is possible to find both based on the USGS maps provided throughout. Carolina ash has less punky bark than black ash which is a good way to tell the two apart.
Other Common Names
Carolina ash is also referred to as Carolina water ash, water ash, Florida ash, pop ash, poppy ash, and swamp ash.
Key Identification Features
Like the pumpkin ash (above) a good identifying feature of the Carolina ash is the swollen base of the tree trunk. This ash tree will only grow to about 30 feet tall and have a diameter of about 8 inches at maturity, most ashes will grow taller than this. It also does not have deep bark ridges/furrows.
Habitat
Carolina ash is the smallest of the northeastern ash species and grows in swamps, wetlands, and wet woods. It does not tolerate salt spray or brackish waters. In nature it is an understory tree in moist to wet, shady sites with acidic soil.
Height
This ash tree will only grow to about 30 feet tall and have a diameter of about 8 inches at maturity.
Bark
Like many ash trees, the Carolina ash has bark furrowing that develops with age.
Carolina Ash Tree (Fraxinus caroliniana) Bark.Photo From Here.
Leaves
The pinnately compound leaves have 5 to 9 leaflets and are 7 to 12 inches long. Leaflets are 2 to 4 inches long and 2 inches across with a usually serrated margin but sometimes entire. The upperside is dark green and the underside is paler and smooth. The overall feel is thick and smooth.
Top and bottom of Carolina Ash Tree (Fraxinus caroliniana) leaves. Notice the lighter bottoms. Photo From Here.
Twigs and Buds
Twigs are smooth but sometimes fuzzy, gray-brown, with oval leaf scars.
Flowers
Green to purplish flowers are dioecious and appear in spring in clusters before the leaves. Male flowers are in a dense mass while female flowers are a more open cluster or panicle. They bloom in May. Similar to those of other ash species.
Fruit
Flattened broad-wing samaras are 1 1/2 to 2 inches long and 1/2- 3/4 inches wide. The violet wings hang well below the seed portion and there can be 2 to 3 wings. Matures from July to October.
Carolina Ash Tree (Fraxinus caroliniana) leaves and samaras (seeds/fruits). Photo From Here.
Native Distribution
The Carolina ash is found in the southeastern United States to Cuba.
Carolina Ash Distribution Range Map
7. How To Identify European Ash Trees (Fraxinus excelsior L.)
Other Common Names
European ash is also referred to as common ash, or just ‘ash’.
Key Identification Features
The twigs are smooth, greenish-grey, stout, and have large jet-black velvety leaf buds arranged oppositely, making them easily identified even in winter without leaves or fruit. The jet-black buds are a distinguishing feature of the European ash because most other ash species have grey or brown buds.
European Ash Tree (Fraxinus excelsior L.) jet-black buds. Photo From Here.
Habitat
This ash tree does well in areas that have been disturbed.
Height
This ash tree is a medium-sized tree that commonly reaches heights of 40-60 ft with a trunk diameter of 6 feet at peak maturity, although some may be larger in ideal growing conditions.
Bark
European ash bark is smooth and pale grey on young trees, becoming thick and vertically fissured on old trees.
Leaves
European ash leaves are opposite, 20–35 cm (7.9–13.8 in) long, pinnately compound, with 7–13 leaflets with coarsely serrated margins, elliptic to narrowly elliptic, 3–12 cm (1.2–4.7 in) long, and 0.8–3 cm (0.31–1.18 in) broad and sessile on the leaf rachis. There are no stipules.
These features distinguish ash from European mountain ash (Sorbus aucuparia) in which the leaves are alternate with paired stipules. The leaves are often among the last to open in spring, and the first to fall in autumn if an early frost strikes; they often fall dull green or develop a bright yellow autumn color.
Twigs & Buds
The twigs are smooth, greenish-grey, stout, and have large jet-black velvety leaf buds arranged oppositely, making them easily identified even in winter without leaves or fruit. The jet-black buds are a distinguishing feature of the European ash because most other ash species have grey or brown buds.
Flowers
The flowers are borne in short panicles, open before the leaves, and have no perianth. The female flowers are somewhat longer than the male flowers, dark purple, without petals, and are wind-pollinated. Both male and female flowers can occur on the same tree, but it is more common to find all male and all female trees. A tree that is all male one year can produce female flowers the next, and similarly a female tree can become male.
Fruit
The fruit is a samara 2.5–4.5 cm (0.98–1.77 in) long and 5–8 mm (0.20–0.31 in) broad, often hanging in bunches through the winter; and are often called ‘ash keys’. If the fruit is gathered and planted when it is still green and not fully ripe, it will germinate straight away, however, once the fruit is brown and fully ripe, it will not germinate until 18 months after sowing (i.e. not until two winters have passed).
Distribution
The European ash tree is, as the name would suggest, native to Europe. It can be found from northern Spain to Russia, and from southern Fennoscandia to northern Greece. It is also considered native in southwestern Asia from northern Turkey east to the Caucasus and Alborz mountains.
The northernmost location is in the Trondheimsfjord region of Norway. The species is commonly cultivated and has established in New Zealand, United States, and Canada including; Nova Scotia, New Brunswick, Quebec, Massachusetts, Connecticut, New York, New Jersey, Maryland, Ontario, Ohio, Kentucky, and British Columbia.
European Ash (Fraxinus excelsior) Native Distribution. Photo From Here.European Ash (Fraxinus excelsior L.) Introduced Distribution
Ash Trees Of The Western & Southwestern United States
8. How To Identify Oregon Ash Trees (Fraxinus latifolia)
Other Common Names
Does not appear any other common names exist.
Key Identification Features
The bark is distinctive with dark gray-brown, and it will eventually develop a woven pattern of deep fissures and ridges, though younger trees in this species will have smoother bark. This tree can be further identified by its opposite buds and branching of stout twigs with wooly hairs. This is an especially helpful tool in the winter when no leaves remain on the tree. The leaflets are also wider than most other ashes. The botanical name “latifolia” actually means ‘wide leaves’.
Oregon Ash Tree (Fraxinus latifolia) Stout Twigs and Stems. Photo From Here.
Habitat
The Oregon ash tree grows mostly in wetlands and wet habitats such as sloughs, swales, wet meadows, swamps, streams, and bottomlands.
Height
Fraxinus latifolia is a relatively average-sized deciduous tree that can grow to heights of 65 ft to 80 ft in height, with a trunk diameter of 16–30 inches. This ash tree has a life span of approximately 100−150-years. It is possible that Oregon ash can grow much larger and live longer in the right growing conditions. It will also become stunted in dryer habitats which is something to consider when attempting to identify this species.
Bark
The bark is distinctive with dark gray-brown, and with age will develop a woven pattern of deep fissures and ridges. Like many trees, the younger ashes of this species will have smoother bark.
Leaves
Oregon Ash has pinnately compound leaves like all ashes. The leaves are 4 3⁄4–13 in long, with 5–9 leaflets attached oppositely in pairs on the rachis with one additional leaflet at the tip (common for ash trees). Each leaflet is oval-shaped and is about, 2 1⁄4 – 4 3⁄4 inches long and 1 1⁄8 –1 5⁄8 inches broad which is bigger than most other ashes. The leaves are noticeably lighter green than other species found in the same areas. The leaves will turn bright yellow and fall off early in autumn.
Oregon Ash Tree (Fraxinus latifolia) Leaves and fruit. Photo From Here.
Buds
Like all ash trees, this ash has an opposite branching arrangement and opposing buds.
Twigs
Oregon ash has stout twigs with wooly hairs which is one of the better identification tools, especially in winter when there are no leaves on the trees.
Flowers
In mid to late spring, the tree produces small flowers that are not very noticeable. This ash tree has light green flowers that start growing during the months of March-May.
Fruit
The fruit (cluster of samaras) is produced by a female tree. The samaras are about 1 1⁄8 – 2 inches long and include wings similar to maple trees. It is shaped like a canoe oar, with the small seed located at one end. Interestingly, this ash only starts producing seeds once it reaches about 30 years of age. They will ripen and turn brown around the beginning of fall, (August-September) and then fall off the tree. The wings help the fruit disperse through the wind.
Roots
Oregon ash will develop relatively shallow roots compared to other ash species, but their root systems will be very dense that have an incredible reach in order to absorb up all the nutrients needed to sustain their life.
Native Distribution
Fraxinus latifolia is found on the west side of the Cascade Range from southwestern British Columbia south through western Washington, western Oregon, and northwestern California; and in central California in the Sierra Nevada.
Oregon Ash (Fraxinus latifolia) Native Distribution Range Map
9. How To Identify Gregg’s Ash Trees (Fraxinus greggii)
Gregg’s Ash Tree (Fraxinus greggii) – Plant Form. Photo From Here.
Other Common Names
Gregg’s Ash is also called; Gregg Ash, Littleleaf Ash, Dogleg Ash, Escobilla, Barreta China
Key Identification Features
This ash tree has many unique characteristics, making it fairly easy to identify. These characteristics are described below:
Gregg’s ash tree is unique in that it has nearly evergreen leaves. These leaves are small (less than 2 inches long) pinnate, dark green, and leathery. Unlike most ash trees the bark is smooth and thin.
Another key identifying feature is that it is usually a shrub, and less commonly found as a tree. If found as a tree it is small in height (about 20 feet).
Smooth, thin, gray bark; slender branches; and pinnate, dark-green, leathery leaves characterize the plant.
Habitat
This ash is found on rocky limestone slopes, bluffs, and canyons and more prevalently in dry creek beds and washes in sandy or loamy soils. Gregg’s ash is a drought-tolerant species
Height
This ash is uniquely a small tree or shrub. As a tree, it not often exceed 20 feet in height.
Bark
The bark of this ash tree is smooth and light gray which is a great way to identify this ash from most other ashes. Most ashes do not have smooth bark, instead, they are furrowed to some extent. Manna ash would be an example of another ash tree with smooth bark.
Gregg’s Ash Tree (Fraxinus greggii): Smooth Bark and Trunk. Photo From Here.
Leaves
Gregg’s ash has distinctive nearly evergreen leaves that are 1-3 in. They are long and are pinnately compound (like all ashes), lightly toothed, dark-green, and leathery which are found in threes, but up to seven small leaflets. The small size of these leaves is a unique characteristic of this ash tree making it a good identifier of this species.
Gregg’s Ash Tree (Fraxinus greggii): Evergreen Leaves. Photo From Here.
Twigs
Another unique characteristic of Gregg’s Ash is that it has slender branches/twigs. This can be observed in the first photo of this section.
Flowers
The flowers are inconspicuous, meaning they are not obvious. They are very tiny and clustered with male parts appearing before females. This is to avoid self-pollination. Flowers have purple (male) anthers and yellow (female) aging to brown stigma and ovaries in green sepals. Gregg’s ash flowers do not have petals.
Fruit
Like all ashes, this ash also has samara (small winged seeds).
Native Distribution
Gregg’s ash can be found in Texas, New Mexico, and Arizona within the United States, and south to Jalisco and Veracruz in Mexico
Gregg’s Ash (Fraxinus greggii) Distribution Range Map
10. How To Identify Arizona Ash Trees (Fraxinus velutina)
Arizona ash (Fraxinus velutina) – Tree Form. Photo From Here
Other Common Names
Arizona Ash has many common names. Additional common names of Arizona ash (Fraxinus velutina) include:
Velvet ash
Modesto Ash (a cultivar of Arizona ash)
Desert ash
Smooth ash
Leatherleaf ash
Fresno ash
Toumey Ash
Standley Ash
Key Identifying Features
The Arizona ash is also called “velvet ash” for having a velvety underside to its leaflets. However, these hairs are not present in every circumstance.
The Arizona ash tree is native to North America to Mexico. The Arizona ash is similar to the green ash (Fraxinus pennsylvanica) closely related to the Oregon ash (Fraxinus latifolia). A distinction of this ash is very difficult because of the similarities. This ash tree does not grow very tall, only to about 35 feet in height. Green ash and Oregon ash will grow taller generally.
A good way to identify this species from these other ash species is to look at the distribution range maps. There is some overlap between these species, but not complete overlap.
Habitat
Arizona ash trees grow best at the edges of wetlands where soils are not completely saturated but get adequate amounts of water. This ash tree is also a widely planted ornamental species.
Height
It is a small deciduous tree growing to 35 feet tall, with a trunk up to 12-inches in diameter.
Bark
Like many ash trees, the bark is rough gray-brown and deeply fissured in the shape of diamonds with scaly ridges.
Branches & Twigs
The shoots are velvety/downy.
Arizona ash (Fraxinus velutina) velvety/downy twigs/stems. Photo From Here
Roots
Shallow-rooting plant
Leaves
The leaves are 4 to 10-inches long, pinnately compound with 3, 5, or 7 leaflets 1.5-3 inches or longer with serrated edges. The leaflets can be slightly different shapes and often have velvety hairs beneath which is the reason for one of the many common names “Velvet ash”. However, velvety hairs may not always be present. The foliage will turn yellow in the autumn.
Arizona ash (Fraxinus velutina) leaf. Commonly is tomentose (has small velvety hairs). Photo From Here.
Flowers
The flowers are produced in small clusters in early spring; it is dioecious, with male and female flowers on separate trees. The flowers inconspicuous and will bloom in spring in clusters which is common for ash trees. Male and female flowers will be found residing on separate trees.
Fruit
The fruit is in the form of seeds, that hang in dense clusters. The fruit is a samara 0.6-1.2 inches long, with an apical wing 4-8 millimeter broad.
Native Distribution
The distribution range map of Arizona ash trees is shown below. This ash is native to southwestern North America, in the United States from southern California east to Texas, and in Mexico from northern Baja California east to Coahuila and Nuevo Len.
Arizona Ash Tree (Fraxinus velutina Torr.) Distribution Range map
11. How To Identify Evergreen Ash Trees (Fraxinus udhei)
Evergreen ash tree (Fraxinus uhdei) Plant Form. Photo From Here.
Other Common Names
Shamel Ash
Evergreen Ash
Key Identification Feature
This ash tree is native to Mexico and was introduced to the United States. Its distribution in the U.S. is primarily only found in southern California.
Although this tree is called ‘evergreen’ ash it is not completely evergreen. These trees will retain some leaves-year long, but it is also partly deciduous so it will drop some of its leaves as well. This is a good identifying feature in the winter.
The bark of this ash tree is light gray and fissured. It does not have the diamond-shaped fissures that many ash trees have. Instead, it has more square-looking fissures.
Habitat
Evergreen Ash is generally grown in parks, commercial areas, and can be seen adorning large landscapes. It is an extremely drought tolerant tree and will need very little water once it has been established.
This species of ash is not too picky where it can grow. It can grow in pH levels that are highly acidic to highly alkaline soils that are clayey, loamy, or sandy in texture and that is moist to dry. It does well in areas with full sun or partial shade and also has some seaside tolerance.
USDA Hardiness Zones 8 – 10.
Height
The evergreen ash is a large and fast-growing tree. It commonly grows to 80 feet in height, growing 36 or more inches per year, and can live up to 150 years of age in good growing conditions.
Bark
The bark of this ash tree is light gray and fissured. It does not have the diamond-shaped fissures that many ash trees have. Instead, it has more plate-like square fissures.
Evergreen ash tree (Fraxinus uhdei) bark – M. Ritter, W. Mark, J. Reimer and C. Stubler. Photo From Here.
Leaves
Evergreen ash tree leaflets are similar to other ash trees in that they are pinnately compound, odd in number, and are dark green. The leaves differ from other ash trees because they are partly evergreen as the same suggests. Although, some leaves will still fall off.
Evergreen ash tree (Fraxinus uhdei) leaves – M. Ritter, W. Mark, J. Reimer and C. Stubler. Photo From Here.
Flowers
Like most ash trees the flowers are inconspicuous and flower in spring.
Fruit
The fruit is a yellow or green samara that is about 0.5 – 1.5 inches, and fruits in the Summer or Fall.
Native Distribution
This ash tree is native to Mexico and was introduced to the United States. Its distribution in the U.S. is primarily only found in southern California.
12. How To Identify Mountain Ash Trees (Fraxinus texensis / Fraxinus Albicans)
Do not confuse this Mountain ash (Fraxinus texensis / Fraxinus Albicans) with American Mountain Ash (Sorbus americana) which is not technically an ash tree (see Species Resembling Ash Trees Section Below).
Other Common Names
Texas ash
Key Identification Feature
Mountain ash is a recent relative of white ash (Fraxinus americana), and looks very similar. Some botanists believe that mountain ash is a subspecies of white ash (Fraxinus americana). For this reason, the botanical name was changed from Fraxinus texensis to Fraxinus albicans for more precise nomenclature accuracy.
Since mountain ash is closely related to white ash it is notoriously hard to differentiate, especially when leaves are off. Texas ash has “C-shaped” leaf scars where the bud sits within the cup of the “C”. This is very similar to white ash. In general, mountain ash has fewer and smaller leaflets and smaller fruit because it has adapted to a warmer, less humid climate.
Mountain ash is only located in a very small area of the United States.
Habitat
Mountain ash trees will grow on rocky limestone hillsides, bluffs, and ridges.
Height
This ash tree is medium-sized, it can grow to around 45 feet tall with a trunk diameter of 2 feet.
Bark
The bark of mountain ash trees is gray, with brown or black spots, diamond-furrowed, with the furrowing developing with tree age.
Leaves
Mountain ash leaves are opposite with pinnately compound leaflets like all ashes and are 5″ to 8″ long. The leaves hold 5 to 7 oval to round leaflets. leaflets are long-stalked and 1″ to 3″ long. Leaf color is dark green on top and lighter green on the bottom.
Texas ash has “C-shaped” leaf scars where the bud sits within the cup of the “C”, very similar to white ash.
Mountain ash (Texas albicans) C-Shaped Leaf Scar. Photo From Here.Mountain ash (Fraxinus texensis) Leaves. Photo From Here.
Flowers
Male and female flowers are found on separate trees in order to prevent self-fertilization. When new leaves emerge, female flowers will be found in loose clusters. Male flowers are found in dark-purplish clusters near the end of twigs.
Fruit
The fruit is a skinny, pointed seed that is enclosed by a flattened wing (samara), and is about 1″ long and up to 0.25″ wide. These seeds are in loose clusters connected by short stalks.
Native Distribution
The native distribution of mountain ash is confined primarily to Texas, except for a northern extension into the Arbuckle Mountains of Oklahoma.
13. How To Identify California Ash Trees (Fraxinus dipetala)
California ash Tree (Fraxinus dipetala) – Tree Form. Photo From Here.
Other Common Names
Other names for California ash is two-petal ash and foothill ash.
Key Identification Feature
The California ash tree has many unique characteristics, making it easy to identify. This ash tree is not dioecious like most ashes, instead, it is bisexual (each flower of each tree has both male and female structures). The flowers are showy on this ash, which is uncommon for ash trees which usually have inconspicuous flowers. Also, this tree is multi-trunked and does not usually grow more than 25 feet tall. Finally, the twigs are cylindric to 4-angled, similar to those of blue ash.
Habitat
This ash is drought resistant and is found residing in canyons, slopes, chaparral, and oak/pine woodlands. They are also commonly planted as a garden tree.
Height
California ash is a deciduous shrub or small tree growing to around 25 feet tall.
Bark
The bark of this tree is grayish-brown and is furrowed with long ridges. The furrowing develops with tree age.
Fruit
The fruit is a long, flat samara 0.8 – 1.25 inches long and 5 – 9 millimeter broad. When the fruit is developing it is green and hangs in bunches. In the summer or fall, the samara color will be yellow or green.
Leaves
Like all ashes, the leaves are pinnately compound. The leaves are between 2 – 7.5 inches long, light to dark green, with three to seven (rarely nine) leaflets that are usually between 0.4 – 2.75 inches long. The leaves are also thick and serrated along the margins.
Trunk
California ash is often a multi-trunked tree which is a fairly unique characteristic among ash species.
California ash tree (Fraxinus dipetala) – Multi-trunked. Photo From Here.
Twigs
The twigs are cylindric to 4-angled which is another fairly unique characteristic among ashes.
California ash tree (Fraxinus dipetala) – 4-angled stems. Photo From Here.
Flowers
California ash has white flowers and are showy, which is uncommon for ash trees which usually have inconspicuous flowers. The showy flower-clusters bloom in late spring, making it a good choice as a flowering accent tree in a garden.
California ash tree (Fraxinus dipetala) – Showy flowers. Photo From Here.
Native Distribution
This species of ash is native to southwestern North America in the United States and can be found in Arizona, California, Oregon, southern Nevada, and Utah, and in Mexico in northern Baja California. It grows at altitudes of 328 – 4,265 feet.
Ash Trees Outside Of The United States
14. How To Identify Narrow Leaf Ash Trees (Fraxinus angustifolia subsp. angustifolia.)
Narrow-Leaved Ash (Fraxinus angustifolia) Plant Form. Photo From Here.
Other Common Names
Narrow-leaf ash is also referred to as desert ash, golden stem ash, and phoenix ash.
Key Identification Feature
As the name suggests, the narrow leaflets of narrow-leaf ash are a distinctive characteristic.
The flowers are inconspicuous and appear in late winter or early spring. Flowers are in dense clusters and can be male or bisexual. Bisexual ashes are uncommon making this a helpful identifying feature.
The bark of the narrow ash tree is squarish and knobby instead of a diamond fissured pattern.
The buds are brown and hairless (i.e. glabrous), which readily distinguishes them from the related European ash (Fraxinus excelsior) which has black buds even in winter.
Habitat
This ash tree does well in urban settings and in acidic soil with lots of sun. Because it is drought tolerant it also grows in dry rocky places in maquis shrublands or in pine/mixed forest.
Height
It is a medium to a large deciduous tree growing to 65–100 feet tall with a trunk up to 5 feet in diameter.
Bark
The bark is smooth and pale grey on young trees, with knobby square-fissuring on older trees.
The buds are brown and hairless (i.e. glabrous), which readily distinguishes them from the related European ash (Fraxinus excelsior) which has black buds even in winter.
Narrow leaf ash (Fraxinus angustifolia subsp. angustifolia) brown hairless Buds. Photo From Here.
Leaves
The leaves are in opposite pairs or whorls of three, pinnate, and 6–10 inches long. Each leaf consists of 3 – 13 leaflets which are distinctively slender as the name suggests. The leaflets are about 1.2–3 inches long and 1–1.5 cm broad. The margins of the leaves are toothed (i.e. serrated). The leaves will turn a yellowish color in autumn.
Younger stems of this ash tree are greenish-brown or yellowish, hairless, and have small white spots.
Flowers
narrowleaf ash (Fraxinus angustifolia) Flowers. Photo From Here.
The flowers are inconspicuous and appear in late winter or early spring. Flowers are in dense clusters and can be male or bisexual. Bisexual ashes are uncommon making this a good identifying feature.
Fruit
The winged fruit (samaras) contain a single seed. This fruit (3-5 cm long) is oval-shaped and often slightly twisted.
Native Distribution
The narrow-leaf ash can be found in Southwest Asia, southern and central Europe, and northwest Africa.
Narrow leaved ash (Fraxinus angustifolia) distribution range map. Photo From Here.
15. How to Identify Raywood Ash Trees (Fraxinus angustifolia subsp. oxycarpa)
Raywood ash tree (Fraxinus angustifolia ‘Raywood’) plant form. Photo From Here.
Raywood ash (Fraxinus oxycarpa subsp. oxycarpa) is a common cultivar of narrow-leaf ash (Fraxinus angustifolia subsp. angustifolia.) (above). Some botanists and plant specialists list raywood as a subspecies, hence the long name (F. angustifolia subsp. oxycarpa). However, there is not a consensus on this. Some don’t consider the differences (hairlessness and leaflet number) enough to justify a subspecific identity. For this reason, some will identify this species as F. angustifolia ‘Raywood’ instead.
Other Common Names
Raywood ash is also called Claret Ash.
Key Identification Feature
The leaf color is vibrant red and purple during the fall which is the reason it is a widely cultivated species.
The leaflets will have white hairs on the lower half of the midribs.
This tree does not produce seeds/fruits. This means raywood ash is a mostly sterile cultivated species. These trees will leave less mess in the fall because seeds won’t be dispersed due to it being sterile.
The bark is more smooth than other species of ash.
Habitat
This tree is not native to the U.S., it is cultivated species often used for landscaping. Raywood ash should be planted in areas that offer a lot of sun, and well-drained soil. Raywood is also drought tolerant. This ash tree will be able to grow in somewhat wetter habitats, just not as well.
Height
This ash tree can reach 25 – 45 feet in height given ideal growing conditions such as well-drained soils and full sun.
Bark
The bark is not fissured like many ash trees, it is generally more smooth.
Raywood ash tree (Fraxinus angustifolia ‘Raywood’) bark. Photo From Here
Leaves
Leaves opposite and pinnately compound, but uniquely often have whorls of 3 or 4 at ends of branches. There are usually 5-9 narrow leaflets with each consisting of about 4-6.5 cm long. They are dark green during the growing season and a vibrant red-purple color in the fall.
Raywood ash tree (Fraxinus angustifolia ‘Raywood’) red leaves and foliage. Photo From Here.
Buds
The buds of raywood ash are similar to narrow-leaf ash in that they are a brown color. This helps distinguish them from the related European ash (Fraxinus excelsior) which has black buds even in winter.
Raywood ash tree (Fraxinus angustifolia ‘Raywood’) brown and hairless buds. Photo From Here.
Flowers
Like most ashes, the flowers dioecious and inconspicuous and flower in spring.
Raywood ash tree (Fraxinus angustifolia ‘Raywood’) opening male flower buds in early spring. Photo From Here.
Fruit
This tree does not produce seeds/fruits. This means raywood ash is a mostly sterile cultivated species. These trees will leave less mess in the fall because seeds won’t be dispersed.
Roots
Surface roots may be a problem with this species of ash for landscape purposes. They are shallow rooting.
Native Distribution
Raywood ash trees are not native to North America, they are native to the Mediterranian. That being said, they are commonly planted in North America for its showy red-purple fall foliage.
Raywood ash tree (Fraxinus angustifolia ‘Raywood’) distribution range map. Photo From Here.
16. How To Identify Manna Ash Trees (Fraxinus ornus)
Other Common Names
Manna ash is also called flowering ash, or South European flowering ash.
Key Identification Feature(s)
As one of the common names suggest (flowering ash), the manna ash tree produces showy white flowers. Showy flowers are not a common occurrence for most ash trees making it a good identifying feature.
The leaf buds are grey, pinkish-brown, brown, with short grey hairs unlike those of the European Ash which are black.
The bark is dark grey, remaining smooth even on old trees which is not common for most ash trees, making it a good identifying feature.
Habitat
This ash tree grows in mixed woods, thickets, and rocky places, most commonly on limestone.
Height
Fraxinus ornus is a medium-sized deciduous tree growing to 50–80 feet tall with a trunk up to 40 inches in diameter.
Bark
The bark is dark grey, remaining smooth even on old trees which is not common for most ash trees, making it a good identifying feature.
Manna ash tree (Fraxinus ornus) smooth bark. Photo From Here.
Leaves
The leaves are in opposite pairs and pinnately compound. They are, 8–12 inches long and can have 5 to 9 leaflets which are oval shaped and 0.2–0.4 inches long and 0.8–2 in wide. The veins on the underside are usually hairy at the base. The margins of the leaflets are finely serrated with a wavy margin. The petioles are short but distinct, they are around 0.20–0.60 inches long. In the fall the leaves can range from yellowish to purplish. The leaf buds are grey, pinkish-brown, brown, with short grey hairs unlike those of the European Ash which are black.
Buds
The buds are pale pinkish-brown to grey-brown, with a dense covering of short grey hairs.
Manna ash tree (Fraxinus ornus) buds. Photo From Here.
Flowers
As one of the common names suggest (flowering ash), the manna ash tree produces showy white flowers. Showy flowers are not a common occurrence for most ash trees.
California ash (described above), native to the western United States, is another example of a species that produces showy white flowers.
Manna ash tree (Fraxinus ornus) showy flowers. Photo From Here.
Fruit
The fruit is a green slender samara that changes to brown as it ripens. The samaras are about 0.59–0.98 inches long, 0.08 inches broad, and 0.2–0.2 inches broad.
Native Distribution
Manna ash is a native of central Europe, It was introduced to Britain around 1700 and is usually grafted on to a rootstock of European Ash (Fraxinus excelsior L.).
Manna ash tree (Fraxinus ornus) distribution range map. Photo From Here.
17. How To Identify Manchurian Ash Trees (Fraxinus mandshurica)
Manchurian ash is closely related to Fraxinus nigra (Black Ash) from eastern North America. Some professionals treat this ash as a subspecies of black ash. For example, Fraxinus nigra subsp. mandschurica (Rupr.) S.S.Sun, or Fraxinus nigra var. mandschurica (Rupr.) Lingelsheim.
Other Common Names
Other common names for this species is mancana Manchurian ash, or mancana ash.
Key Identification Feature
The first-year twigs of the Manchurian ash are a golden color.
Habitat
This ash tree does well in many different types of conditions. It can grow in clay or sandy soils that are either wet or dry, with various pH levels, in shade to sun, various temperatures and weather conditions, but prefers some water with well-drained soils with full sun for best growth. Because of these characteristics, it can withstand fair amounts of pollution, making it an excellent plant for urban city settings and for landscaping. Although this ash can grow in a variety of conditions, it grows best with full sun with moist well-drained soils. In these conditions, it will grow 2-3 feet per year. It does better in slightly drier conditions than black ash, more characteristic of green ash.
Height
It is a medium-sized to large deciduous usually growing to 40-50 feet but can reach around 100 feet tall, with a trunk around 20 inches in diameter.
Bark
The bark of this species is gray and smooth when young, it later develops shallow fissures characteristic of many ashes.
Leaves
Like all ashes, the leaves are pinnately compound and are about 10-15 inches long. The leaflets can number anywhere from 7-13 and are 5-20 cm long, and 2-5 cm wide and are obviously toothed and nearly stalkless. The leaves turn a beautiful yellow-chrome color in the fall.
Manchurian Ash Trees (Fraxinus mandshurica) leaves. Photo From Here.
Buds
The buds of the Manchurian ash are black, ovate, pointed and about 1/4 inches long.
Twigs
An identifying characteristic of this ash tree is first-year twigs are a golden color.
Flowers
Like most ashes, the flowers are produced in spring and are inconspicuous making them poor identifying features. The flowers of this species do not have petals.
Fruit
Like all ashes, the fruit is a samara comprising a single seed 1–2 cm long with a wing that is 2.5–4 cm long and 5–7 mm broad.
Roots
The roots of this ash are shallow, fibrous, and spreading. This is something to consider in landscaping.
Native Distribution
The Manchurian ash native distribution range includes northeastern Asia in northern China, Korea, Japan, and southeastern Russia. This tree is occasionally cultivated as an ornamental tree in parts of Canada and the United States but in such low numbers, it is not recorded in the USDA maps.
Manchurian Ash Trees (Fraxinus mandshurica) Distribution Range Map
Species Resembling Ash Trees (That Are Not Actually Ash Trees)
By looking at the scientific names of these species you can tell right away that they are not actually true ash species. For example, Fraxinus is not shown in their scientific name, meaning they are not classified as true ash species, despite some of the names having ‘ash’ in them. This is why it is important to understand the classification system stated at the beginning of this post.
American Mountain Ash Tree (Sorbus americana)
Not to be confused with Texas ash (which is an ash tree) and is also called mountain ash.
European Mountain Ash (sorbus aucuparia)
Boxelder Tree (Acer negundo)
Shagbark Hickory Tree (Carya ovata)
Elm Tree (Ulmus species)
Black Walnut Tree (Juglans nigra)
Prickly Ash Tree (Zanthoxylum americanum)
Why Are Ash Trees Important? Threats to Ash Trees
Emerald Ash Borer
Ash trees are endangered because of the emerald ash borer (EAB). EAB is an insect that eats through the cambium layer in the ash which eventually kills the tree because the cambium layer is how trees obtain nutrients. EAB is an invasive insect that is devastating the ash tree populations. This is not good because ash trees not only provide native wildlife with food, shelter, and habitat they provide wood products for people.
Finding the perfect turkey hunting gift can be a challenge if you’re not a hunter. Heck, it can be hard if you are a hunter sometimes. With two decades of turkey hunting experience, I’m confident I have some great gift ideas for you. I’ve also spent years researching hunting gear for the buying guides and gear reviews on this blog and have a good handle on hunting gear that works.
The gifts we’ll talk about in this article will include essential gear, unique gadgets, and thoughtful stocking stuffers that any turkey hunter would be grateful for. Let’s jump into the article.
This post contains Amazon and other affiliate links, which means I’ll receive a commission if you purchase through my link, at no extra cost to you. Of course, you are not obligated to use my links, but it does help fund these posts in hopes of bringing more value to you.
Table of Contents
1. Turkey Hunting Vest
I would recommend a turkey hunting vest because you’ll be carrying a lot of gear that you may not be aware of. For example; shells, calls, sandwiches, water, bug spray, turkey decoy attachments, and other odds and ends. It’s very helpful for getting to Point A to Point B while keeping your hands as free as possible. I always wear my vest or at least bring it with me so that I know I have everything I need when I’m out hunting.
Having a lot of pockets is key, I also like having a lot of inside pockets. Try to get one that has back and seat cushions built-in so you don’t have to make a separate purchase. This ALPS vest checks most of the boxes I would be looking for in a vest.
If you’re not going to be hunting from a blind you’re going to want something comfy to sit on or you’ll be moving around way too much. I suggest something with padding for your butt and your back otherwise you’ll get sore faster.
Some turkey hunting vests have this as a built-in feature. Staying comfortable is important for success because if you don’t stay comfortable you’ll move around more, and the more you move around the more likely you’ll be seen by turkeys and miss an opportunity to bag a bird.
The importance of gloves is often overlooked by beginners because they feel like they don’t need them. However, your hands are often the most noticeable part of your body because of their excessive movement. Concealing your hands will go a long way to remain undetected.
Touchscreen gloves are awesome for turkey hunting because I often use my phone hunting GPS to navigate and take waypoints. I’m also using my phone when the hunting is slow. Having gloves that are touchscreen enabled will keep my gloves on my hands so I’m not moving them as much when taking them on and off to use my phone, thus keeping turkeys from spotting the extra movement.
This cookbook by the well-known hunter, Steven Rinella, offers cooking instructions and fantastic photography. Getting better at preparing wild-game meals is something every hunter can appreciate.
Rinella’s Meateater cookbook is one of the most well-known cookbooks on the market today and has excellent ratings. If you know a hunter who wants to improve their wild-game eating experience, this book would make an excellent gift. (Who knows, maybe you’ll selfishly benefit as well).
Buffs are versatile and can be worn in many different ways. I use mine as a facemask as well as for protection from the sun, insects, and the cold on chilly spring mornings. Additionally, turkeys have incredible eyesight, so having a facemask will help you from being detected. Your face is also one of the first things a turkey will notice so camouflaging the face helps to avoid detection.
I use my slate call more than any other call when turkey hunting. I like my slate call because I can make realistic calls when performing both up-close quiet calls or loud calls for shock gobbles. This versatility makes it a great all-around call. The only downside is that it takes two hands to operate. A mouth call (below) would be better suited for hunters who want both hands free when calling. They’re both reasonably inexpensive and you could get both as a gift.
A mouth call can be beneficial for those who don’t spend much time sitting and prefer to hunt on the move. Using a slate call in these situations can get you seen by turkeys since a hunter will be more in the open. A mouth call is the most discrete call, making it a great gift for a turkey hunter who is more of a mobile hunter.
A box call is a great tool for locating gobblers that are far away in the distance because the box calls are generally able to produce the loudest sounds of any type of call besides an electronic call. A loud call is a helpful tool to have in a turkey hunter’s arsenal because sometimes turkeys are far away from the hunter. It sometimes takes a loud call to get them to gobble back so they can be located.
When turkeys just don’t seem to be cooperating and you can’t get one to gobble, a crow call can sometimes get a turkey to ‘shock-gobble’. This can be a game-changer for a particular hunt. This isn’t an item that a lot of turkey hunters would think of because it isn’t used often but it’s one of those items that can pay off when it’s needed and is nice to have when hunting.
10. Electronic Game Caller With Programmable Turkey Calls
An electronic game call not only makes a great gift for a predator hunter, but also for a hunter of many other game species. These calls come with a function that lets you download new sounds, and download custom sounds so that it can be used for any type of hunting. This call can play 2 sounds at the same time and has a 300-yard remote range.
Carlson’s choke tubes would make an amazing gift for a turkey hunter. These choke tubes are screwed into shotgun barrels to increase shot-pattern density for longer and more lethal shots on turkeys. This is accomplished by using triple-shot technology (TST) in which makes the shotgun pellet spread-rate release more gradually than other choke tubes on the market. This choke-tube features shot-look technology that allows for the tightest patterns and longer downrange reach over any turkey load on the market.
Different decoys are used in different situations to get the turkeys to do what you want. A tom turkey in strut when placed next to a hen decoy is used to get another dominant tom fired up and aggressive so that he will want to attack the decoy, thus bringing the bird into shooting range. Jakes will often be scared of a tom decoy so keep that in mind. A tom turkey is one of the best gifts for turkey hunters.
A jake decoy that is semi-puffed up with hen decoys around him will make a tom want to put the jake in its place by letting him know who’s boss. This will make the tom want to come in and scare the jake away from the hens so he can have them to himself. Additionally, other jakes will feel comfortable coming to join this jake. This can bring in any age male turkey.
A hen is used as an attractor for toms and jakes. They can be used alone or with other male decoys. When placed alone hens and male turkeys will feel comfortable coming into the decoys. When placed alone there is no jealousy trigger in the males and they may come in slowly but calmly. When placed with male decoys, a jealously and territorial trigger button will be pushed within male birds making them want to come into the decoys a little more agessively.
This is a great broadhead because it has a large cutting diameter, but it is expandable so it will fly through the air pretty well for how large it is. Additionally, you can see the arrow stopper built into the tip of the broadhead which creates massive damage and helps prevent the arrow from going all the way through the gobbler. I took my biggest tom to date with this broadhead.
All turkey hunters will appreciate a fully adjustable and swiveling blind chair. The legs of this chair adjust which allows for a perfectly leveled seat. This is key for maximum comfort. Additionally, the chair swivels 360º so that you can shoot out of any window of a blind easily at the approaching turkeys. A comfortable chair is key for success because when you’re comfortable you can last longer in the blind.
17. Lawn Chair For Turkey Hunting From Ground Blinds
Lawn chairs are the most affordable and comfortable chairs for ground blinds that I’ve been able to find. They’re so comfortable that when I start to get bored after the morning excitement, I’ll often doze off in hopes of being woken up by a gobble (this has happened many times). This is my recommended chair of choice for beginner turkey hunters.
Another benefit is how easily lawn chairs can be transported. They fold up and can be put into a small bag that you can carry over your shoulder. This is something to consider when you’re carrying a lot of gear to your spot.
The downside is they aren’t as maneuverable as some other ground blind chairs, but most are more expensive than lawn chairs.
For whatever reason, turkeys are just not phased by ground blinds. It’s always best practice to conceal them into the environment as much as possible but from what I’ve experienced, you don’t need much. You can also get away with a lot of movement within a blind that you otherwise could not. Although heavy, it’s worth its weight in gold. I’m almost always hunting out of a ground blind for turkeys.
Not only are they fairly affordable, but they also make a huge impact on a hunter’s comfort level and success. One of my favorite blinds is the Ameristep Care Taker Ground Blind which offers enough room for two hunters. The Double Bull blind is a one-way see-through blind which is very cool and works well to see turkeys in all directions.
It has adjustable shooting windows with removable mesh screening. It’s very easy to put up and to take down. It’s completely blacked-out on the inside, so hunters stay out of sight. My favorite aspect of this blind is how easy it is to travel with because it comes in a carrying case similar to that of a lawn chair. Also, it’s very easy to set up because it pops up in sections similar to an umbrella.
19. Rynoskin Insect Protection Clothing For Turkey Hunting
Ticks and insects are at full-force during spring turkey seasons. I’m a big advocate of Rynoskin Total, I wear it religiously to protect me from mostly ticks but also to help with minimizing mosquito bites and bites from other insects. Because of how bad ticks and other bugs are in Spring, I honestly don’t go turkey hunting or in the woods unless I’m wearing the stuff.
I don’t like spraying myself with harmful chemicals. Rynoskin Total is a chemical-free breathable baselayer that helps prevent bugs from penetrating the tight mesh. But make sure you read my full review before you buy it because I developed a regimen that I follow to help maximize the effectiveness of the gear.
A binocular harness wraps around the torso and keeps the binoculars at chest level so hunters can be hands-free when hunting. When turkey hunters need their binoculars, they will be able to get to them effortlessly. A binocular harness is one of the best gifts for turkey hunters because binoculars are only needed periodically, a place to store them while maintaining quick-access is very helpful.
Being able to store them in an easily accessible place makes the process seamless when they are needed. Vortex not only makes great binoculars but they also make great binocular harnesses. This harness can fit up to the Vortex 10×50 Binoculars and has additional pockets for other important items, like GPS’s.
Binoculars are a staple for turkey hunters and all outdoor-goers. My post: 14 Best Binoculars For Hunting For The Money is a great resource for hunters of all budgets. I bought these 14 binoculars and did a field test review comparing all of them. The binoculars below were my favorites after conducting my review.
There is a lot to like about the Leupold RX-1400i TBR/W. This rangefinder is one of the best rangefinders for hunting for the money because of the price and its ability to be used by both rifle hunters at long range and bowhunters at close ranges. It has angle compensation and internal ballistic profiles.
Leupold RX-1400i TBR/W – Best Hunting Rangefinder For The Money
Rubber hunting boots are the best for spring turkey hunting when there is a lot of mud. Full rubber boots are much more durable than neoprene boots which is why I like the Lacrosse Grange boots (below). The Grange’s are one of my favorite hunting boots because they are lightweight, ankle-tight, durable, waterproof, and affordable.
They almost feel like you’re putting on another pair of socks, I just don’t get tired of wearing them. The only downside to these is that they don’t have as good of traction as some other rubber boots.
The Sitka Tool Belt is a helpful waist pack for turkey hunters because it carries the many small items that turkey hunters need when hunting. For example, hunting licenses, shotgun shells, turkey calls, rangefinder, gloves…etc. I did a hands-on review of the Sitka Tool Belt and the biggest takeaway is how well laid out it is for organization and accessibility. I would recommend the green camo version for spring turkey hunting because it will blend in better.
Sitka has also come out with the Turkey Tool Belt, designed specifically for turkey hunting with dedicated pockets for tukey hunting gear. If it’s anything like the regular Sitka Tool Belt it will be a great product but I have not got my hands on that model.
The right gift can help the turkey hunter in your life have a more successful and enjoyable season. I hope this guide has sparked some ideas and pointed you in the right direction. If you’re looking for more gift ideas for different types of hunting (like deer, ducks…etc) you might like my other hunting gift idea articles.
Where to shoot a deer is dependent on weapon type and deer orientation in relation to the hunter. The best shot placement will be determined by these factors for quick, ethical kills.
The first thing to consider when determining where to shoot a deer is your weapon type. Not all weapons are created equal (caliber). Others are designed to kill in a completely different way (bows vs firearms for example). Below I describe where to shoot a deer when using bows and firearms.
Where to Shoot A Deer With A Bow
Bows are much less powerful than firearms and are designed specifically for cutting and bleeding (hemorrhaging). Bowhunters are limited to where they can shoot because of the lack of bone-breaking capabilities that firearms have.
The best place to shoot a deer with a bow is in the ribcage. The ribcage contains the most vital organs for deer and other animals for that matter. These main vital organs are the heart, lungs, and liver. Since these organs are quite large, it increases your odds of making a good shot. When these organs are punctured deer will not survive long, making them quick and ethical places to shoot deer with a bow.
Arrow Passthroughs
An arrow can easily break through small rib bones and get into the vitals, often passing through the deer completely. A complete passthrough is ideal for blood tracking after the shot because the deer has an additional hole to bleed from, making the tracking job easier. Additionally, if shot from a treestand the exit would be lower on the deer making blood filling up in the cavity able to leak out more readily. This can be key for finding deer after the shot.
Where to Shoot A Deer With A Firearm
Anywhere you can shoot a deer with a bow you can shoot with a firearm. The reverse is not true. Like with a bow and for the same reasons, the best place to shoot a deer in almost all situations with a firearm is in the ribcage when presented. However, you have a little more leeway with a firearm because of its bone-breaking capabilities.
Firearm Caliber
Caliber plays a big role in where to shoot a deer. If you’re using a smaller caliber or lower energy bullet, like a .223 or shotgun slugs then you’re much more limited because there is less energy, knockdown power, and bone-breaking capability. In this instance, you would want to wait for a good ribcage shot and maybe a brain shot if you’re absolutely comfortable with the shot.
If you’re using a high-energy 30-06 caliber rifle with large grain bullets then you have more leeway. You can take shots that will break bones, like when shooting the neck or taking front-quartering shots. Larger calibers also deliver a lot more knockdown power.
Deer Orientation | Where To Shoot A Deer For Best Shot Placement (With Pictures)
Depending on the position of the deer’s body to you, you’ll need to place your shots differently in order for them to be as effective as possible. Below I describe the best shot placement for deer in these different positions.
Where To Shoot A Deer When It’s Quartering Away
A slight quartering away shot is the best position to shoot a deer. This is because the projectile will travel through many organs and has the possibility of passing through the most vitals such as both lungs, heart, and liver. This also means the most bleeding will occur allowing for easy blood trails and quick ethical kills.
When a deer is in this position, it is best to aim for the ribs further back on the deer. At this angle the projectile will exit near the front shoulder on the opposite side of the deer, passing through many vitals.
If you’re shooting from a treestand you will want to aim slightly higher on the deer than if you were at ground-level with the deer. This is because you want to make sure you hit the opposite-side lung. If you do not aim a little higher you may only hit one lung because of the angle of the arrow when it hits the deer.
Shooting a deer when it is broadside to you is another great shot option. In this position, the deer has the maximum amount of vitals exposed (surface area). This means you have the most room for error when a deer is in the position. The best shot placement in this position in my opinion is at the top edge of the heart. This is because if the deer ducks your string when shooting your arrow will still get the lungs. If the deer does not move you’ll hit the heart, lungs, or both.
Again, when shooting from a treestand you will want to aim slightly higher on the deer than if you were at ground-level with the deer. This is because you want to make sure you hit the opposite-side lung. If you do not aim a little higher you may only hit one lung because of the angle of the arrow when it hits the deer.
Shooting at a deer that is directly below your treestand is a tough shot to make. If possible, I recommend the deer to move away from your stand a short distance. This is because when the deer is right below you it is common to only hit one lung with such a steep angle. Deer can survive a long time with only one collapsed lung and can make blood trailing difficult because they often will run far distances and bleeding will stop.
If you decide to take the shot, the best place to aim is as close to the spine as possible and behind the shoulder in order for the best odds of hitting both lungs. If you end up hitting the spine, it will drop the deer in its tracks but will only paralyze the deer so I follow-up shot is often necessary.
Directly Under Treestand Shot Placement – Treestand Level
Front-Facing / Brisket Shot
The front-facing shot can be difficult as well, especially with a bow. There is a lot of bone in this position and only a small opening to get into the vitals. If you’re using a firearm there is a little more wiggle room. You’ll want to aim where the neck meets the body. Basically, I picture where the esophagus enters the body cavity. This is a tough shot to make from a treestand and is generally not recommended because of the angle of arrow travel. The deer would have to be a fair distance away to have an appropriate angle, making the shot even more difficult from a treestand.
Brisket Shot Placement on Deer- Ground Level
Quartering Towards Shot Placement
This is one of the most difficult shots and is not recommended to take with a bow. In this position, the vitals are shielded by the shoulder bone. Of course, there are less steep angles of quartering-to shots. If a deer is quartering to but almost broadside, then that is still a god shot. However, when the deer is at a fairly steep angle it is best to wait for a better shot with a bow. If you try to shoot behind the shoulder often results in a shot that is too far back, usually in the stomach. A liver shot is usually the best you can hope for in this position.
The quartering-to shot is an ethical shot to take with a rifle because it has a lot of energy, knockdown power, and bone-breaking capabilities. A rifle will be able to get into the chest cavity and do a lot of damage, whereas a bow would not be able to do this most of the time.
Quartering To Shot Placement on Deer – Ground Level (Rifle Only)Quartering To Shot Placement – Treestand Level (Rifle Only)
Where To Shoot A Deer To Drop It In Its Tracks (Firearms Only)
There are a few places where you can shoot a deer that will drop it dead in its tracks. These spots can be helpful to know when hunting on small properties so that deer don’t run onto neighboring properties after they’ve been shot. These spots can also be helpful when hunting highly pressured areas and you want to drop a deer instantly so that the deer won’t get shot by another hunter. These shots should only be performed with firearms, bowhunters should avoid these areas and wait for a better shot at the heart, lungs, and liver.
These Areas Include:
High-Shoulder Scapula
Brain
Spine
Where Not To Shoot A Deer
As well as knowing the best places to shoot a deer it is also important to know the worst places to shoot a deer. Knowing where not to shoot a deer will enable you to make better decisions when determining shot placement in the field.
If you shoot a deer anywhere other heart, lungs, liver, high-shoulder, brain, or spine it will be unlikely that you will recover the deer. Sometimes major arteries can be hit on a bad shot but it is unlikely. For this reason, all deer should be searched for diligently even if a poor shot was made. Deer tracking dogs are a great way to find deer that have been hit poorly. Just make sure to give deer that are hit poorly enough time to bed down and expire before taking up the blood trail.
These are the 15 all-time most important tips deer hunters should use and apply to increase their hunting success. These tips will be beneficial whether you’re a beginner or an expert.
From my decades of deer hunting experience, these have been the top 15 things that have leveled up my deer hunting success the most once I applied them.
Table of Contents
1. Understand Local Rut Phases and Dates
Knowing local rut phases and dates is important for hunting deer, especially bucks. When I was first learning how to hunt deer I’d heard of the pre-rut, rut, and post-rut, but it wasn’t until later in my hunting career that I truly understood how deer acted at each of these stages. Once I understood each stage deer movement started to make a lot more sense. I was able to choose the when, where, and why I should be hunting particular stands rather than hoping to get lucky.
There is a lot of information on the internet today stating that the rut starts on a specific date. Be careful and do some research on this for your state. Internet-based information comes from people all across the United States. This can be confusing because the rut is different depending on where you live. This makes getting the correct information difficult. Contacting your local wildlife department may help provide you with some answers.
Additionally, trail camera pictures can tell you a lot about the different phases of the rut. When do you see the first sign of rut activity? What about the most activity? When does the activity stop? There’s no better intel than information from the exact properties you will be hunting!
In my early years of hunting deer, there was some mention of hunting pressure, but I never took it seriously. I occasionally saw hunters, but I suppose I thought that hunting pressure didn’t exist in Maine. I believed that hunting pressure was only found in populated and heavily hunted states such as Michigan and Pennsylvania. How could it apply to Maine? Maine is so vast.
I was wrong. I went years without seeing mature bucks. Frustrated, I knew I had to make a change. Finally, I decided to test if hunting pressure was my problem. I chose to scout areas with a lot less hunting pressure. The next season I saw success right away. I started to see more bucks.
After seeing some success I began doing two things; first, I dedicated a lot of my scouting time to finding isolated hunting spots. This would ensure minimal if any hunting pressure. The second was using hunting pressure to my advantage. By predicting how a big buck would react to hunting pressure from other hunters I was able to place myself in strategic locations. Both of which have been very successful tactics. I was learning where to find pressured bucks.
Hunting pressure varies by property and by state. It is helpful to get an idea of how much hunting pressure is occurring on the properties you hunt. If other hunters are hunting deer where you hunt, consider finding a new property to hunt or finding the least hunted sections of a property.
3. Scouting & Scouting Efficiently
You can do more good by doing less during hunting season. Let me explain. Instead of spending time during the hunting season trying to locate a buck, you could have already located many big buck hangouts outside of the hunting season while scouting outside of the hunting season.
Doing this allows you to focus on hunting during the season and less on scouting. More high-quality hunting time increases your chances of shooting a deer greatly! That is not to say that scouting in-season is a bad tactic, this can also work with great success. I like to do my homework first, and then scout in-season if my pre-season scouting isn’t paying off.
Deer Aren’t Everywhere
Deer and especially bucks are not everywhere, you have to find where they are to hunt them. By scouting right after the season ends, or in the spring right after snow melts is your best bet. Scouting during these times of the year allows for rut sign that was made in prior seasons to be easily visible. The sign you want to be looking for is scrapes with licking branches and big, tall rubs and big tracks. These are all classic signs that a big buck is in the area.
Tall rubs like this are great indicators that a big buck is using the area.
Why would you spend time scouting areas where the deer were last year? Using this sign you can predict that bucks will be back in this area at the same time the following year. Whitetails are very habitual creatures. They often keep the same patterns at the same time (often within a few days) year after year. This is why if you find good buck sign in an area it could be a good place to hunt the following year.
By far, I have found off-season scouting to be more valuable for learning how to hunt deer than scouting during the hunting season. Scouting missions outside of hunting season enables you to scour a property without fear of bumping bucks out of the vicinity. This results in much better intel on where the bucks are and to find many good areas to hunt. This way the hard work is done when hunting season rolls around.
Shooting broadheads well before the hunting season is a must when bowhunting deer. A lot of hunters don’t take this step seriously, I’ll admit I used to only take a few shots with my broadheads right before the season too.
When I first got started bowhunting deer, I missed a handful of embarrassingly easy shots at does. I knew I had to make a change to prepare for success and be a more ethical hunter. I wouldn’t be able to live with myself if I missed a chip shot at a big buck.
It is important to practice with broadheads before the season to ensure success.
After getting serious about practicing with broadheads I learned a lot about broadhead accuracy. What I found is that broadheads can be finicky. Making sure broadheads are dialed in is a small step that can pay big dividends toward success.
It is still important to check if expandable broadheads are flying like your field points. Often they shoot slightly different. Small adjustments to your sights might need to be made.
Currently, I am shooting expandables. I never practice with field points once the season approaches. I do the same thing when I shoot fixed blades. Sure, I chew up targets but it’s big confidence builder for me to know I can make the shot when it presents itself. Confidence is half the battle when bowhunting deer.
5. Entrance and Exit Routes
Many hunters don’t give whitetails enough credit for how smart they are, I know I didn’t. Years of learning from mistakes have taught me how deer have such an incredible ability to learn and adjust to negative stimuli. For this reason, it is crucial to pay attention to your entrance and exit routes when learning how to hunt deer.
What Are Entrance And Exit Routes?
They are routes that hunters take to get back and forth from a treestand. Why are they important? Good routes minimize deer seeing, hearing, or smelling you when heading to your stands, keeping stands fresher longer. If deer pattern you while you’re walking to your treestand it will only take a hunt or two before they associate your stand location with danger. Once they pattern you they will change their routines or avoid the area altogether.
Canoeing is one of my favorite ways to access my stands because you leave almost not trace of ground scent. You can’t beat canoeing for entrance and exit routes.
Why Entrance And Exit Routes Are Important
Often hunters will leave their treestands the same way they entered them. This can be a mistake. For example, by entering a treestand through a field in the evening there will likely be no deer in the field. This is because they’re still bedding. But, when you leave through a field at night after hunting hours are over, deer will likely be in the field feeding. If you walk through the field the same way you entered your stand, you will spook the feeding deer. Deer learn fast and will adjust by coming into the field later in the night, or avoiding the field altogether.
Routes are especially important when considering mature bucks. These bucks are smart and won’t stand for human intrusions. One mistake and they will likely never be back. Effective routes reduce, to the fullest extent possible, the odds of alerting does and bucks to your presence. If you’ve been bumping does and fawns all season the chances of seeing a buck during the rut declines. Bucks want to be with does during the rut. If you’ve alerted the does on your property to your hunting spot, there won’t be any does. Consequently, you will be less likely to see bucks during the rut.
Planning routes is critical to get in and out of treestands undetected when bow hunting deer. Effective routes will keep deer unsuspecting, keeping stress levels low and increasing odds of shooting a deer.
6. Don’t Over-Hunt Stands & Have Many Stands
Overhunting individual treestands on an individual property is a big mistake. I used to make it all the time. I would overhunt stands so much that I would stop seeing deer altogether, then continue to hunt them! Repeated hunting of a stand will keep deer away from that area. I finally learned when this happens to stop wasting time and move on.
I am a strong believer that each time you hunt a stand the odds of taking any deer, let alone a big buck starts to diminish quickly. Almost every one of my bucks that I’ve shot has been on the first sit or two of the year. This is no coincidence.
Even with effective entrance and exit routes, if you hunt the same stand repeatedly deer will catch onto you at some point. This is almost inevitable when hunting deer. Every time a stand is hunted more lingering scent is left, making “burning” a stand more likely.
How do you avoid burning stands?
Move to another stand!
By not overhunting one stand you give it time to “cool down”. This lets scent dissipate and keep deer stress levels low. This keeps deer comfortable and moving in the area. Your stand will never be as good as the first few sits of the season but the longer the intervals the “fresher” it will become. Fresh stands are more likely to have deer pass by them because they like to be in low-stress environments.
Placing many stands on a property allows for a good stand rotation and allows you to hunt different wind directions. This keeps your pressure spread out between stands. This combined with good entrance and exit routes works really well for keeping stress low at all your stand locations. resulting in higher odds of shooting a deer.
7. Hunt Multiple Properties
To take it another step further, rotate hunting on different properties. Like you can over-hunt individual stands you can also over-hunt individual properties. By hunting on multiple properties you will further ensure that you are not overhunting any one particular property.
If an area is hunted heavily by you or others it is not uncommon to change the deer behavior of the entire area. By spreading out hunting pressure onto different properties deer won’t be able to pattern you. They also won’t catch onto the fact they are being hunted as quickly. This keeps stands fresher and deer stress levels low resulting in better hunts out of each stand.
8. Within Multiple Properties Have Many Stands
To further increase your odds have many stands on multiple properties. This will make it extremely difficult for deer to catch on to your patterns and keep all your stands “fresh” and deer relaxed.
I use the Aero Hunter saddle by New Tribe. Because of its versatility, I can hunt many trees on multiple properties.
This is how I am set up for my hunting seasons and I have seen fantastic results since I started doing this. Using this method I can hunt fresh stands during the right conditions at the right time of year all hunting season long. This has put the odds greatly in my favor and that’s what it’s all about. Having many fresh stands will dramatically increase your success.
Saddle hunting has been huge for helping me be more effective in hunting multiple stands within a single property as well as multiple properties, keeping things fresh.
9. Hunting Stands at the Right Time
You can even take it another step further and only hunt specific stands when the time is optimal. Hunting stands at the right time has been very important to my success.
As mentioned above I am a strong believer that each time an individual stand is hunted the odds of taking a deer will begin to diminish. For this reason, it is important to only hunt stands when the time is right to avoid boogering stands up before the odds are in your favor.
When should you hunt your stands? Whitetail behavior changes throughout the hunting season based on food, weather, and time of year. Pick stands that are best depending on those conditions. By only hunting stands when the time is absolutely perfect your chances of intercepting deer are highest.
This is a white oak leaf. Notice the lobular the edges. Red oak leaves will be pointed. White oak acorns are a preferred food source for whitetails but only drop for a few weeks. Hunting over white oaks when they are falling is a prime example of hunting stands at the right time.
10. Stand Placement
Sure, having a plethora of stands in your arsenal is important to have more success on trophy bucks and bow hunting deer in general, but there should be a method to your madness. Otherwise, a lot of hours will be spent in a treestand not seeing many deer, let alone bucks.
Figuring out where deer are bedding and where deer are feeding will allow you to figure out their tendencies. Once you have an understanding of these tendencies you can put yourself in-between the bedding and feeding areas and intercept them. The closer you are to their bedding area the more likely you will catch a deer on their feet during daylight hours.
Here is a classic buck bed. These tucked away beds in swamps are great places to find buck bedding. I shot my 2018 buck only a few hundred yards away from this bed that I had scouting the Spring prior.
Hunting near rut sign is another great way to find bucks. Big, tall rubs and scrapes with licking branches offer tremendous opportunity. When I find this sign I try to determine where the buck that made this sign would bed down. In general, if you’re hunting in the low country this is usually the thickest, nastiest cover in the area. If you’re hunting in the hills this will likely be the point of a ridge. I place my stands as close as I can get to these bedding areas without being seen by the bedded deer.
11. Wind Direction and Thermals
Understanding wind direction and thermals is a key factor in learning how to hunt deer. If you do not pay attention to the wind and thermals you will get picked off by deer which will ruin your chances of success. Often, deer will slip away without you even knowing they were there at all.
To keep track of the wind direction and thermal activity I use milkweed silk. Milkweed silk is fantastic because it’s very buoyant in the air which will drift in the faintest amount of wind. Additionally, because it is so light it floats or sinks depending on what the thermals are doing. Because the milkweed silk is white it stands out well against the wooded background. By watching the milkweed silk you are able to watch exactly where your scent stream is traveling. Checking wind and thermals will help you see more deer and have better success when hunting.
If you’re unfamiliar with milkweed silk, here is what it looks like. Milkweed likes to grow in upland portions of fields.
12. Scent Control
You might be wondering why anyone would need to use scent control if they are already using the wind to their advantage. The reason is primarily not to keep deer from smelling you while on stand, although it definitely doesn’t hurt! But the main reason to use scent control, in my opinion, is to keep deer from smelling the tree you were hunting in after you leave.
Using plastic totes to store washed scent free clothes and equipment.
The less scent you leave at your stand and on your entrance and exits routes the better. By using scent control your scent will smell fainter, and less threatening while hunting and after you leave. This helps keep deer from becoming alerted to your presence. Scent control results in more times you can hunt a particular tree before deer in the area catch onto you. If a treestand you have prepared is a slam-dunk spot you want to be able to hunt this spot as many times as possible when the time is right. Scent control will allow you to get the most use out of each treestand.
13. Weather Advantage
Not all days are created equal when hunting deer. The weather is a big influence on deer behavior and movement. Most days are best spent in the treestand waiting for the deer to come to you. Sometimes, when conditions are right, it may make more sense to go on the offensive and go after deer on the ground.
Windy days over 20 mph are good days to be on the ground. When wind speeds are high deer tend to hunker down and stay in their beds. If you know where deer are bedded and you think you’ve might be able to sneak up on a bedded buck windy days are great. The wind blocks any noise or movement you would make during your ambush.
Heavy rain days can also be good for the same reasons as high wind days. Downpours keep deer in their beds, making it unlikely you will see deer from your treestand. The quiet ground conditions and noisy rain patter will mask noise during your approach.
14. Put Yourself in the Mindset of a Deer
Getting into the mindset of deer has greatly helped my success when deer hunting. I have been able to more accurately hypothesize where does, bucks, and mature bucks prefer to spend the majority of their time.
For example, if you were an old mature buck that had been hunted for many seasons and likely shot at a time or two, where would you spend your time? Probably in an area where you were never bothered. Where would that be? Either in an overlooked pocket of dense cover, remote areas with low hunting pressure, or somewhere where you had the advantage to escape.
Mature bucks are not so different from you and me, they have learned from their past experiences. Older bucks have likely learned from being wounded, shot at, and/or seen other deer shot. As you can imagine those kinds of events engrain weariness into them. Because of these events, older bucks associate humans as something to be very afraid of and avoided hunters at all costs. Although it seems a little foolish, next time you are wondering where a big buck might be hiding think “where would I feel safe if I was being hunted?”.
15. Does, Small Bucks, and Big Bucks
Bucks and does live different lifestyles. For example, a does life revolves primarily around food, which is why they are generally easier to find. Does do care about security to an extent and will often bed in the same cover-type as bucks. However, they will bed closer to the food sources and are less worried about isolation.
Bucks on the other hand are more worried about security, younger bucks included. That being said, young bucks are somewhat oblivious to the reality of danger. They usually haven’t had as many negative experiences with hunters at that stage in their life. This makes younger bucks less cautious and more visible than mature bucks.
Mature bucks will be isolated and further back in the cover. These bucks don’t like to socialize as much, too many other deer around them tends to stress them out. They’re always on edge, in thick cover they can’t differentiate noises and movements made by deer and hunters. If they can’t tell what’s going on, it stresses them out which is why they like to keep to themselves.
Getting back into dense, isolated cover is a great way to find trophy bucks. Using a canoe to get there is an effective tactic.
Understanding this concept has made me so much more successful, I never used to see bucks. Instead, I always saw does right at dark coming out of their bedding and heading to feed in fields. Now, I push further back into the bedding areas, and try to get behind the does where trophy bucks are bedded.
Conclusion
I wish I had these tips when I was first learning how to hunt deer. Each one of these tips came from mistakes I have personally made and learned from. I hope you can take away something from this post and I hope it brings you more luck in the seasons to come.
Since you’re wondering if deer move in the rain, I’ll assume you’re a pretty hardcore deer hunter and don’t mind hunting in the rain or getting wet as long as there is a decent chance the deer will be moving. After all, there are only so many days in the season.
I’m also guessing you want to know if it will be worth your time and energy before you go through the trouble of getting soaked, am I right? Look no further, I’ve got you covered in this post.
Do Deer Move In The Rain?
The short answer is yes, deer do move in the rain but the degree to which movement occurs depends on a few simple factors. These main factors include; the intensity of rainfall, time of year, and recent weather.
In this post, I break how these factors play a role in deer movement so you will be able to determine for yourself if deer will be moving on the particular rainy day you want to hunt.
Intensity of Rainfall
Not all rain events are created equal as it relates to deer movement. Learning how much and why deer move differently in varying intensities of rain will allow you to take advantage of the short deer hunting season. There are only so many days in the deer hunting season, make the best use out of them by understanding these principles.
Do Deer Move In Light Rain?
Light rain does not hinder their movement. It is common to see deer on the side of the highway while driving during light rain. Highway grasses are some of the first to turn green in spring. Deer are selecting for grasses and forbs at this time of year. Rainwater acts as ‘salad dressing’ if you will and makes grasses and forbs more palatable for deer.
Light rain does not have much effect on deer movement throughout the year or during hunting season. Deer will be moving during light rain because it does not handicap their ability to detect danger to any significant degree. In their minds, it is worth the risk to move around and feed during light rain.
Although deer will be moving during light rain, you may notice that they are a little more ‘on edge’ in some instances. Especially pressured deer, because when the woods are quiet deer rely more on vision instead of hearing. This may mean that deer are moving slower, and perhaps not as far from their bedding areas during daylight.
Do Deer Move In Moderate Rain?
Moderate rain will hinder movement to some degree. As rain increases to a moderate intensity deer will start to lose their ability to effectively use their three main senses to detect danger; sight, smell, and hearing. If you see deer moving during moderate rain, you may notice that they are a little more ‘on edge’ than in light rain. Especially, pressured deer.
You can increase your chances of seeing deer moving in moderate rain by taking into consideration the time of year and recent weather (discussed in detail below).
Do Deer Move In Heavy Rain?
There is a limit to how much rain deer will tolerate before movement is greatly reduced. Heavy rains will greatly reduce your odds of seeing deer moving. Deer feel their ability to detect danger is almost non-existent and become very nervous.
To increase their survival probability and gain an advantage over predators in situations when their senses are basically useless, they will strategically bed down so that they have some sort of advantage.
Once heavy rain subsides it is a great time to be in the woods. After rain showers, you’ll often notice deer grazing in fields because of the ‘salad dressing’ effect previously mentioned. When you notice other wildlife such as birds, squirrels, and chipmunks come out of hiding you can bet deer are moving too.
Recent Weather Patterns Influence Deer Movement In The Rain
Recent weather events will also be a factor in much deer will be moving on a particular day. If the days prior to a rain event are sunny then deer will be in slight shock during the first day or two of moderate rainfall. For this reason, they will hunker down in their bedding areas.
If there was a 3 day stretch of moderate rain in a row and you wanted to hunt the 4th day that also calls for moderate rain intensity, your odds are much higher on the 4th day rather than the first day or two. This is because after a few days deer will become acclimated to the rain to a degree. They will also need to eat at some point.
During periods of heavy rainfall, deer will stay put for longer periods of time and will only move when they really need to. This is true even if the rain event occurs for many consecutive days. Of course, they will still need to eat and will likely move short distances in order to find just enough to eat and then go lay back down again.
Time of Year Influences Deer Movement In The Rain
Deer are heavily influenced by the time of year because of their energetic shift from season to season. The time of year will determine what stage of movement they will be in. To learn more about whitetail energetics see my post; Whitetail Energetics: The Key to Finding Big Bucks.
Do Deer Move In The Rain During The Early Season?
During the early season, deer are not moving very much in general. They stick to their strict summer patterns to pack on the weight for the upcoming breeding season and winter months. Light rain will not affect deer at this time very much, moderate rain will have some effect on movement, and heavy rain will keep deer in bedding areas until bad weather subsides.
Do Deer Move In The Rain During The Rut Phases?
The rut, however, is a very short period, and energetically it makes sense for deer to move in the rain to procreate. Bucks will sacrifice their otherwise cautious nature and use their precious energy reserves for breeding activity. That being said, increasing intensities of rain will still reduce the odds of seeing deer at this time of year. However, your chances are higher than at any other time of year when hunting in rain.
You are much more likely to see deer moving in moderate amounts of rain during the rut phases. This is true even in heavy rain to a degree, but the probability does still diminish quite a bit. You never know during the rut though, you could get lucky from a treestand.
Do Deer Move In The Rain During The Post-Rut?
During the post-rut deer are getting into their late-season patterns and are again trying to conserve energy for winter. For this reason, deer aren’t going to be moving in the rain as they were during the rut. Deer movement in the rain will be similar to that during the early season,. However, it is very likely deer have moved to a different location for the winter months. Light rain will not affect deer very much at this time. Moderate rain will have some effect on movement, and heavy rain will keep deer in bedding areas until bad weather subsides.
How To Hunt Deer In The Rain
As discussed above, deer don’t move as much as rain intensity increases because their ability to detect danger is reduced. Although they might not be moving much, this can be an advantage for a smart hunter.
Instead of waiting for the deer to come to you, go to the deer. Deer will not be able to hear, smell, or see you very well in moderate to heavy rain. This is a great opportunity to sneak through some bedding areas and catch a deer by surprise.
A good hunter knows how to keep the odds in his favor when hunting no matter the weather conditions. There is never a good reason to avoid hunting. There is always a tactic you can implement in order to create your own success.
Conclusion
What you should take away from this article is that deer do move in the rain, but their movement decreases in proportion with increasing intensities of rain. That said, you need to take into consideration the time of year and the weather to determine your best plan of action when hunting deer in the rain.
What will you do to put the odds in your favor when it’s raining?
In this post, you’ll learn how to track big woods bucks in snow. Being able to judge and read whether a track was made by a big buck, small buck, doe, or fawn is key to your success. Otherwise, you might walk miles, just to realize you’ve been tracking a small buck or doe! It may seem difficult at first but with the information in this post and a little practice, you’ll learn how to track big bucks in snow in no time.
Although the size of the track itself is a good indicator of the size of the deer you’re following, it’s not always best to rely on just the size. There are also other indicators (behavioral and physical) that will either support or disprove your initial observations of a big buck track. Judging and reading a big buck track consists of a handful of subtle and not so subtle clues that when pieced together start to unravel the bigger picture. I will be going to all of these ways in this post.
Table of Contents
Tracking Big Bucks In Snow (Start Here)
If you haven’t read the other posts in this tracking series I suggest you do before you continue on:
When I first started tracking big woods bucks in snow I thought it was going to be easy to tell the difference between a big buck’s track and other deer. I thought this because I had a lot of experience with tracks in non-snowy conditions and could easily judge a big track in the sand, mud, bare ground, and even in a few inches of snow. However, when I started tracking big bucks in deeper snow in northern Maine and New Hampshire, the skills I thought I had were greatly challenged by snow depth and snow consistency. In this post, I describe the factors I consider when judging a big buck’s track in snow.
Temperature & Weather
Temperature plays a huge role in determining how big a track looks. If the temperature is warm and the track is melting, then the track may look a lot bigger than when it was fresh.
This is also true during rainy days where the track is melting fast. It’s important to keep a log of the temperatures and weather in the back of your mind. Or even write them down each day in a notebook/ This will help to understand the influences weather has had on tracks. I often take screenshots of previous days’ weather and the predictions for the current day. This way I know what to expect the tracks should look like.
What I have found helps me determine if a track would be considered big or not based on the temperature and weather influences, is to focus in my mind on what a perfectly preserved, fresh track would look like with no outside influences. Then in my mind, still thinking of the perfectly preserved track, I do my best to run a ‘time-lapse’. Based on past and present temperatures and weather conditions, then visualize what the track would look at the present moment. I compare what I’m picturing in my mind to the track in order to determine if I think it’s a track worth following. I’ve even kept pictures on my phone so that I can refer back to how certain tracks looked during certain conditions.
How To Differentiate Tracks In Snow (Big Buck vs Small Buck vs Doe)
Track Size
Although the best way to become familiar with how to differentiate tracks is by looking at a lot of tracks in a range of conditions, there are some key factors that can help you make the right choice. One factor is a big buck will almost always have a bigger track than other deer.
Big Buck Track (Left) vs Smaller Buck or Doe (Right)- Track Comparison
There are a lot of influences that can alter your perception and judgment of a big track, nevertheless, the first step is to start looking for big tracks. Once you’ve found what you think is a big track, you can get more precise on your reading of the track.
Track Measurements
Common quick-measurements you can use in the woods to tell if a track was made by a big buck are if in the width of the track is roughly the length of a 30-06 cartridge or a ‘four-finger track’. This is roughly a 3-inch track in width, anything bigger is a bonus. The length is not as good of a predictor of weight as width, but most big buck tracks are around 4.5-inches from tip to dewclaws.
After you’ve had experience looking at many tracks you’ll build a library of past tracks in your subconscious mind that will help you make quicker analyses in the future. In other words, you’ll get an eye for it. You’ll notice the track is in the 10% club. Meaning that out of all the tracks you’ve seen, only 10% of deer make tracks that big so you know it’s a heavy deer. Indicator 1 in the photo below is showing my handprint in current conditions to compare to the buck’s track. Indicator 2 is showing the snow debris left behind after the buck made the track. This snow is soft and melting, but the debris has not melted. This is a fresh track.
All deer do have dewclaws, which will show in snow. Just because you see dewclaws does not mean it’s a buck. That being said, big tracks have more defined dewclaws. Dewclaws on big bucks are set back further than most other deer (indicator 3) and are at roughly a 45º angle (Indicator 4).
It is important to realize that big bucks can have smaller tracks. It’s just that the odds are in your favor if you take a big track rather than a medium-sized track. Just know that a medium-sized track might have been made by a big buck. If you see a smaller than usual track, but other indications are showing (see below), the track might still be worth taking so don’t rule it out.
Splayed-Toe Tracks
In addition to the size and dewclaws, a big buck will have splayed out toes from his weight (Indicator 5). This means that his toes will be spread apart further than other deer.
Deer Track Stride Length
The next thing to look at is stride. The stride is an indicator of the overall length of deer. The longer the deer the more it weighs. A deer might have a smaller than top 10% track, but I’ll consider taking it if it has a good stride. A couple of feet between tracks is a good indication of a long buck. Just be aware that bucks are always changing their strides in relation to their attitudes. So it is best to follow the track for a short distance to figure out the track’s baseline stride (see baseline section below). Once you’ve tracked a few deer, you’ll start to notice which tracks have obviously longer strides than others.
Big Woods Buck Track in Snow and Long Stride Length
Track Gait/Swagger
Next look at the swagger or gait. This is how much the buck sways when walking. If the bucks toes are pointing abnormally outward and the length of the gait is around 8-12” you’ve got a wide chested buck, indicating girth, another indicator of weight. Picture a fat man waddling through the woods vs a skinny teenager.
Toe-Draggers
Another indicator to key in on is how much the buck drags his feet. Big bucks typically drag their feet more than other deer because they are older, bigger, and don’t have the same mobility as they used to. If you see a track making big cross-country ski trails, there’s a good chance it’s a good buck.
Can you see the toe dragger in this group of tracks?
Antler Size Indicators
If the track you’re looking at meets some or all of these criteria (more the better), you know you’re on a big buck’s track. If you want to get even pickier you can observe antler size while tracking. By looking at where the buck walks you can determine how wide a buck’s rack is. Of course, there are more obvious ways to tell like rubbing on trees, but there are also more subtle ways. These ways include; size of gaps between trees he avoids, broken branches between trees he walks through, tine marks on blowdowns he crawls under, tine marks when feeding on the ground, and tine marks if he lays his head down when bedded.
Bed Size
Another way to gauge how big a buck is other than his track is by looking at the size of his bed. You’ll have to take into consideration how long he was laying in his bed because the longer he lays, the bigger the bed will look. You will almost always see the tarsal glands of the buck in the bed. Sometimes you can see urine spots. The position of the urine in the bed will also tell you if you’ve been tracking a buck or a doe. Buck urine spots will be closer to the center of the bed.
A Big Buck Bed in Snow
Buck Attitude And Demeanor vs Does
Does and bucks have different attitudes. If you’re on a questionable track, you can often get a feel for if the track was made by a buck or a doe by following a track for some distance. During the rut, bucks have one thing on their mind and it shows. You can often see their excitement by strides being often longer than their baseline (see paragraph below), and even leaping for short distances to speed up travel.
Does, on the other hand, have less purpose in their steps, and they don’t travel very far. They have a much smaller home range and will often do small circles in an area if tracked for any distance.
Deep Snow & Powdery Snow
This is all well and good, but what if the snow is sugary, deep or both? Identifying tracks in this type of snow can be frustrating. I know it was for me, and even still is at times because you can’t see the track. If you can’t see the track, then how do you tell if you’re ever on a buck or not? The trick here is to use all of the tools listed below and mix and match as many of those as you can. You will probably need to follow the track for a longer period of time to get a good read on the track. You don’t always need to see the track to know it’s a buck. But it does make the process more difficult.
What Is A Track’s Baseline?
I define baseline as; the tracks an individual buck makes when he is calm and predictable. I always try to find a buck’s baseline to get the best judgment of a track. Otherwise, there are factors that can fool you into thinking a buck is bigger or smaller than it really is.
It’s important to visualize what that buck’s behavior was like at the exact moment he made the tracks you’re observing. For example, if the deer is running the track is going to look splayed and bigger. It can be easy to mistake a doe for a buck in these instances. Additionally, if a deer is excited because he smells a doe or startled because of a limb cracking he may start walking at a fast pace, making his track look like it has a long stride when in reality it isn’t when the deer is calm and at its regular pace.
How To Determine Track Baseline
Follow the track for a few hundred yards or until you feel like you’ve got a good feel for the track. What is the deer doing? Is he marching across the hardwoods on a beeline looking for does? If so, his stride may look bigger than baseline. Or is he moseying around a little bit? Is he with a doe or by himself? zigzagging? nipping buds? All of these will influence how you perceive the size of the buck who made the track.
Take note of what you’re seeing most often. Is the track usually very long, but sometimes is short? Does he have a gait, but sometimes it doesn’t look like he has a gait at all? Does his track look big but then other times it looks smaller than what you thought?
If you had a clone copy of a specific buck, your perception of size in each of these different scenarios listed above. A monster buck might look like he has a small gait if he’s not in any rush to go anywhere. Take into consideration what that particular deer is doing and extrapolate your observations in order to interpret the size of the buck. Otherwise, you could follow the same deer all day and think he’s a monster buck at some points and the smallest buck you’ve ever followed at other times.
What I find helpful for people is to take the average of what you are seeing and that’s generally a good representation of the buck’s size. If 75% of the time it looks like a big buck than it probably is. If only 25% of the time, then perhaps you should find another track. Just make sure you are taking baseline into consideration.
Is The Buck Track Worth Following?
Time Of Year
Not every big buck track you find is worth following. The time of year will help you decide if a track is worth following. If it’s early season, or late season your odds of catching up with an older track are greater, as bucks usually aren’t going very far. However, if you find a big track that looks older, and it’s in the middle of the rut, I would think twice about following that buck.
Rested Or Tired?
You can get an idea of a buck’s energy levels by looking at where the tracks are headed. If the tracks are going from the lowlands up towards a mountain than that buck is probably tired and is going to bed down on top. The same can be said for a buck entering a big swamp, especially a cedar swamp. An even better indicator that he will be bedded in these areas is if you notice some feeding sign along the way. Tired bucks are bucks you can catch during the rut.
If you flip this scenario around, and the bucks are leaving these areas, or you’ve come across beds during the rut then he may be ready to travel a long distance. You’ll have to judge this by following the track for a while.
These are just suggestions to keep in mind. Of course, anything can happen on the track. A well-rested buck may get caught up with a doe. In that case, you could kill a rested buck. This is the name of the game. Sometimes, even on fresh track you may never catch up to a buck during the rut. All you can do is put the odds in your favor as much as possible.
Conclusion
A big buck may have some or all of the characteristics described above. Of course, the more indicators a buck is showing, the better chance you’re on a big buck’s track. Puzzle together the characteristics the specific track is displaying using the criteria above and you’ll be well on your way to become an expert at judging and reading big woods buck tracks in snow. After you’ve been on a few tracks, you’ll quickly learn how to track big woods bucks in snow and differentiate between big buck tracks and other deer tracks.


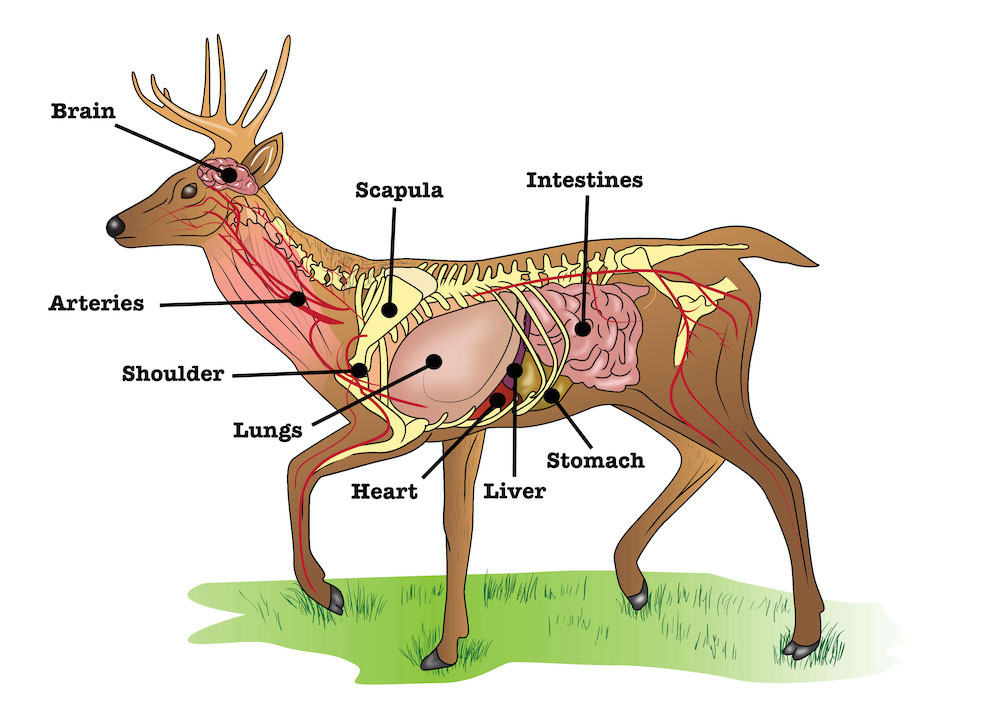
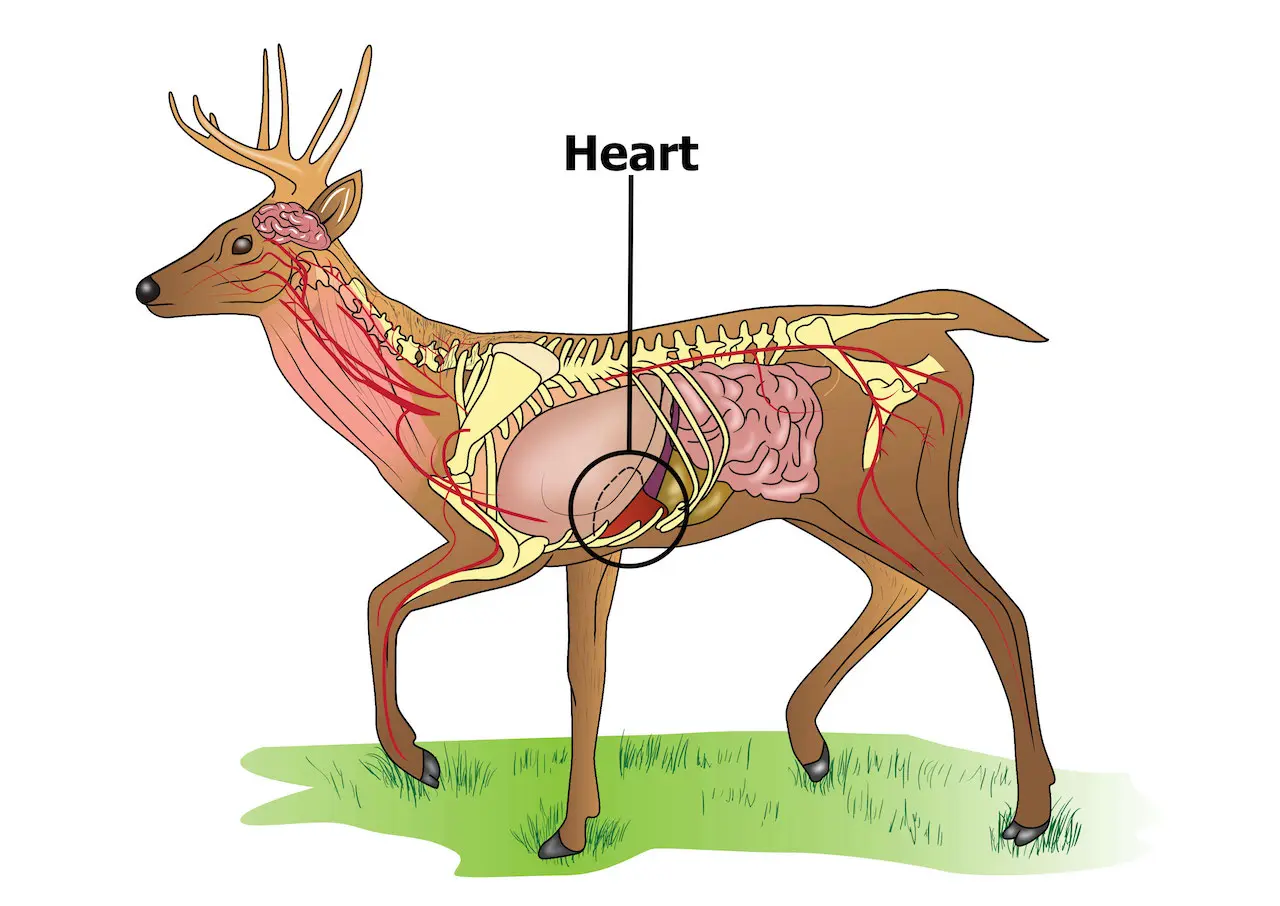

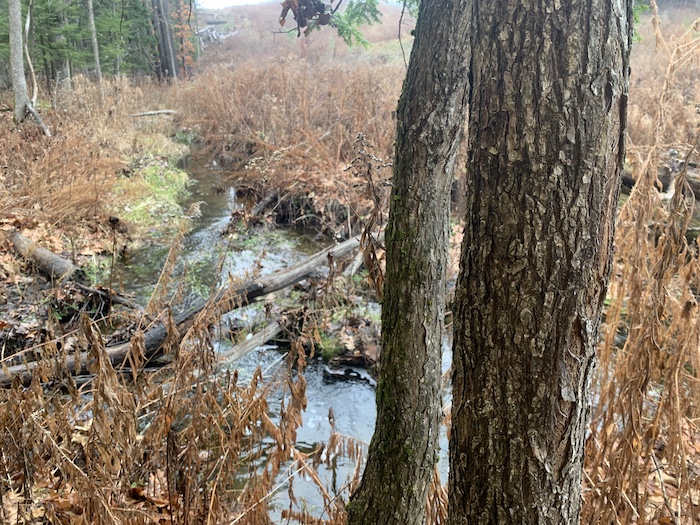
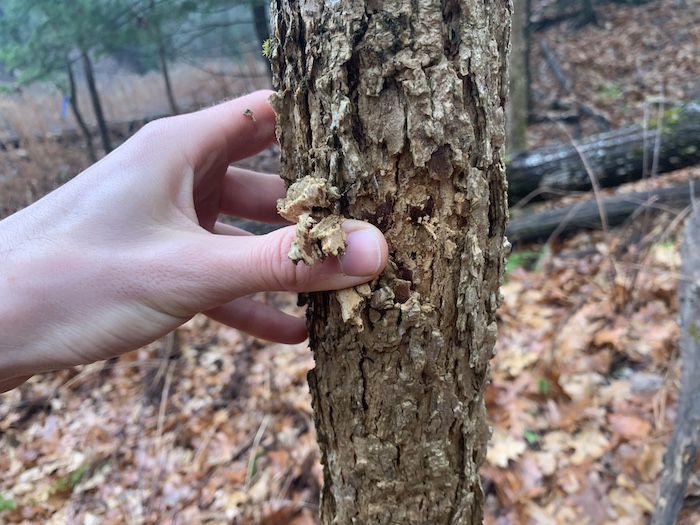
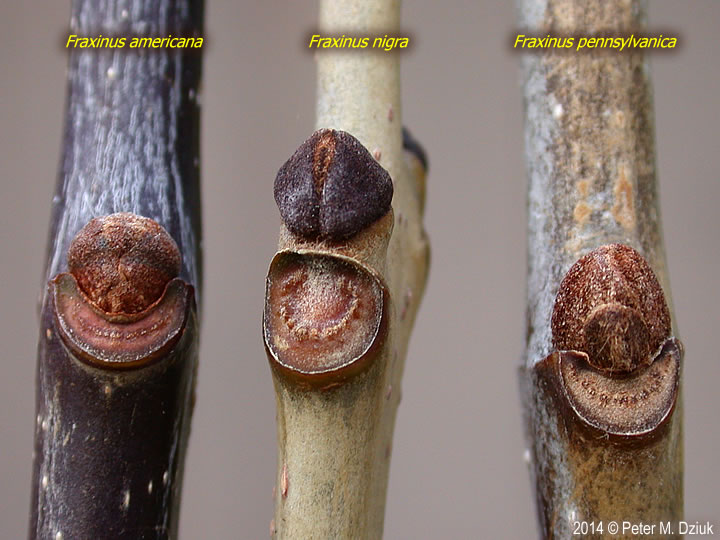
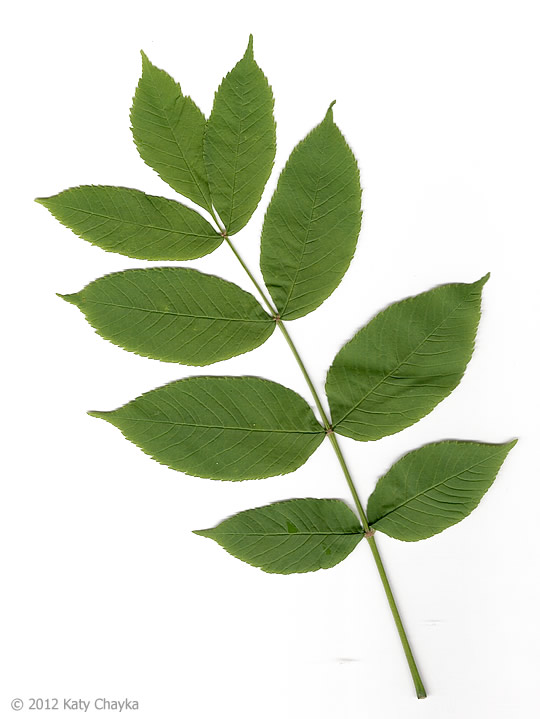
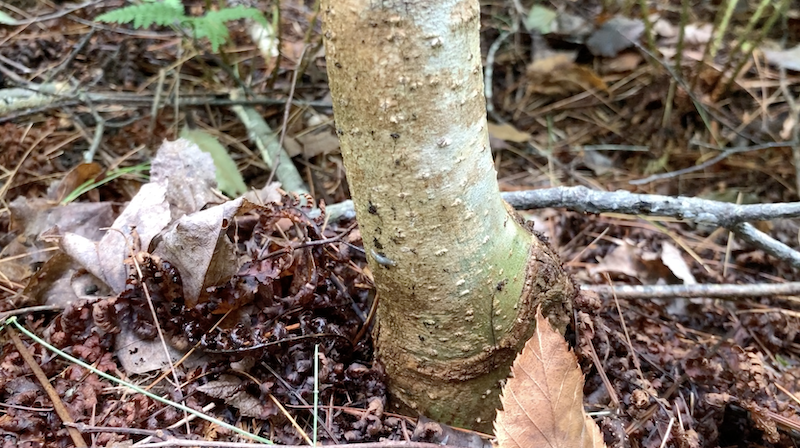
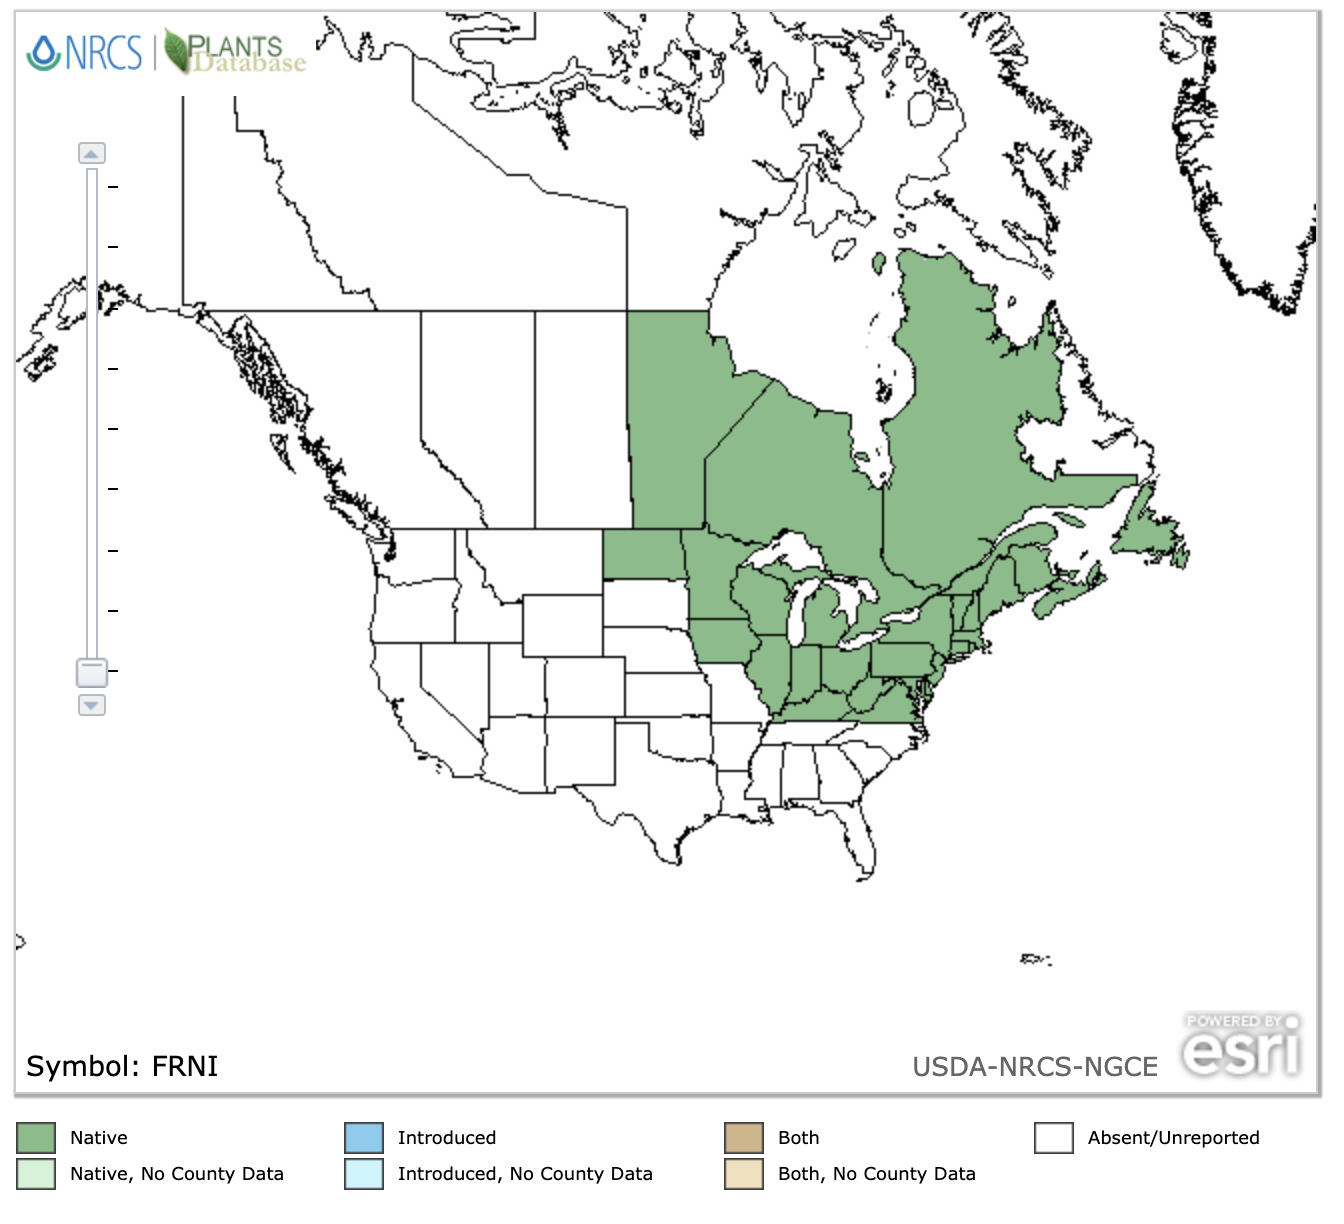


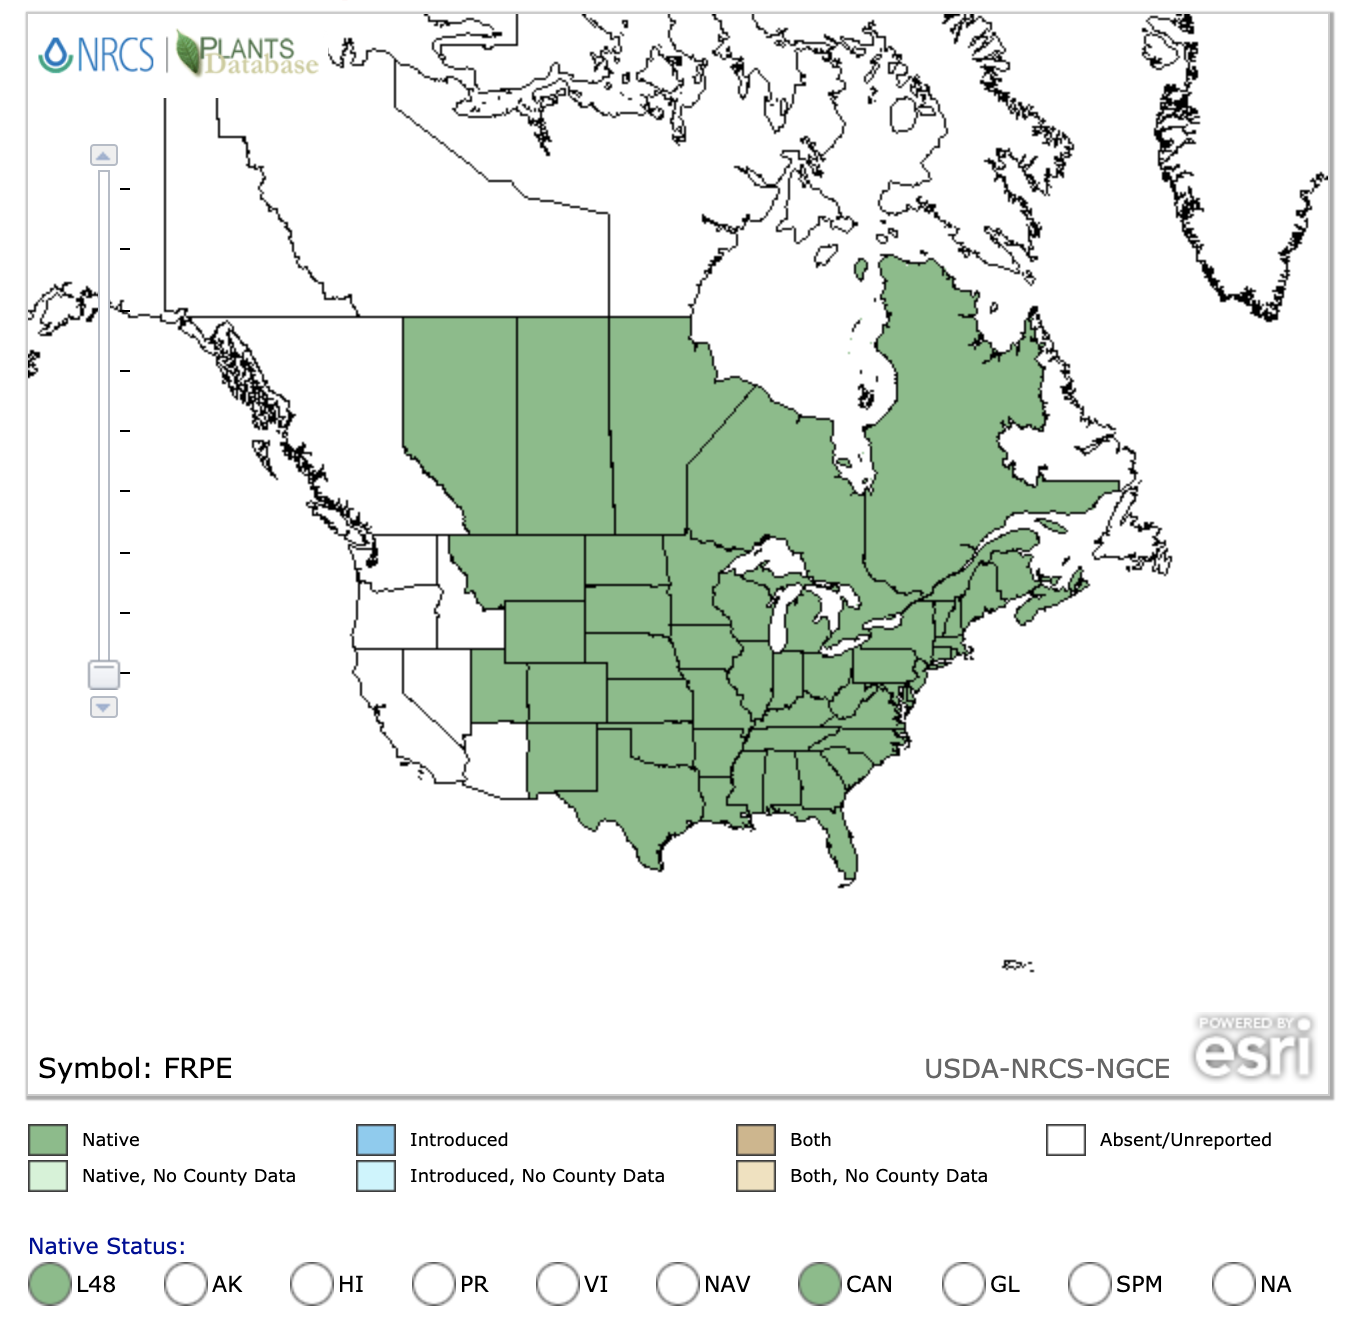
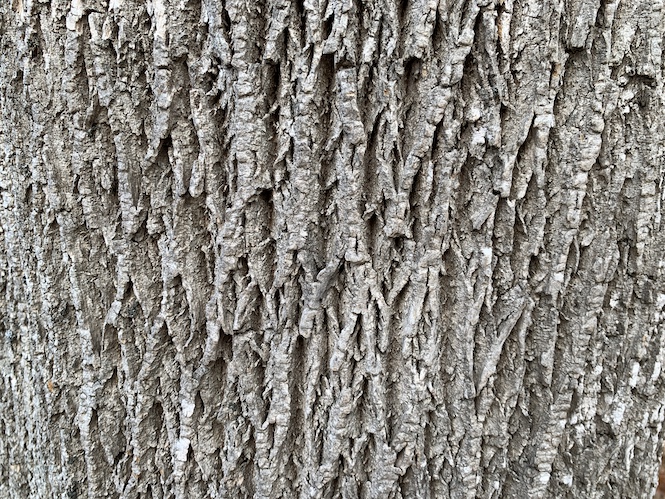
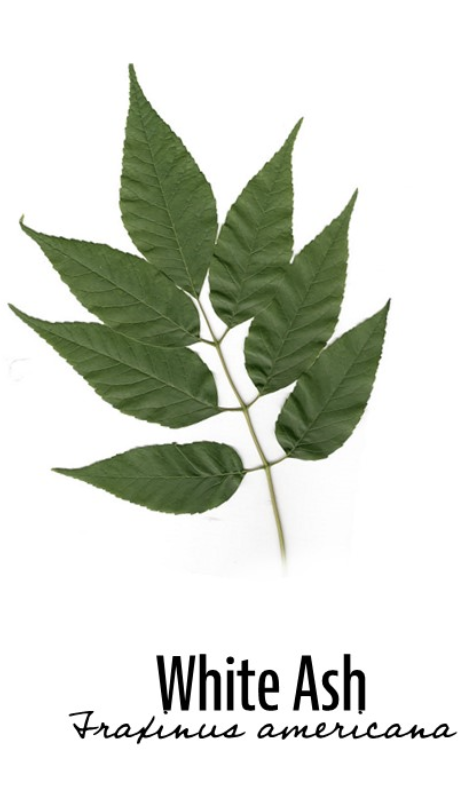
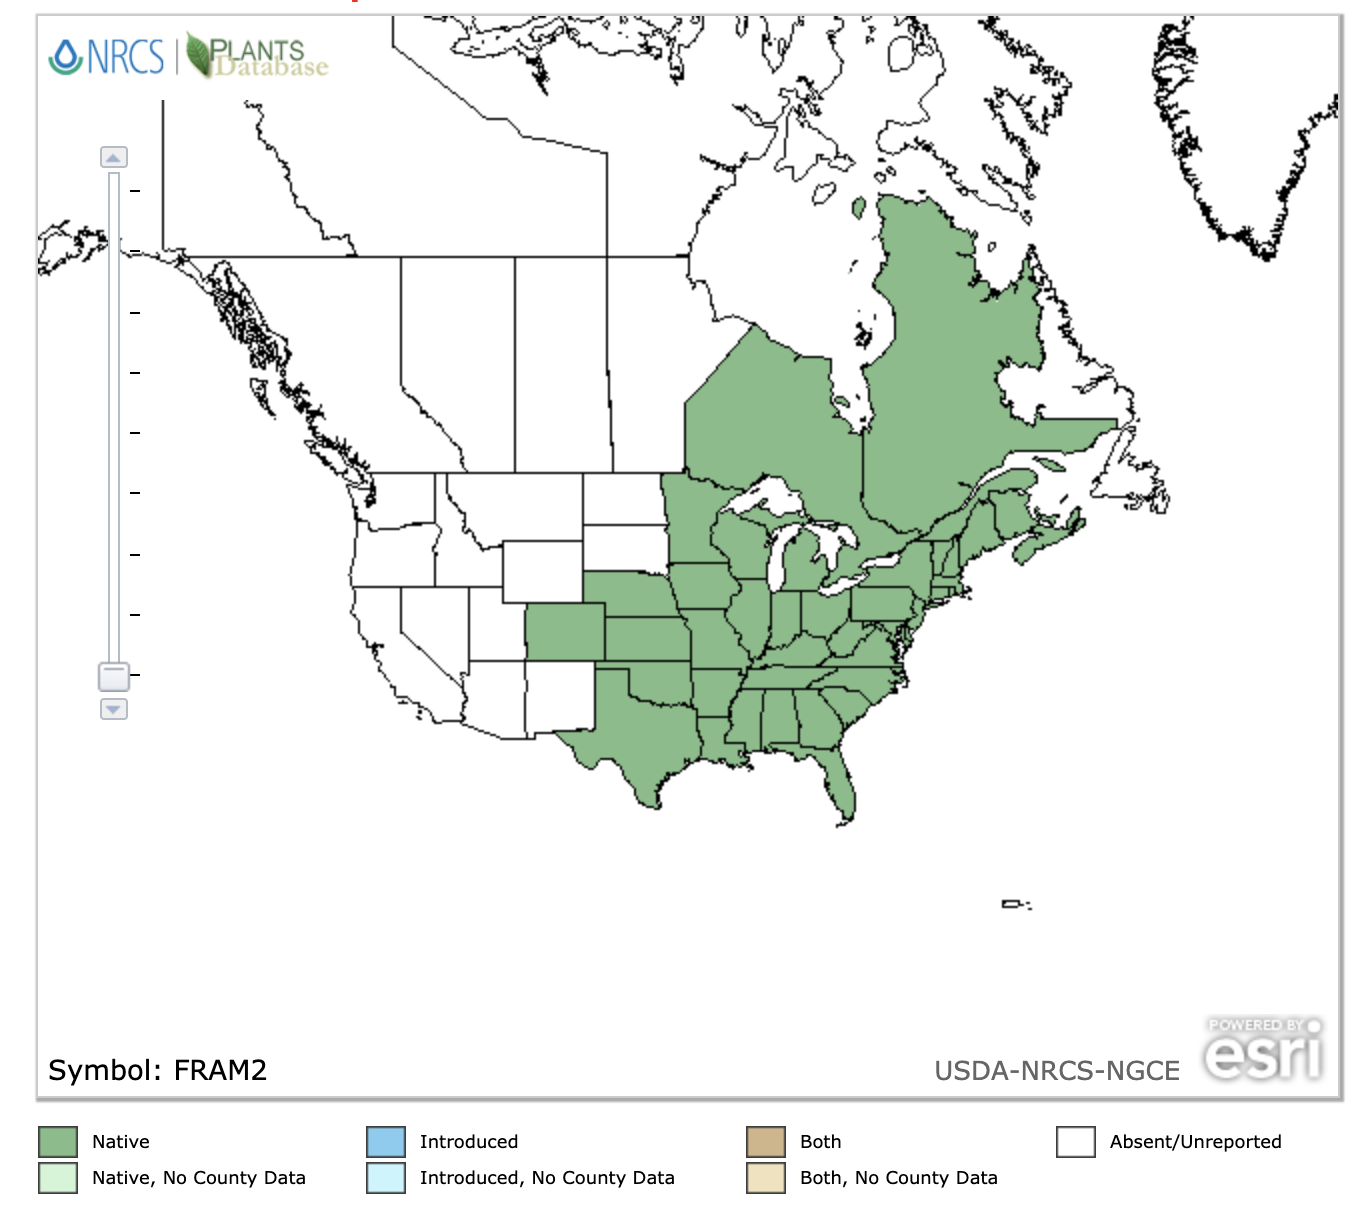
")

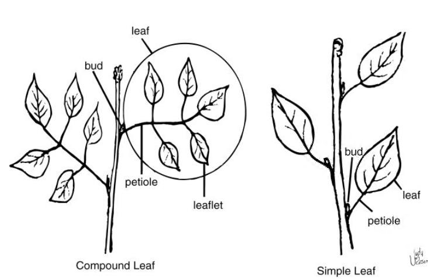
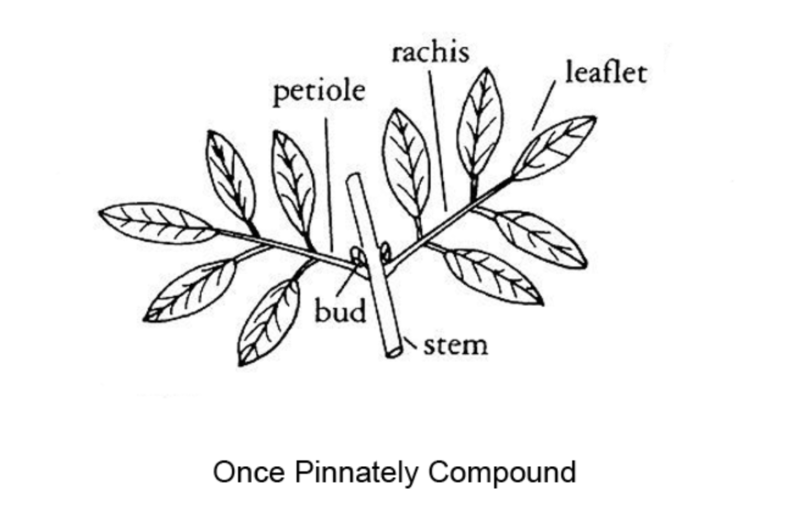
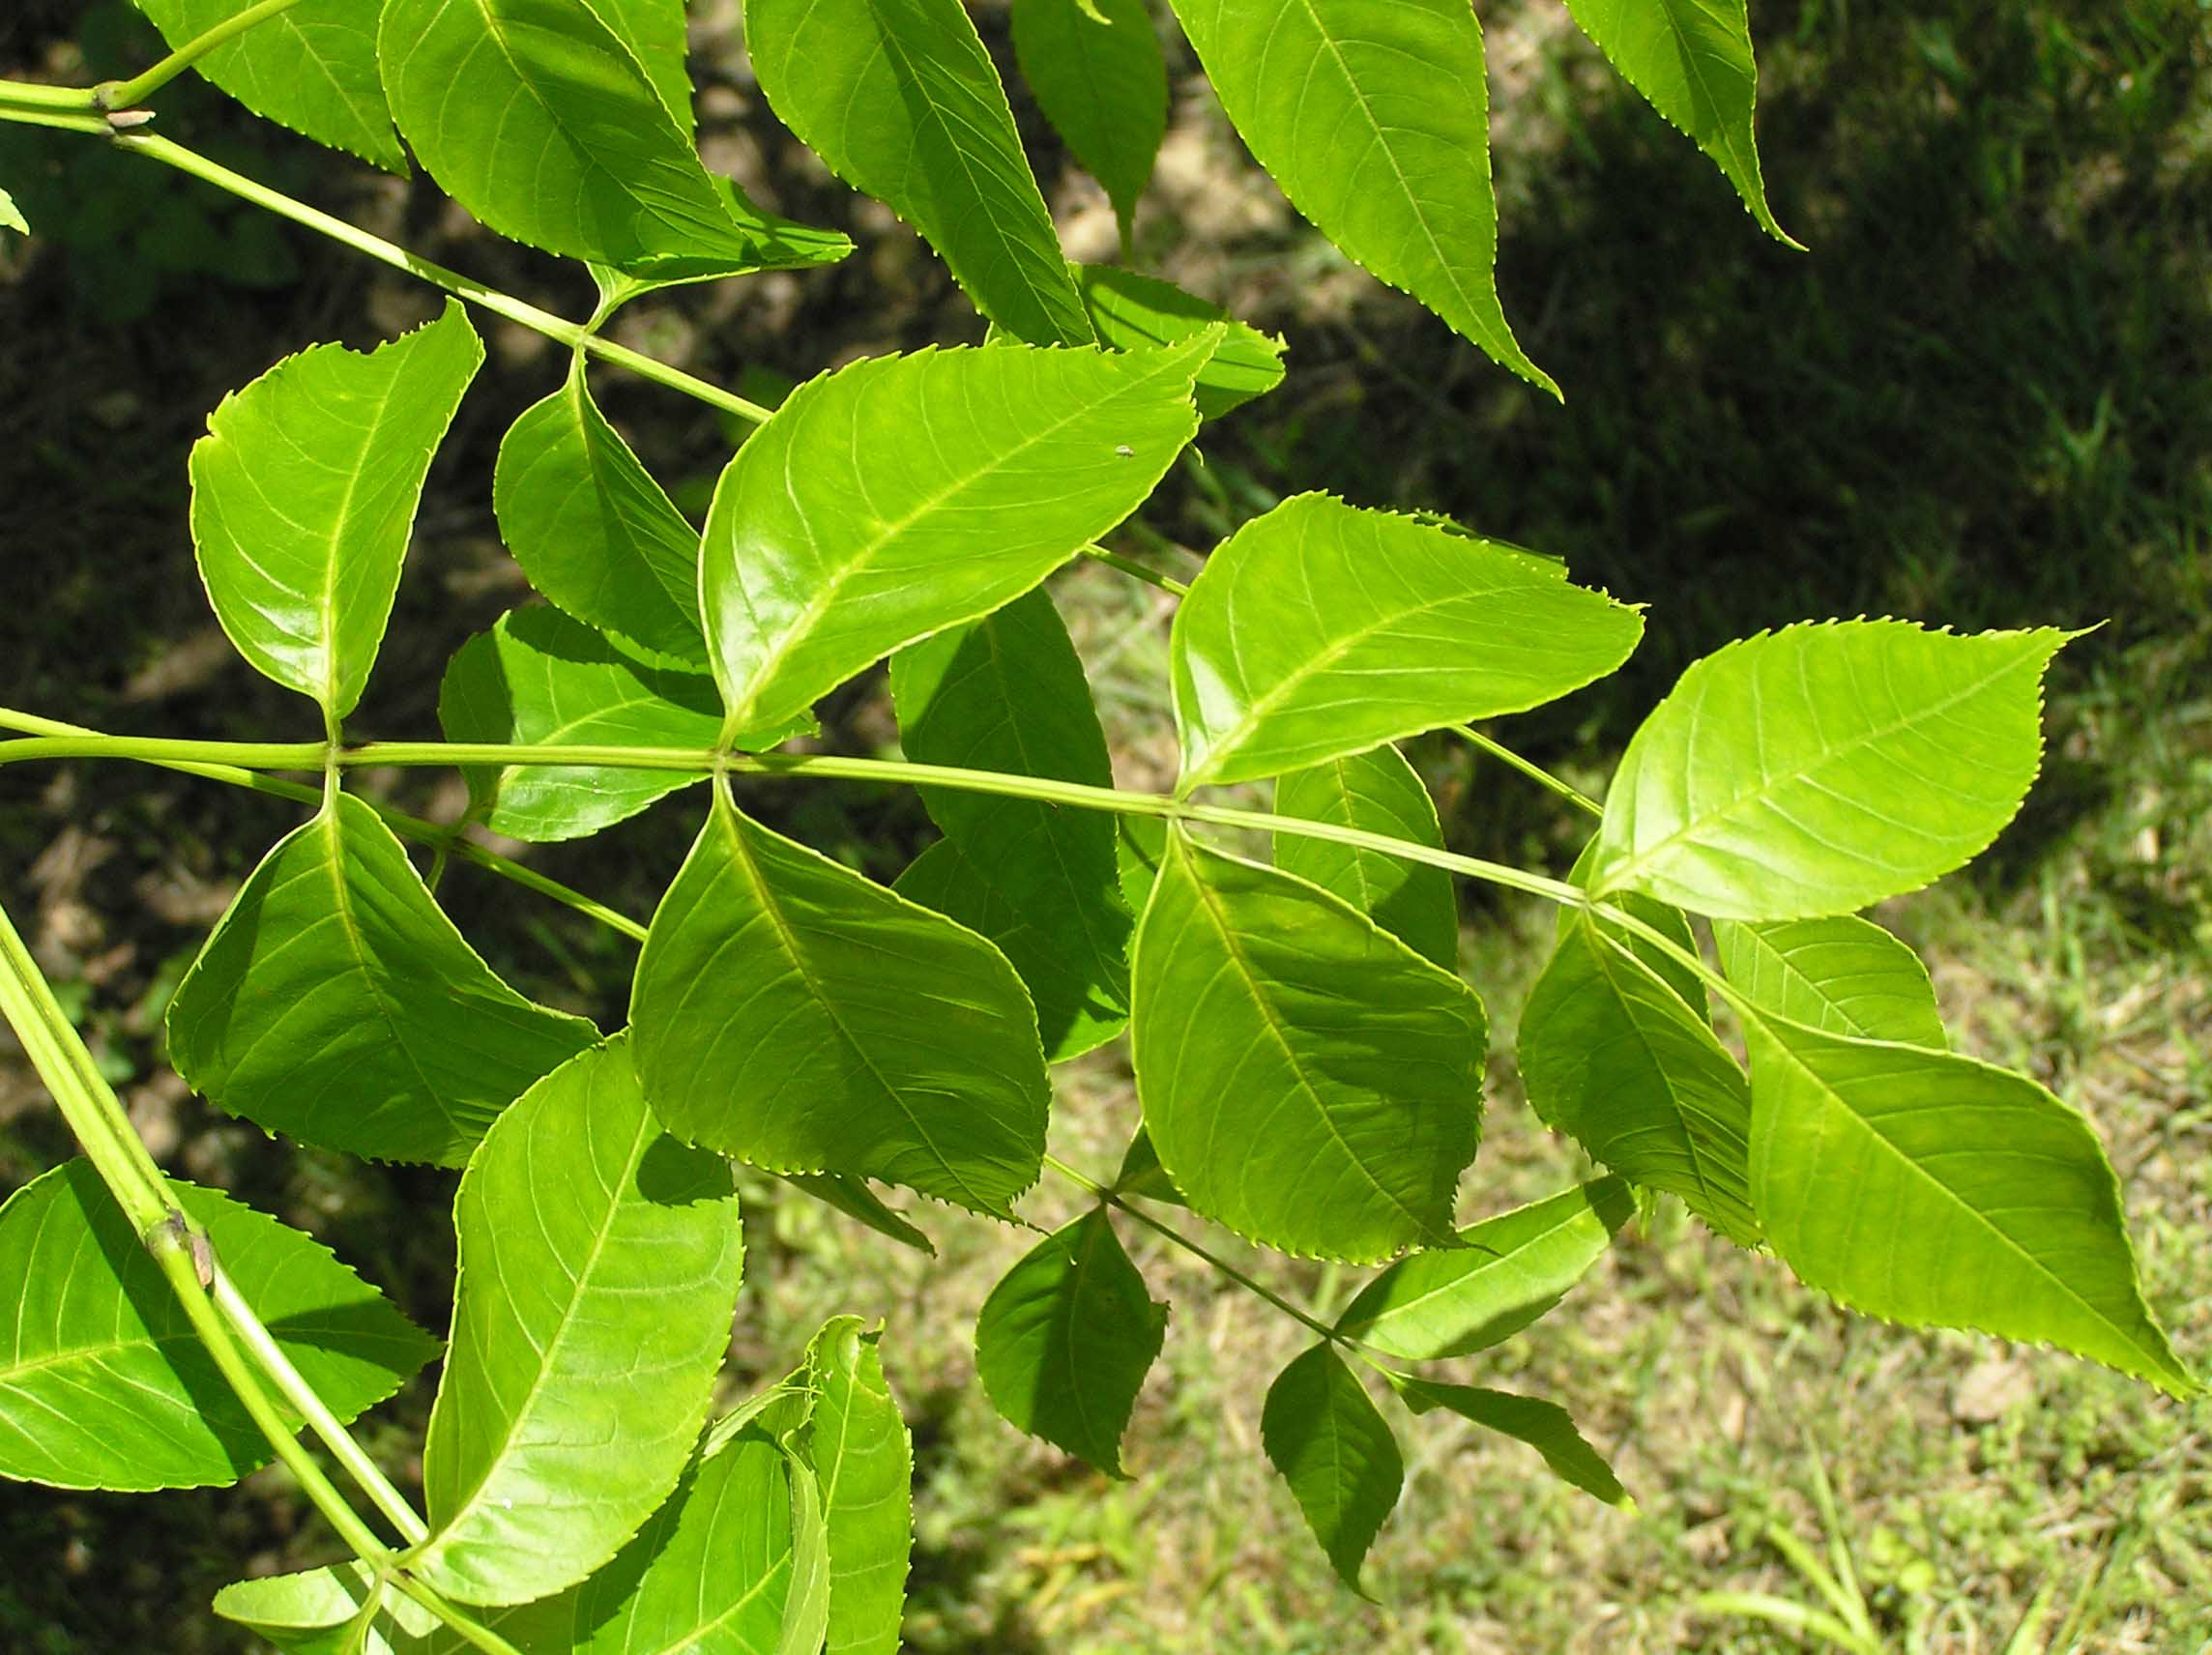


 leaf underside")

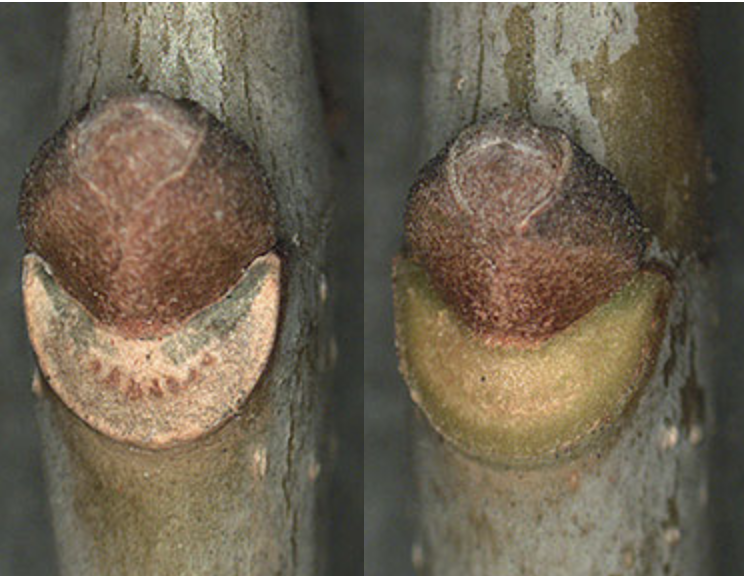
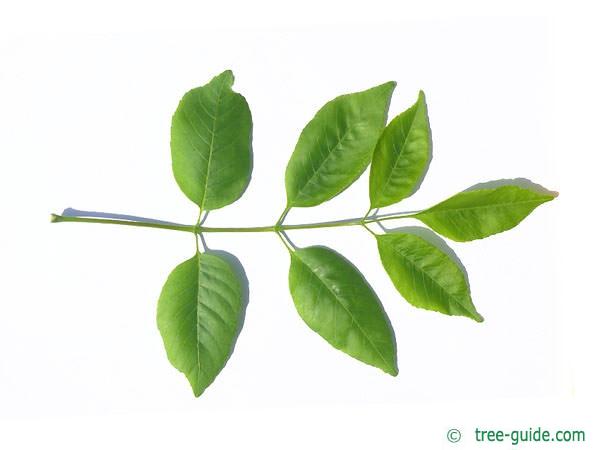
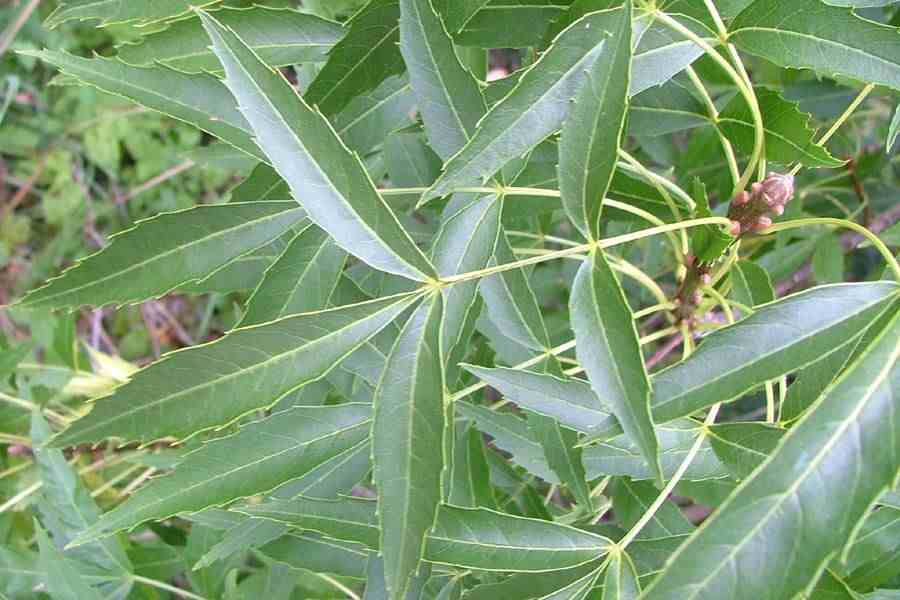


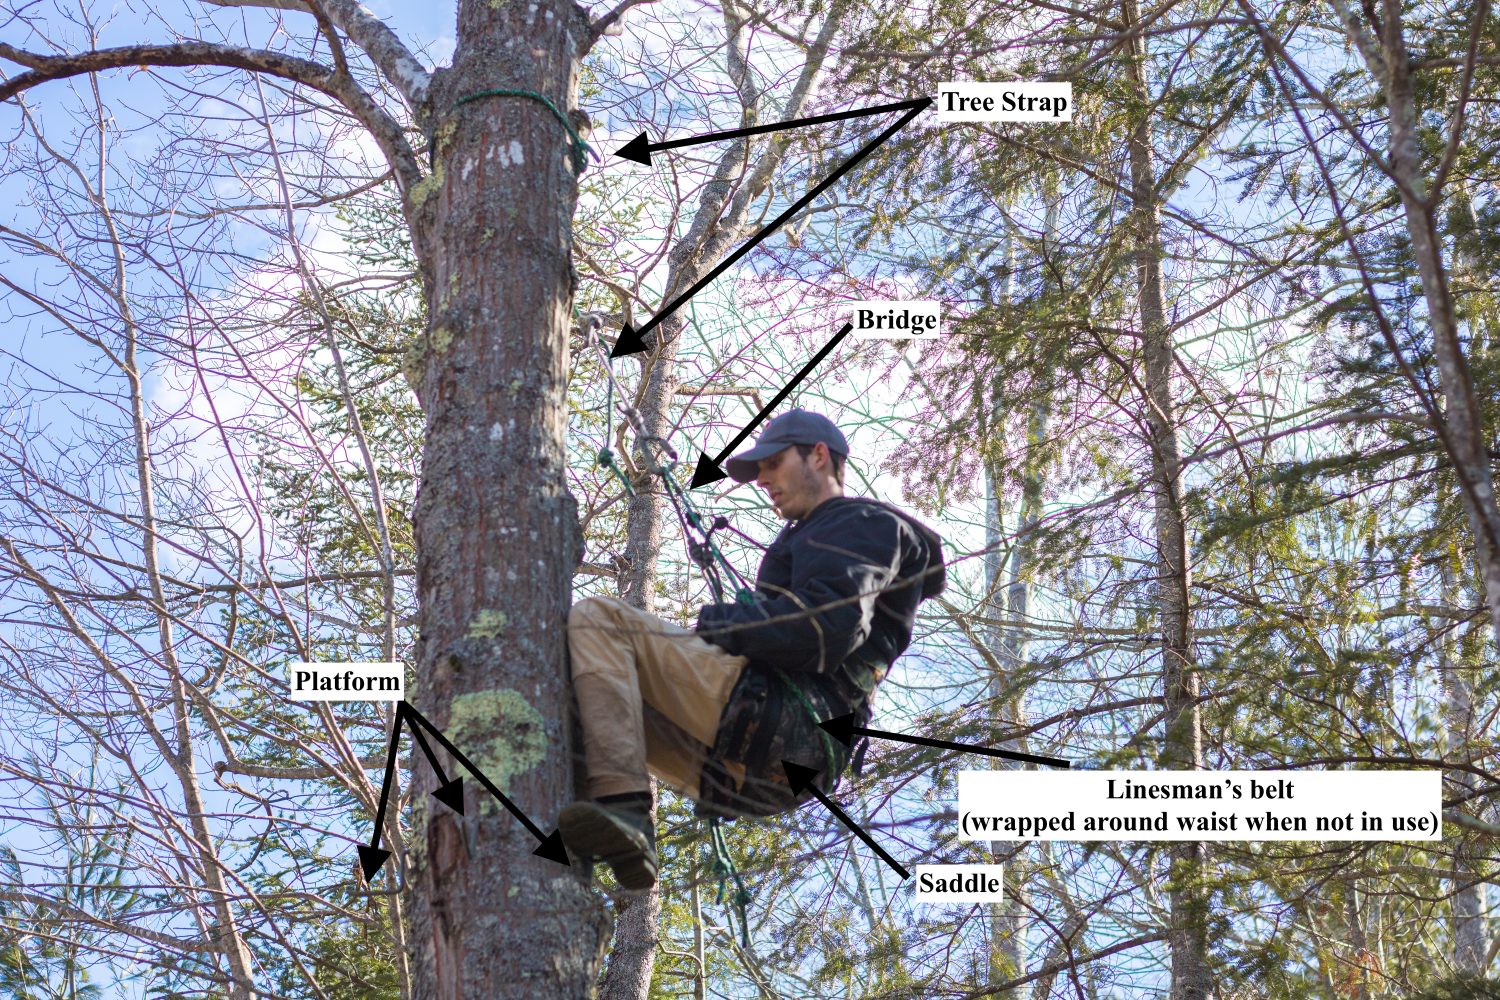
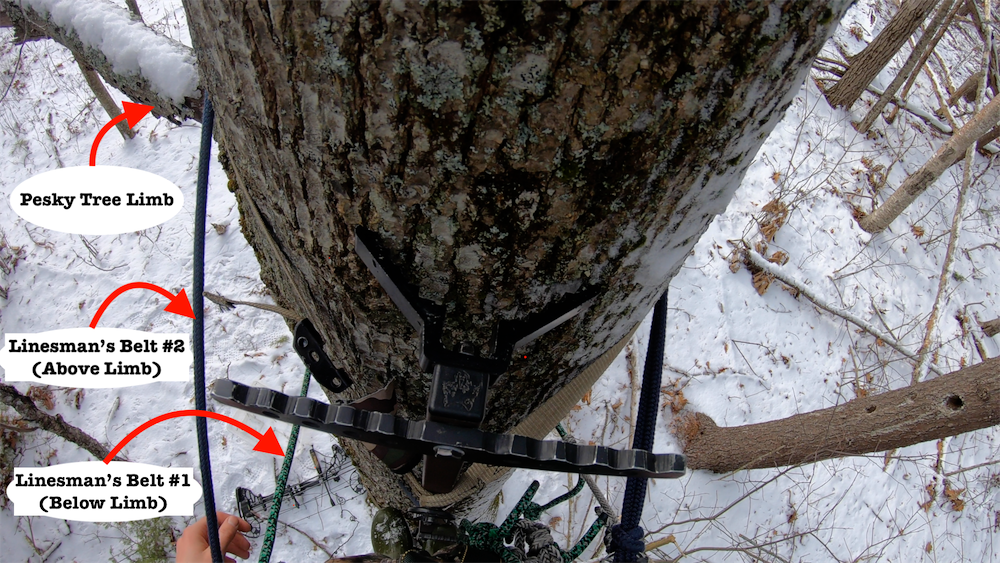
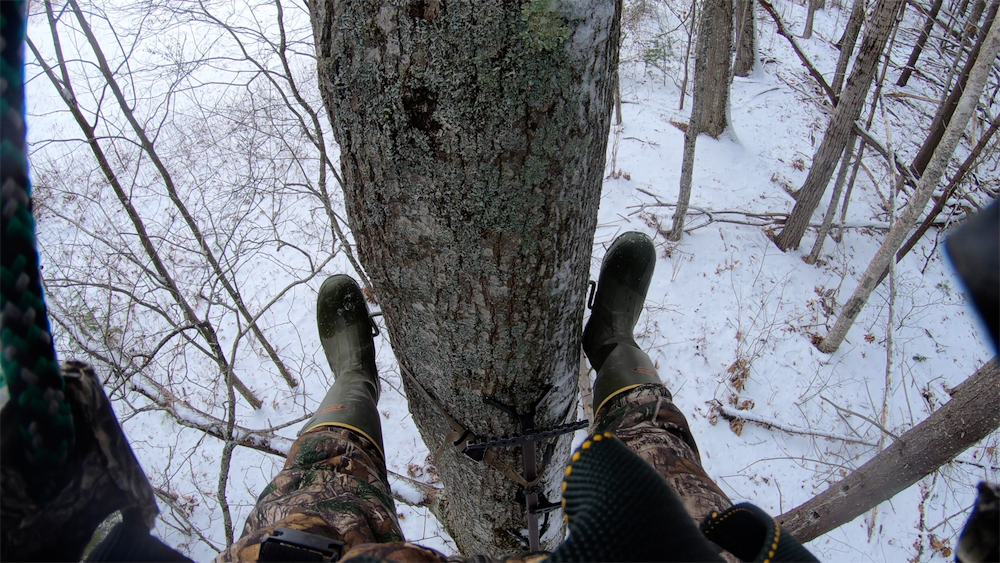
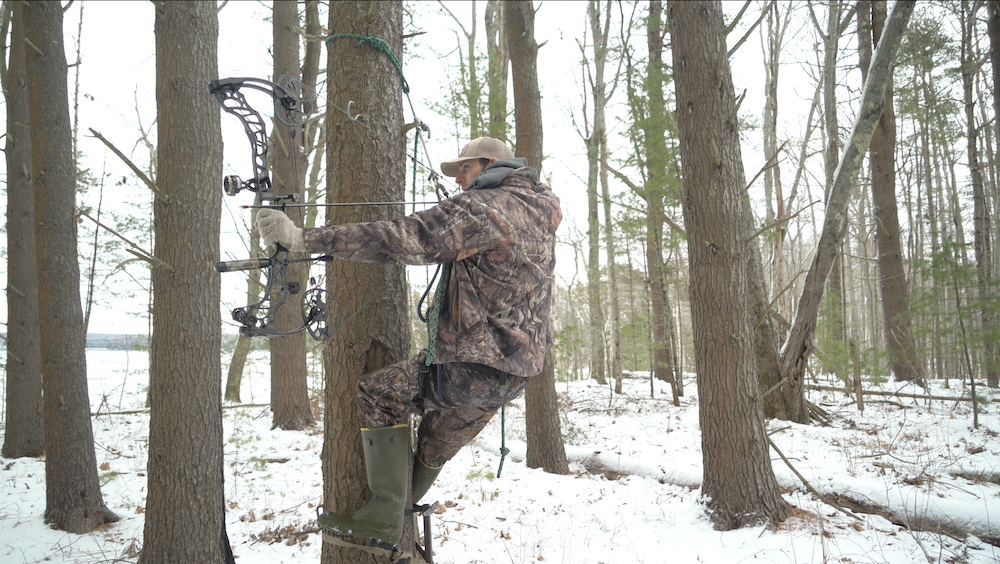
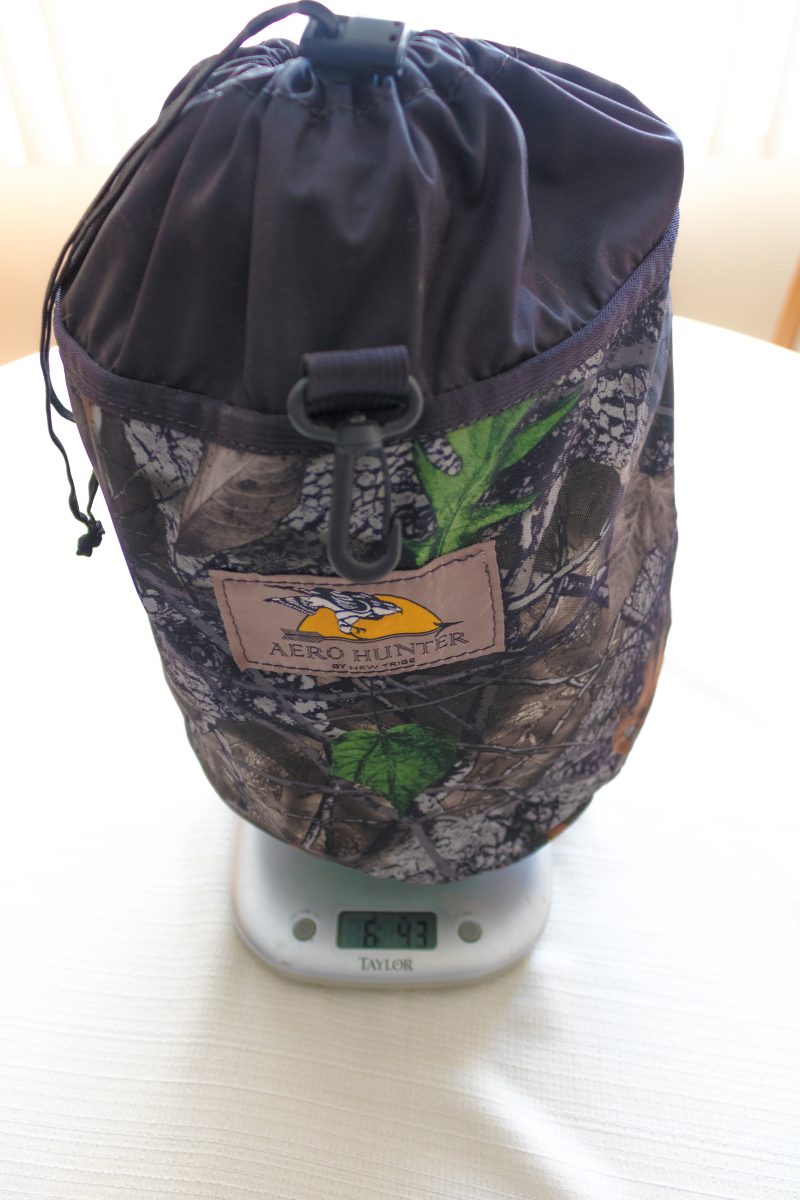
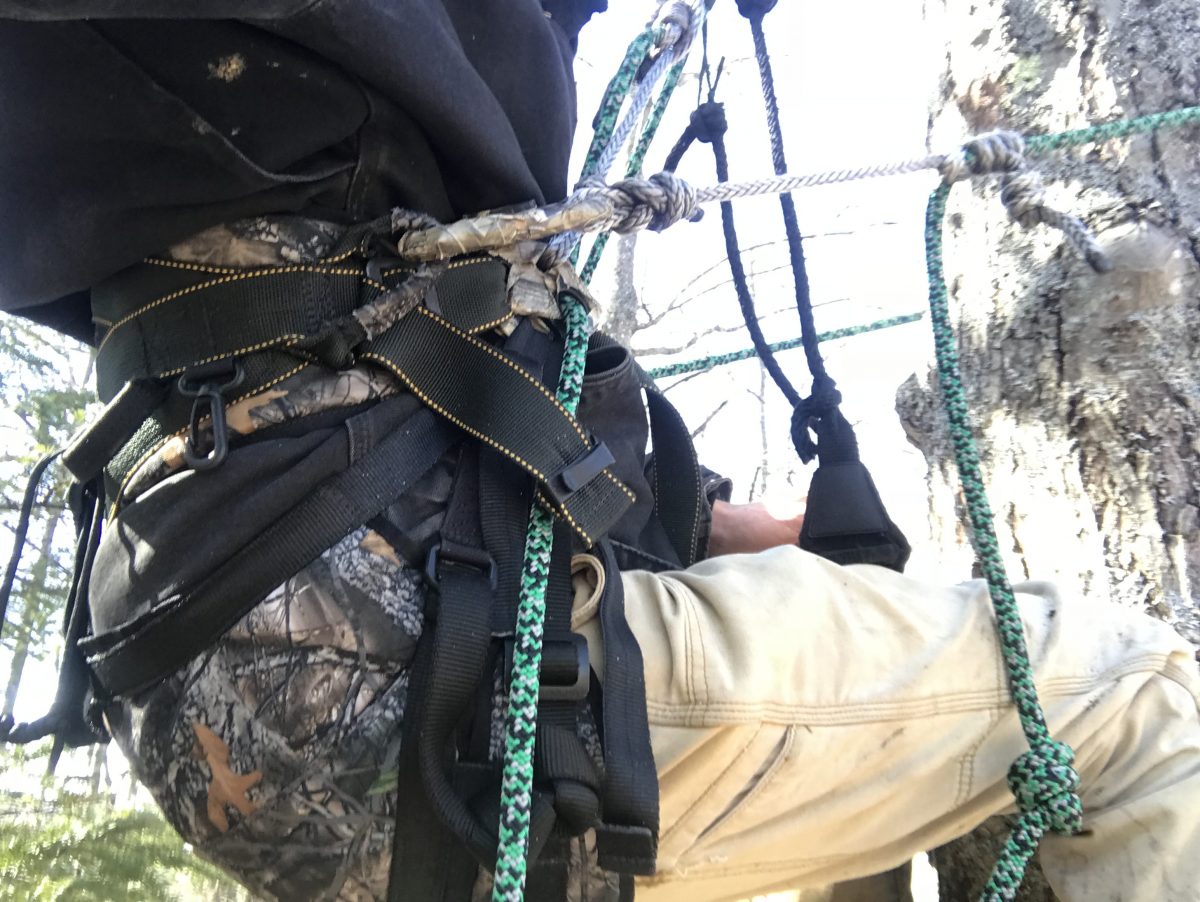
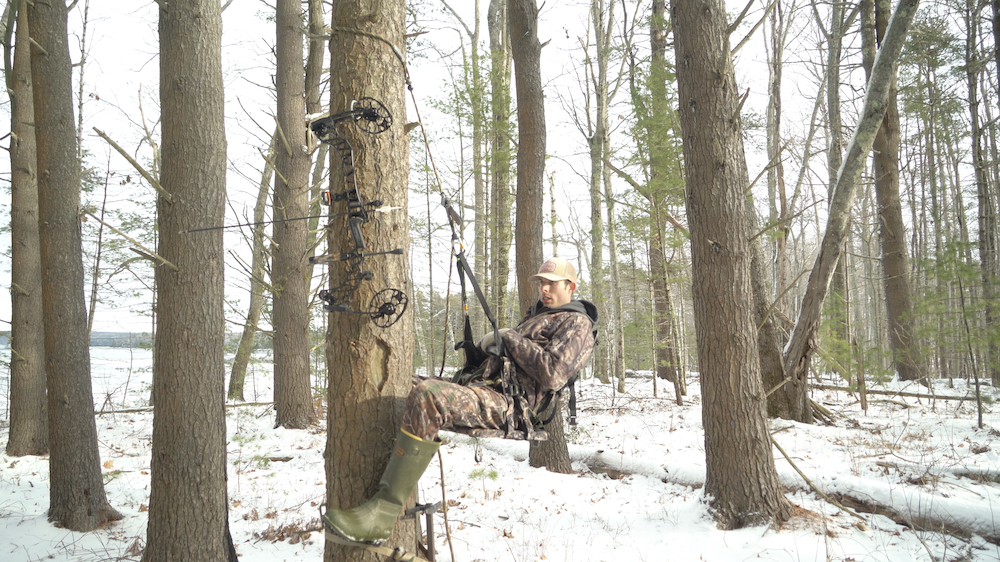


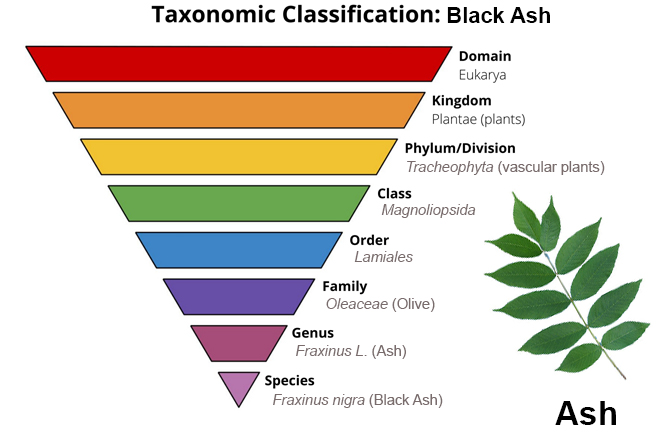
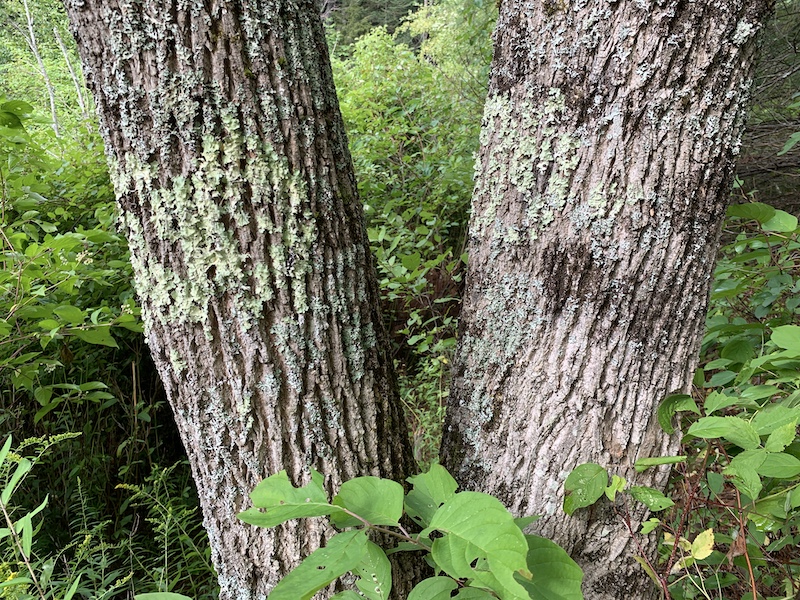

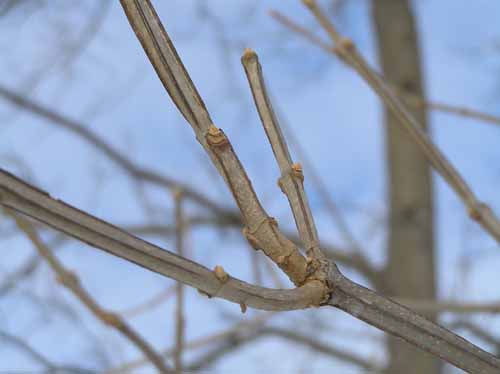


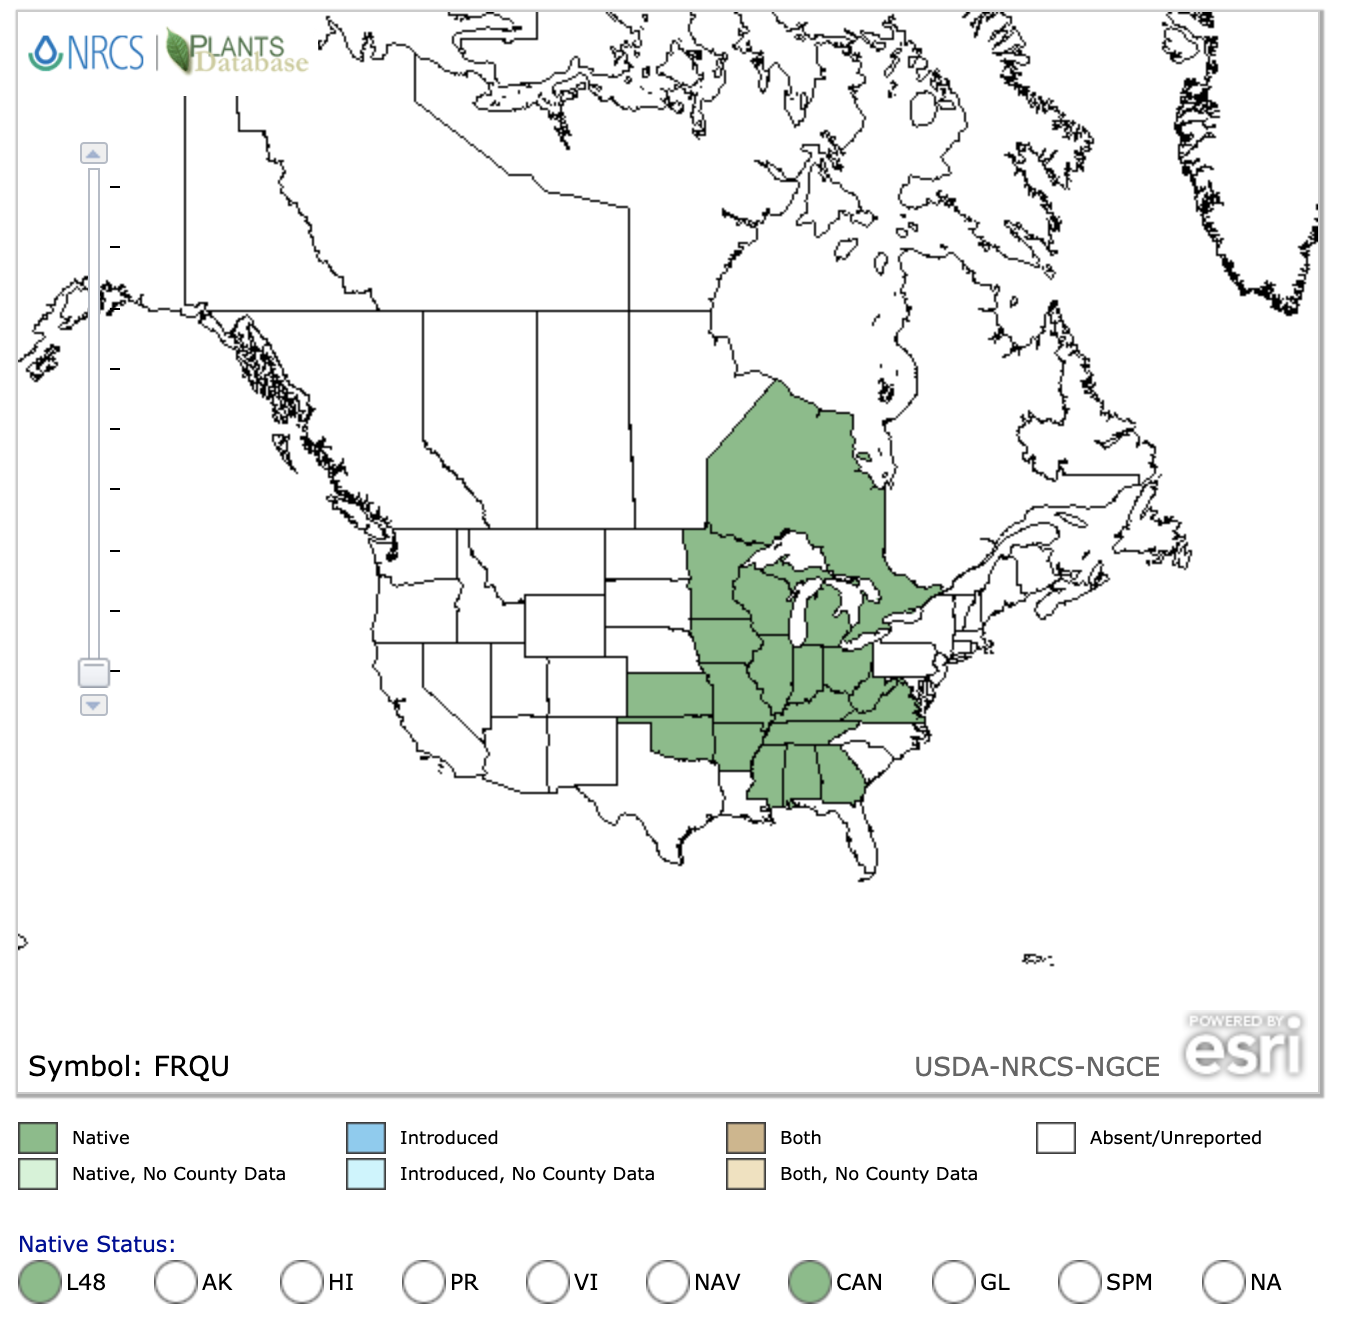
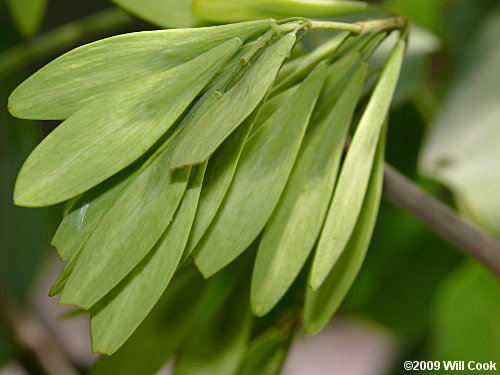
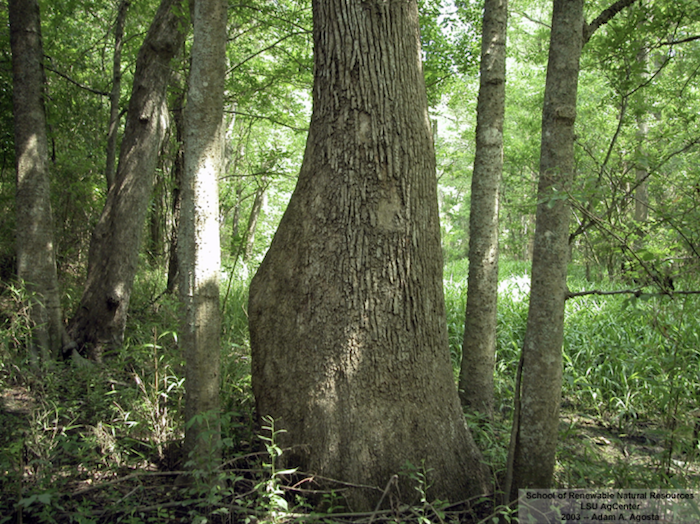
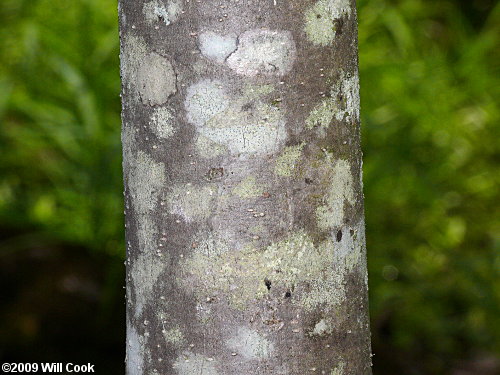
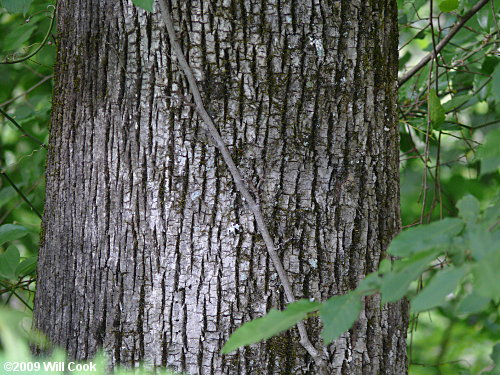


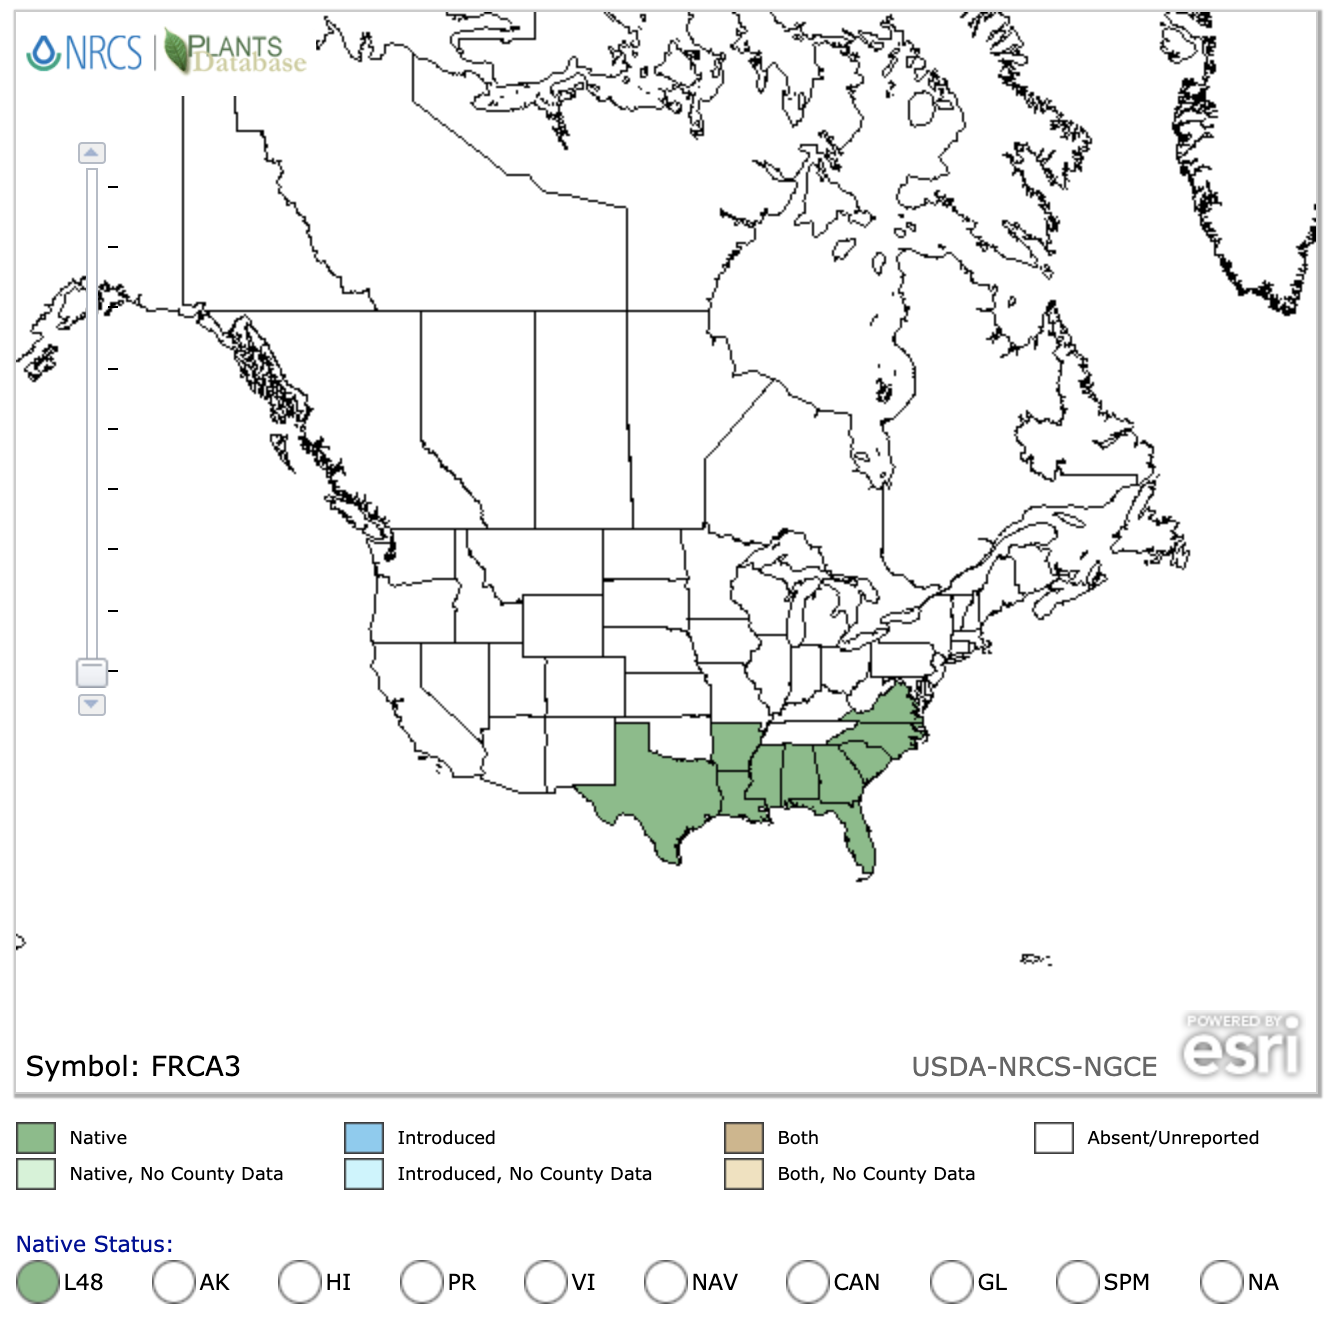
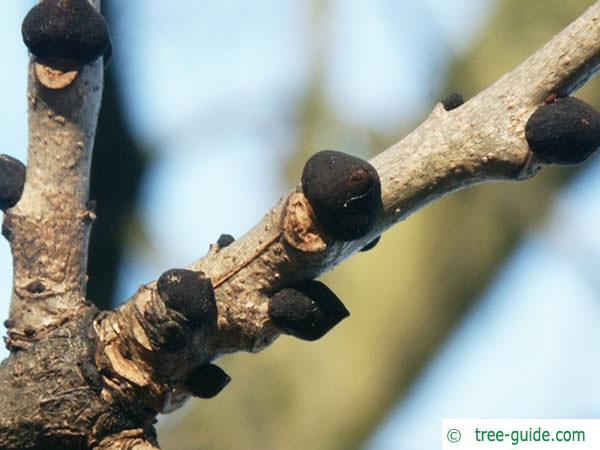
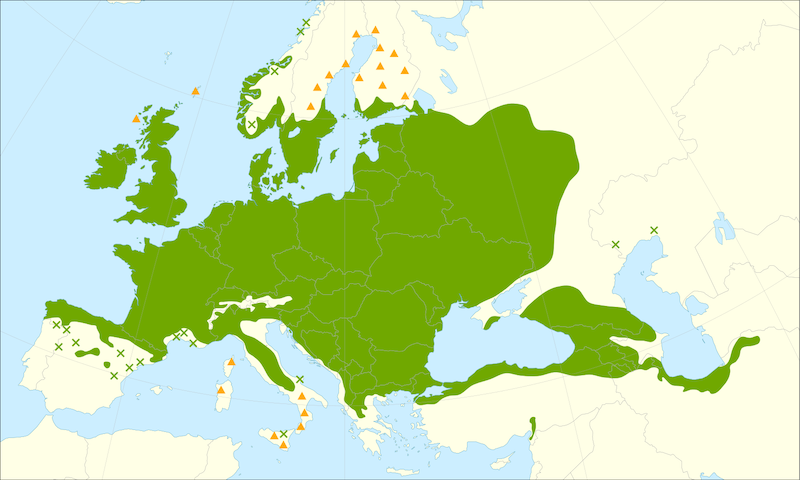

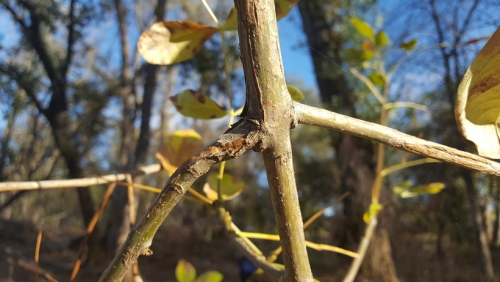
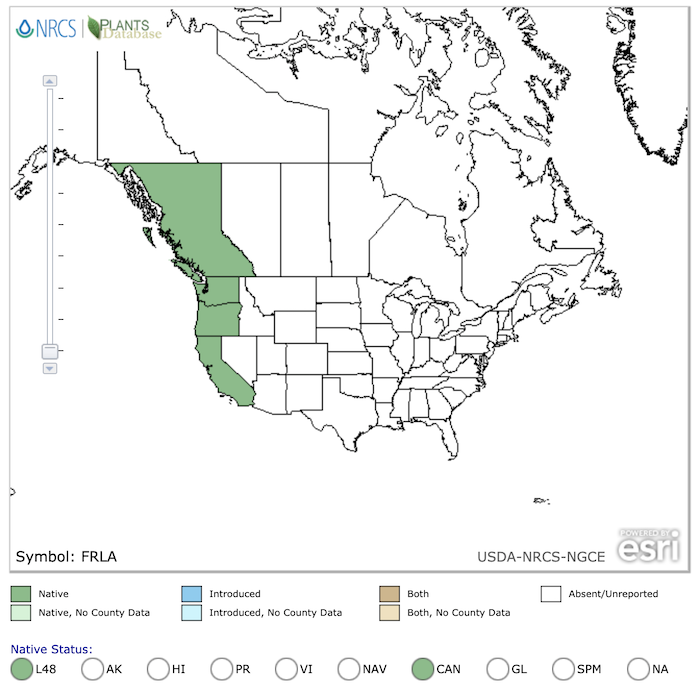

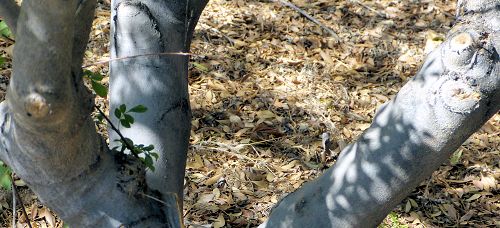
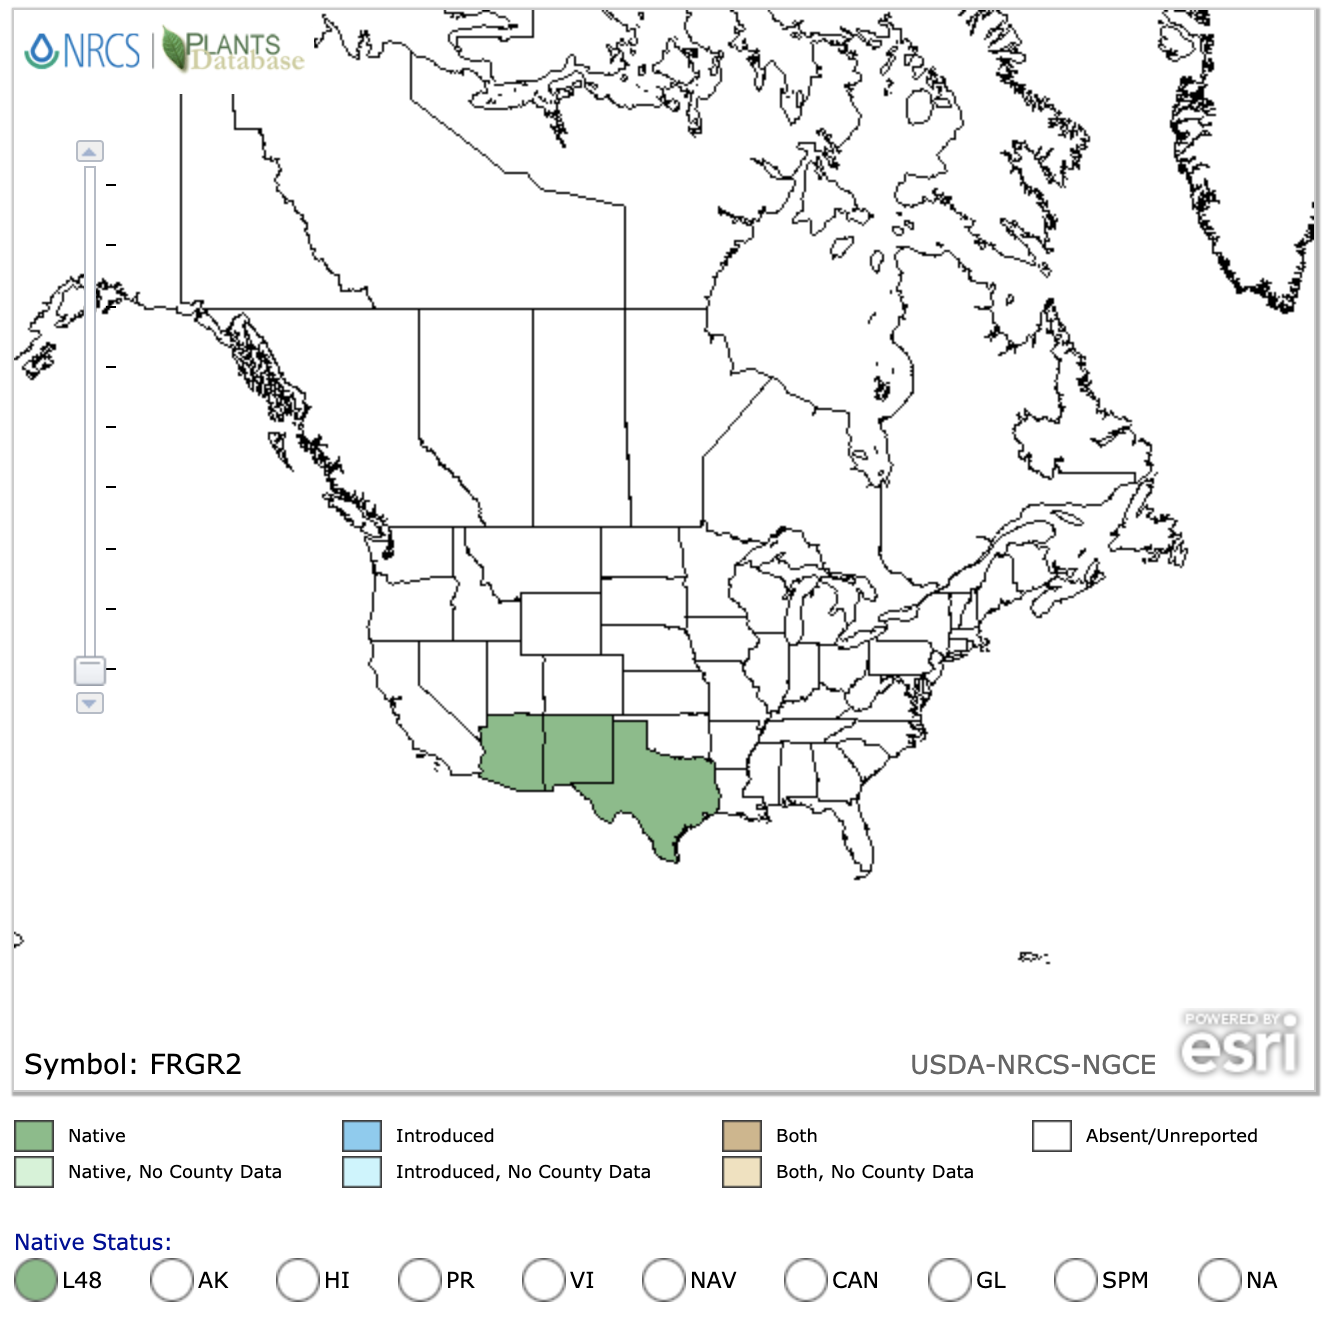
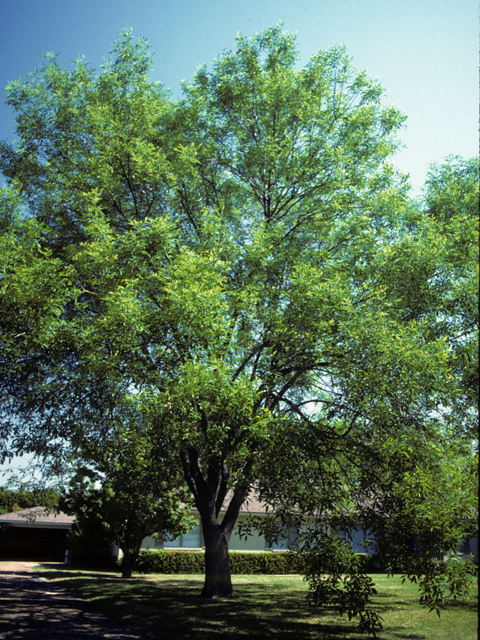
 buds")
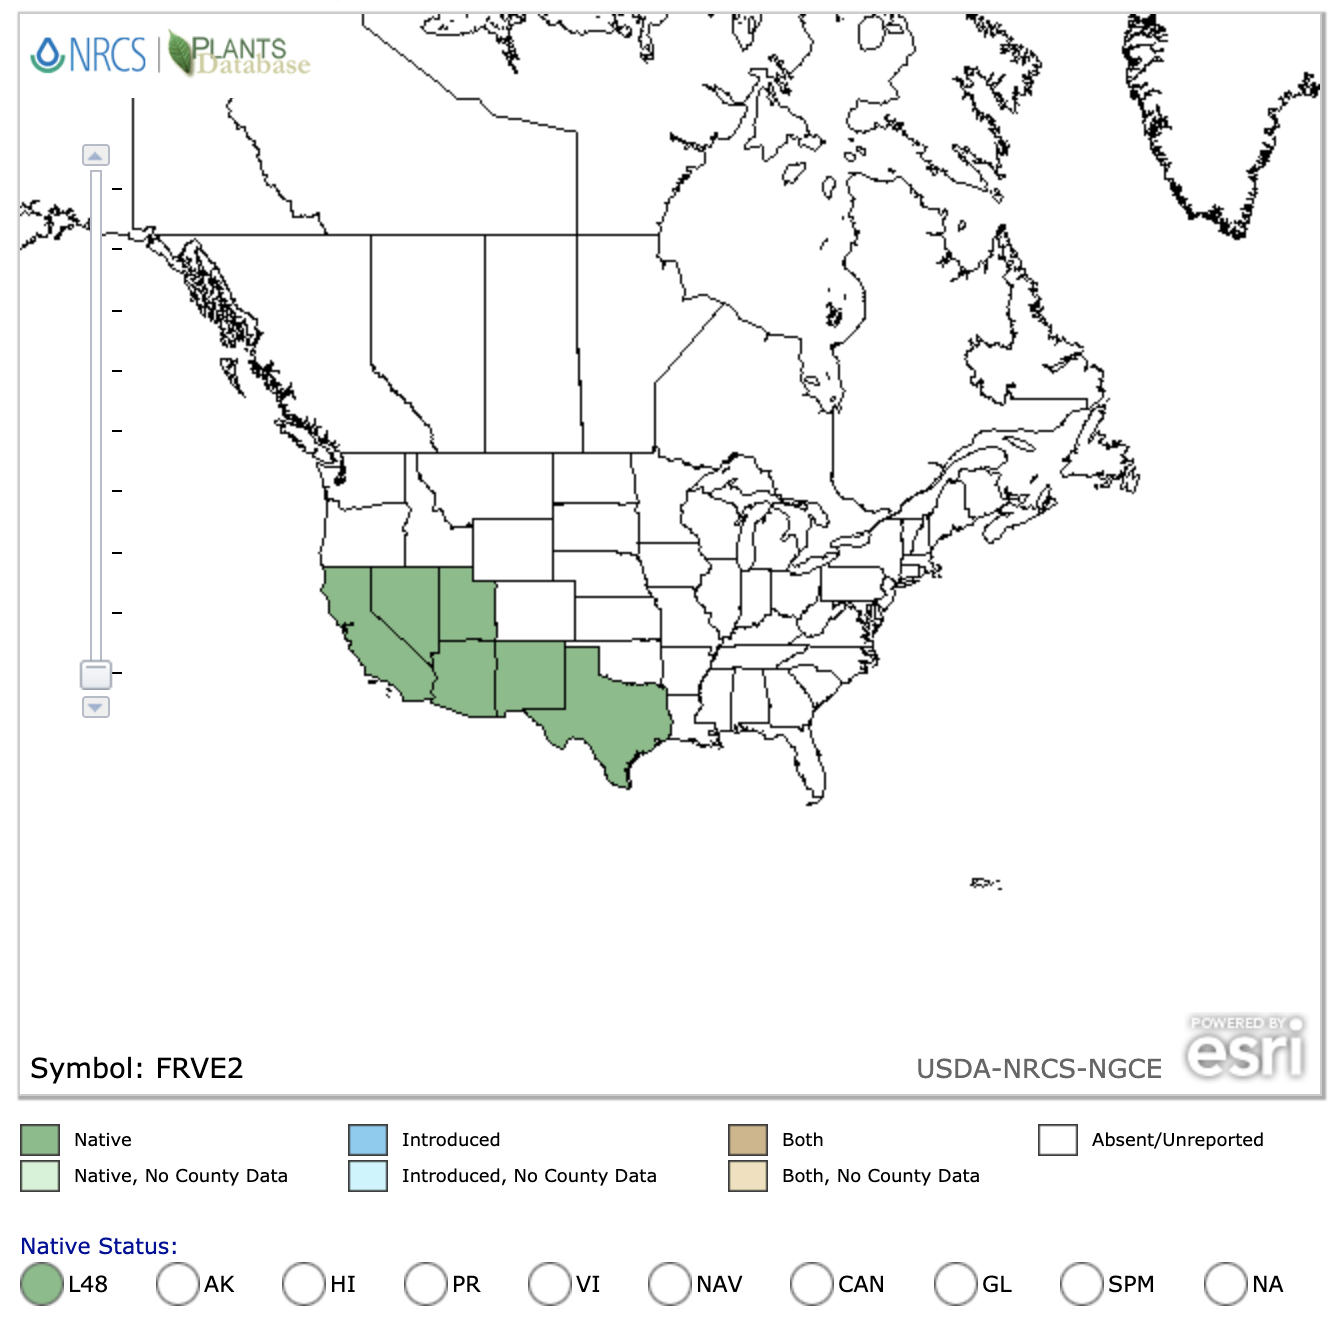


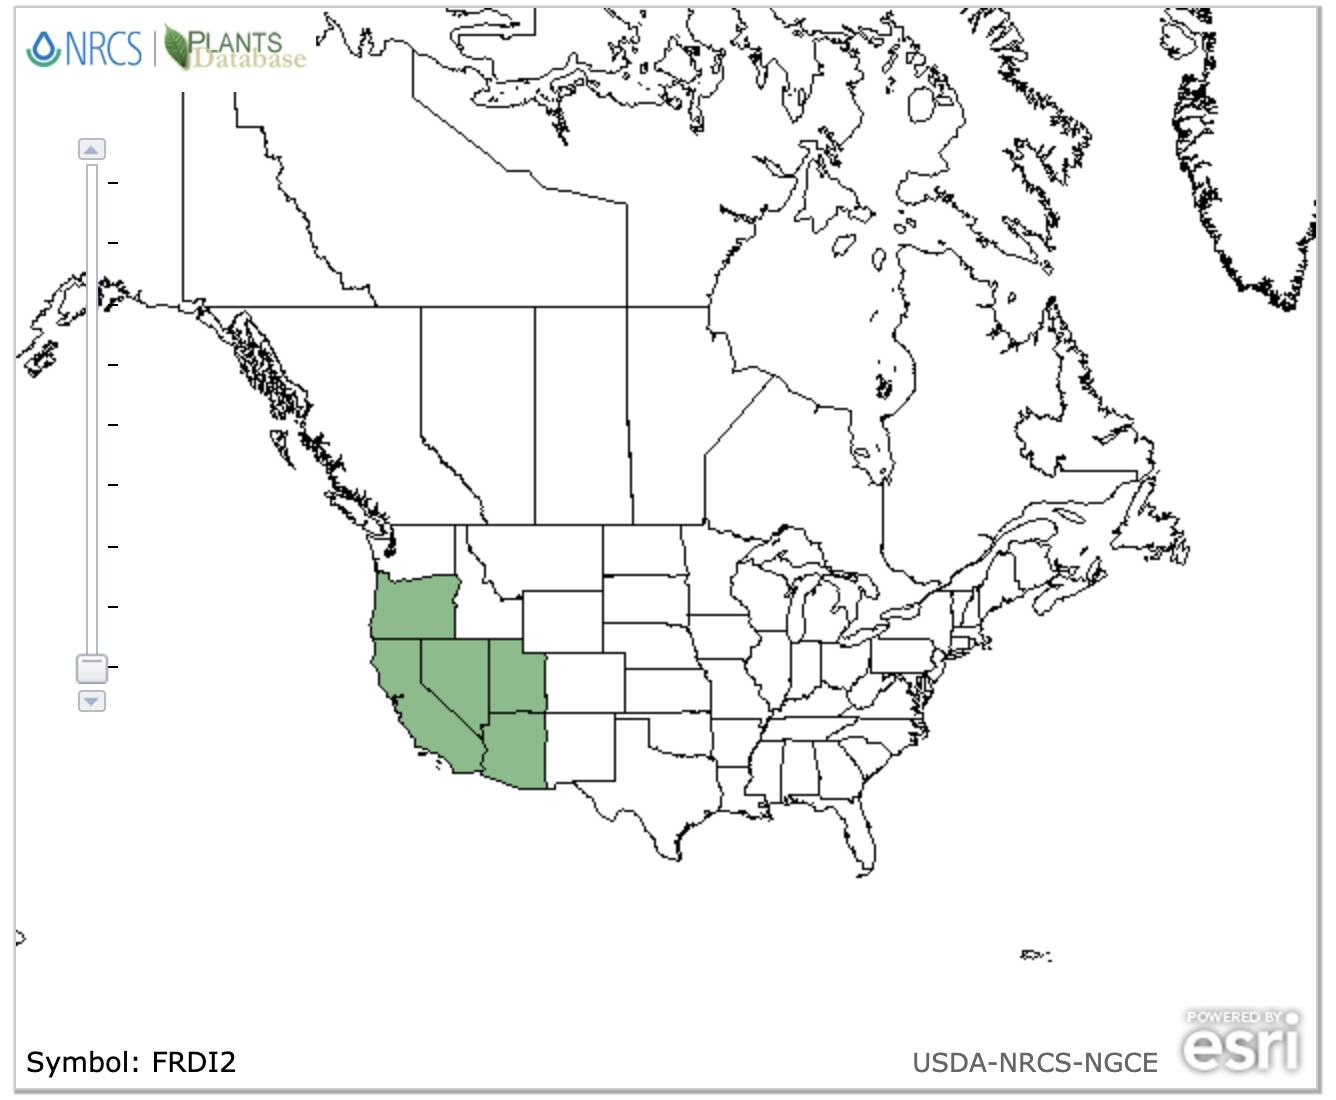

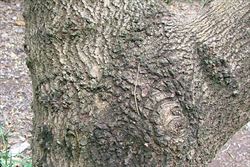

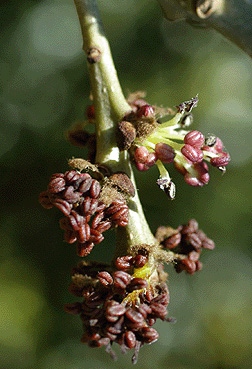


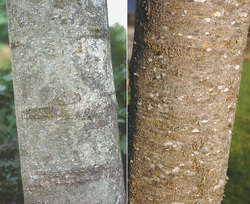


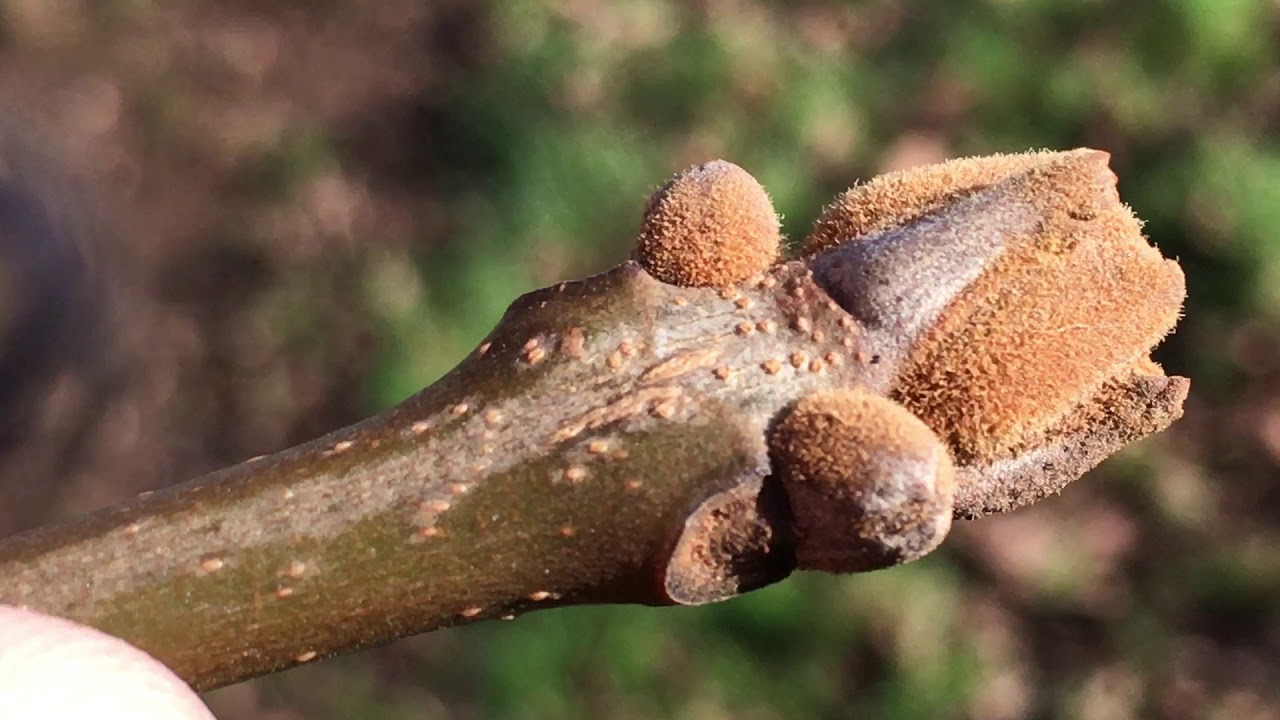

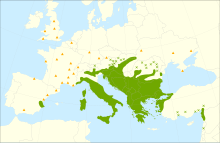
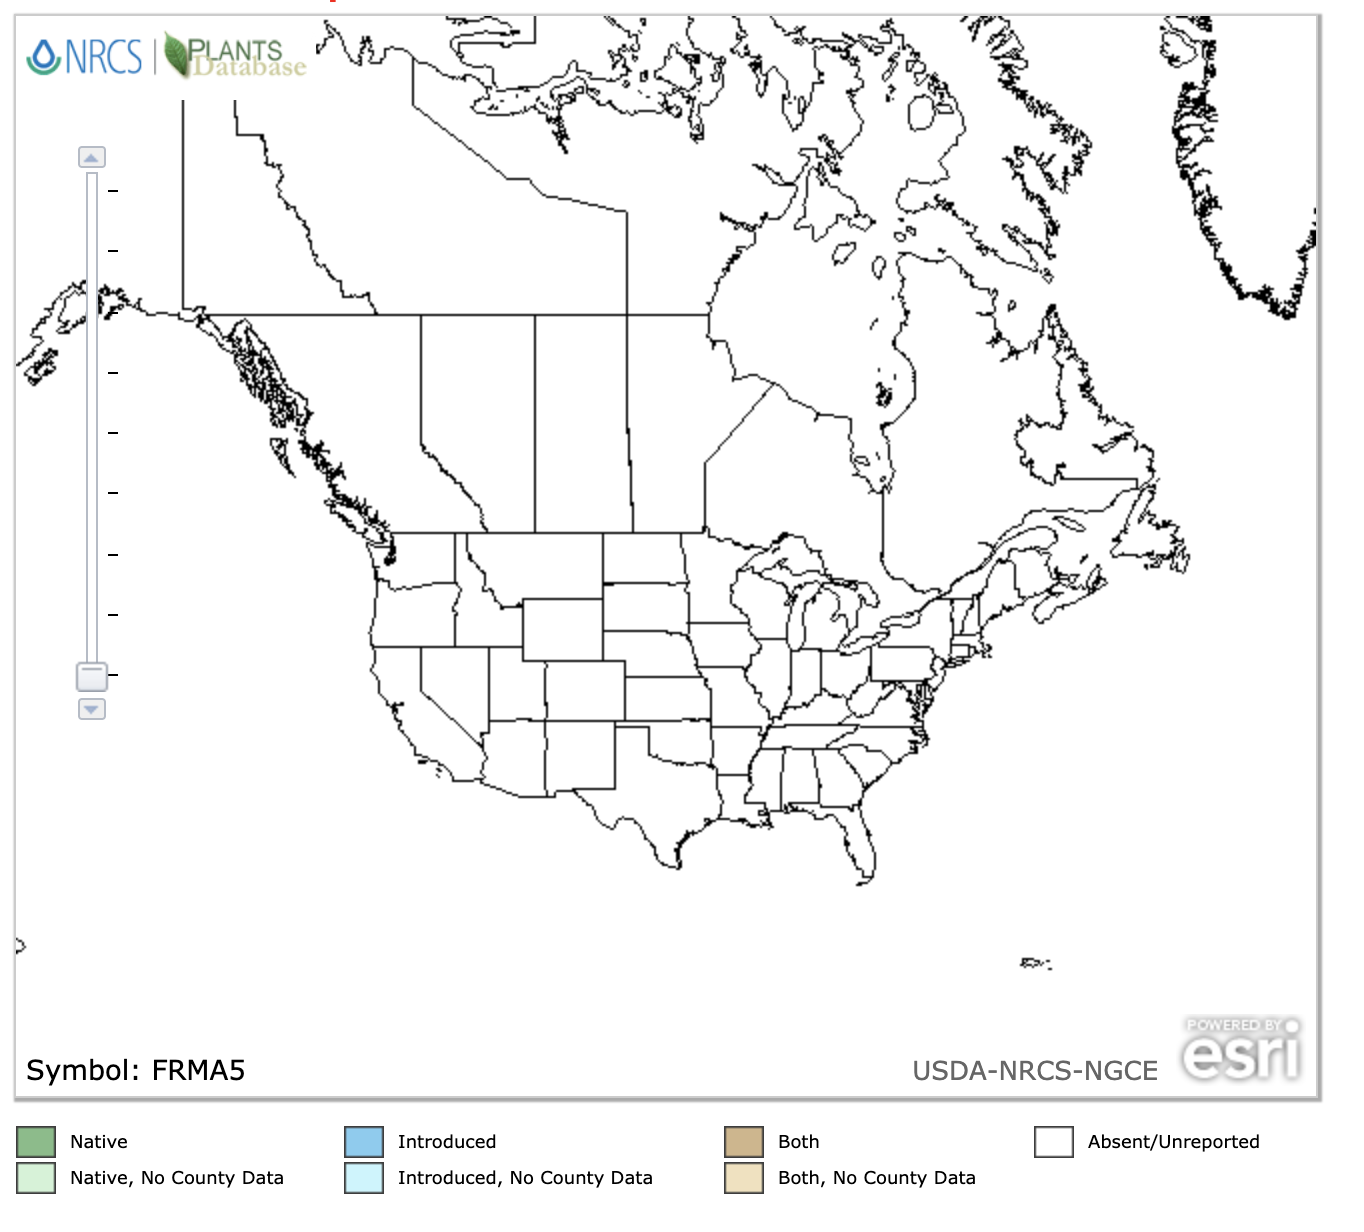
![Best Gifts For Turkey Hunters [2025 Edition]](https://jasontomeoutdoors.com/wp-content/uploads/2020/12/Best-Gifts-For-Turkey-Hunters-768x432.png.webp "Best Gifts For Turkey Hunters [2025 Edition]")
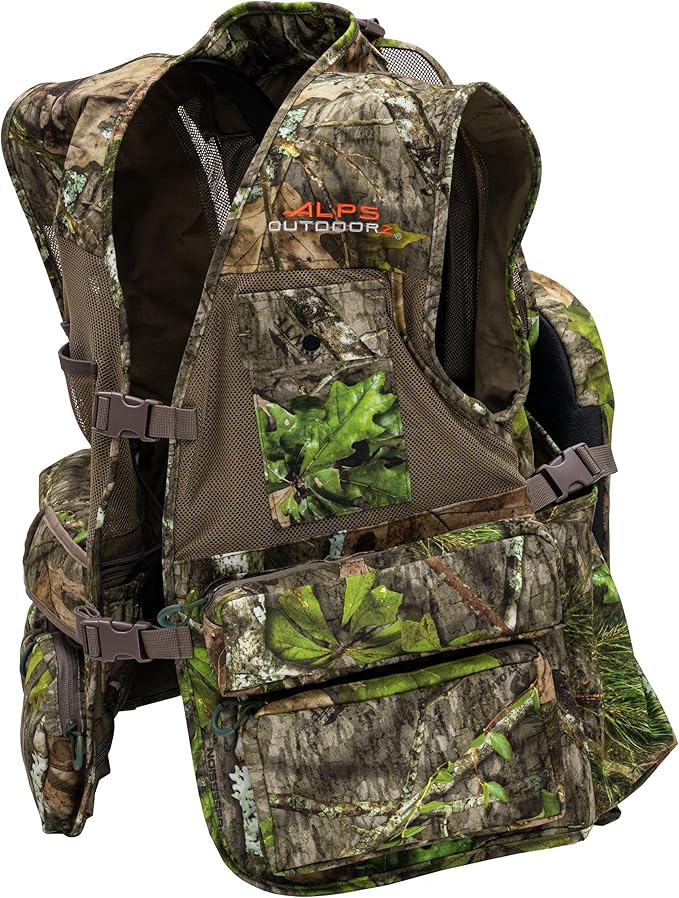


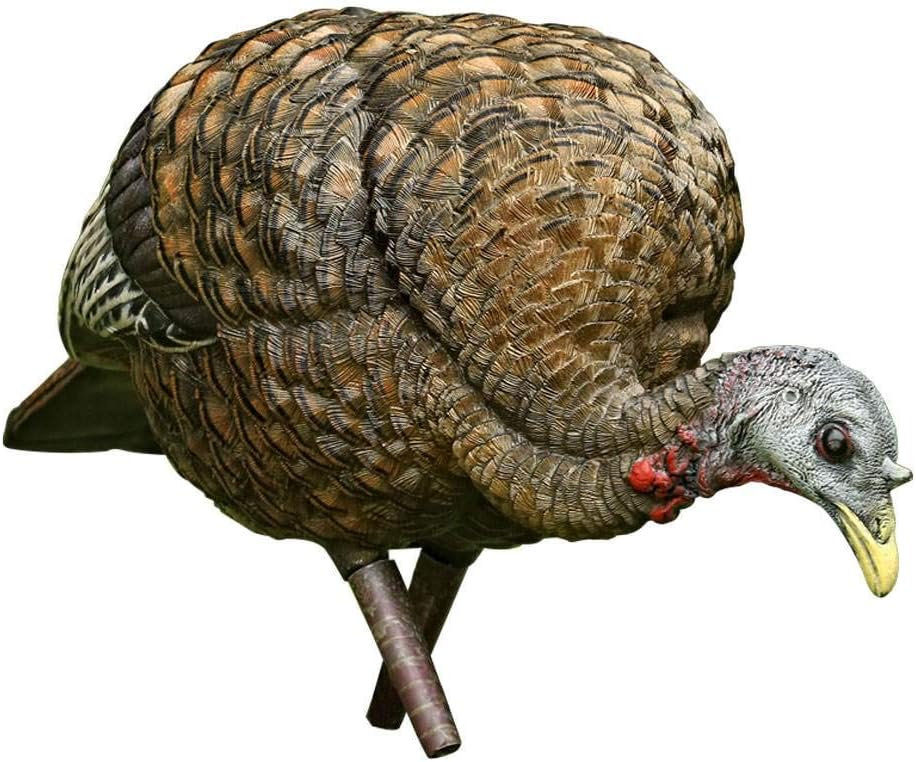
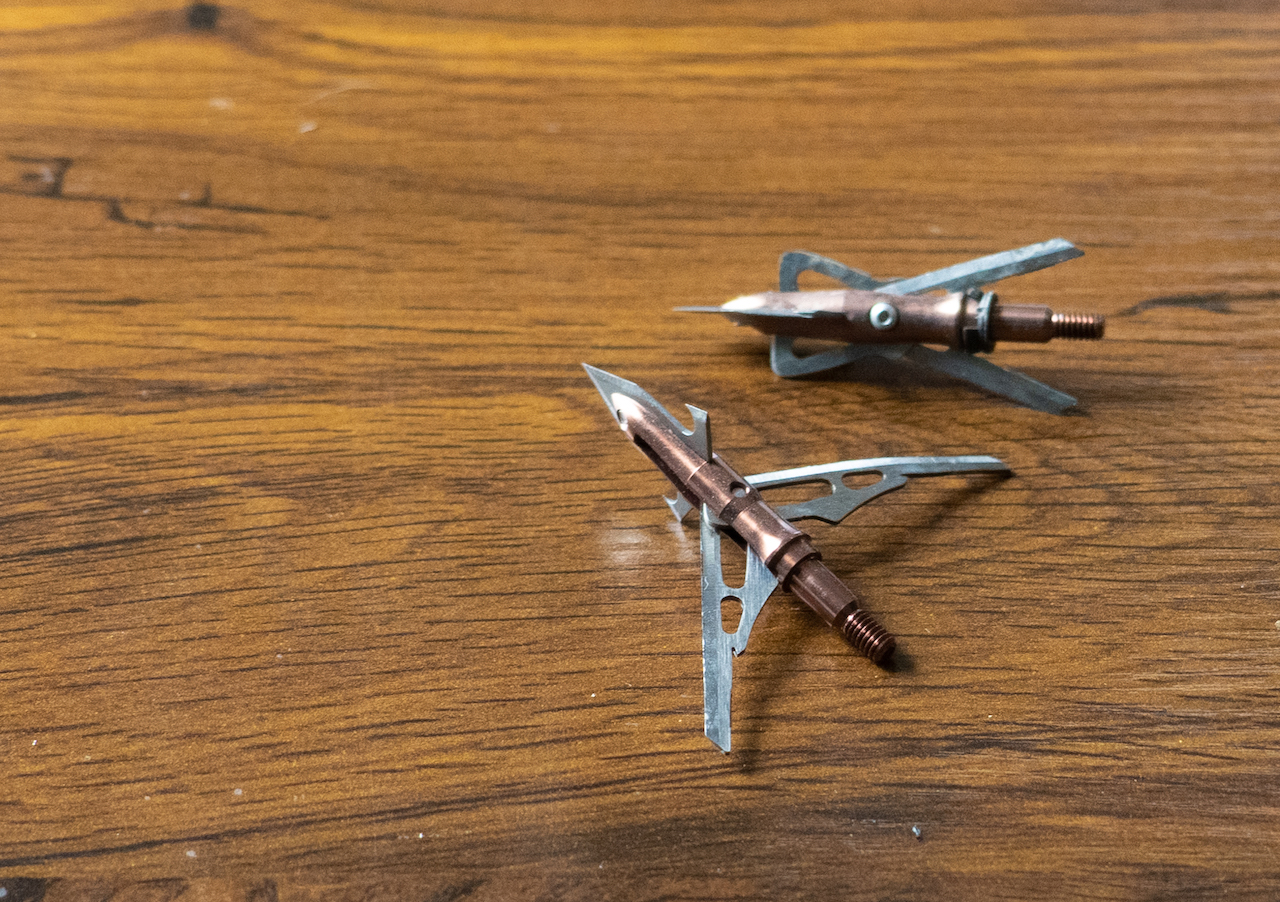


")